At its heart, a raised garden bed is simply a big container for your garden, a plot with sides that lifts it above the ground. You get to fill it with your own hand-picked soil and compost, giving you complete control over the growing environment for your veggies, herbs, and flowers. It’s a simple change that makes gardening far more manageable and, more often than not, much more productive.
Why Raised Garden Beds Thrive in New Zealand
For us Kiwi gardeners, a raised bed is so much more than a tidy-looking box. It's a genuinely practical solution, perfectly suited to our unique climate and often tricky soil conditions. From the damp winters in the Waikato to the sun-baked summers of Hawke's Bay, these beds offer some serious advantages.
One of the biggest wins is superior drainage. We all know how unpredictable New Zealand weather can be, with heavy downpours common even in the middle of summer. In a raised bed, that excess water just drains away freely, stopping the soil from becoming a waterlogged bog that can lead to root rot and other nasty plant diseases.
This elevation and improved drainage also mean the soil warms up faster in the spring. As the sun starts to show its face in September and October, the soil in a raised bed will heat up much quicker than the ground. This little head start allows you to get tender seedlings like tomatoes and courgettes in the ground that much earlier.
Overcoming Common Soil Challenges
Let's be honest, many of our backyards grapple with less-than-ideal soil. You might be dealing with dense, heavy clay that’s a nightmare to dig, or sandy coastal soil that just can't seem to hold onto nutrients. A raised garden bed lets you bypass these problems entirely.
You get to create the perfect soil mix from scratch, building a rich, fertile foundation for your plants. This level of control is a total game-changer for growing healthy, productive crops. It’s a bit like creating your own small-scale market garden, a concept with deep roots in our history. The history of vegetable production in New Zealand shows a shift from little plots near cities to a major agricultural sector. By 1899, about 1,390 hectares were already dedicated to market gardens in places like Pukekohe and the Horowhenua, feeding our growing urban centres.
A key advantage is accessibility. Raised beds reduce the need for bending and kneeling, making gardening more comfortable and sustainable for people of all ages and abilities. This simple change can make the difference between a chore and a joy.
And finally, a well-contained raised bed massively reduces the constant battle with weeds and that ever-encroaching lawn. That means less time on your knees pulling out weeds, and more time enjoying the fruits of your labour.
Designing Your Ideal Raised Garden Bed
Before you even think about picking up a tool, a little bit of planning goes a long way. Getting the design right from the get-go means a better harvest and easier work for seasons to come. It’s all about finding that sweet spot where your garden’s potential meets your personal needs.
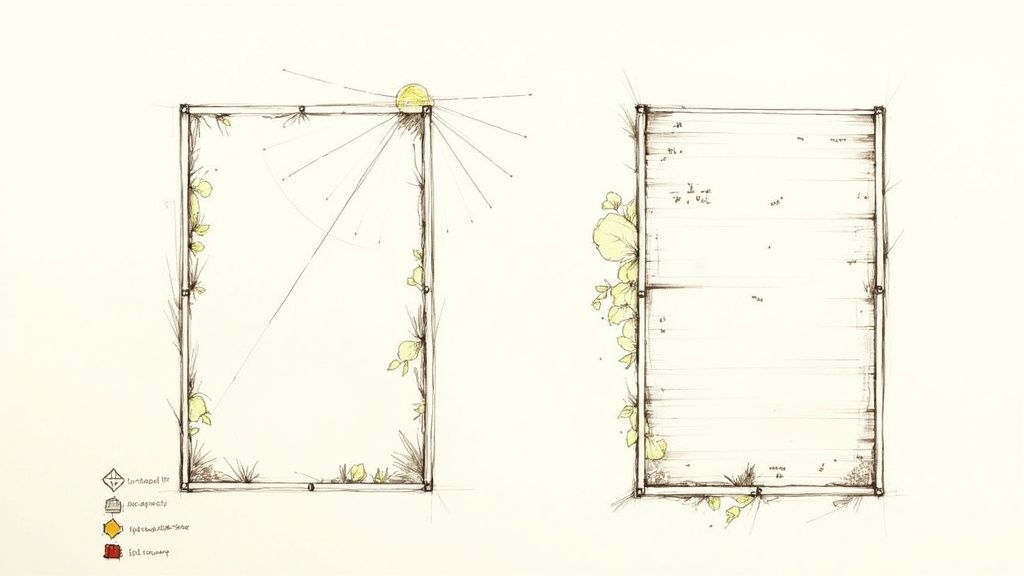
The very first, and most critical, decision is location. Most vegetables and flowers are absolute sun-worshippers, needing at least six hours of direct sunlight every day to really thrive. Spend a day just watching how the sun moves across your property.
Don't forget that in New Zealand, the sun sits much lower in the sky during winter (June to August). This can cast surprisingly long shadows from your house, fences, or trees. Finding a spot that gets good sun year-round is the goal.
Sizing Up Your Space and Needs
Once you’ve scouted the perfect sunny patch, it's time to talk dimensions. The size of your raised bed dictates not just what you can grow, but how you’ll manage it all. There’s no single "right" size—it’s about what works for you and your back.
Here are a few pointers from experience:
- Width: The golden rule is simple: you should be able to reach the centre of the bed without stepping on your lovely soil. For a bed you can get to from both sides, a width of up to 1.2 metres is perfect. If it’s going up against a wall or fence, stick to around 60-70cm.
- Height: A depth of at least 30cm is fantastic for growing leafy greens, herbs, and lettuces. But if you’re dreaming of big, beautiful root veggies like parsnips, carrots, or potatoes, you'll want to go deeper. Aim for a height of 40-45cm to give those roots plenty of space to stretch out.
- Length: This is where you have the most flexibility, as it usually comes down to the space you have and the materials you're using. Standard timber lengths often make beds around 2.4 metres long a pretty cost-effective option.
Thinking about how your beds fit into the bigger picture is a creative process that can completely transform your backyard. For more ideas on how to weave them into your outdoor space, check out our comprehensive guide to garden landscape design.
Choosing the Right Materials
The materials you choose will set the tone for your garden’s look, but they also determine how long your beds will last and what they'll cost. In New Zealand’s climate, durability is a big one. You need something that can handle a bit of everything.
Comparing Materials for Your Raised Garden Bed
Here's a look at common materials for building raised garden beds in New Zealand, focusing on longevity, cost, and soil safety.
| Material | Pros | Cons | Estimated Lifespan (NZ Conditions) |
|---|---|---|---|
| Untreated Macrocarpa | Naturally rot-resistant due to its oils. Sustainable local option. Looks fantastic. | Can be more expensive than pine. Will silver over time if not oiled. | 15-20 years |
| Corrugated Iron | Incredibly durable, won't rot or warp. Heats soil faster in spring. Modern, rustic look. | Can have sharp edges. Higher initial cost. Can get very hot in full summer sun. | 20+ years |
| Untreated Pine | Very budget-friendly and widely available. Easy to work with for DIY projects. | Shorter lifespan, will start to break down much faster than hardwoods. | 5-7 years |
| Recycled Plastic | Extremely long-lasting and won't rot, splinter, or leach chemicals. | Can be expensive. Appearance may not suit all garden styles. | 50+ years |
Ultimately, whether you go for the natural charm of Macrocarpa or the rugged longevity of corrugated iron, the best material is the one that fits your budget, your style, and your long-term gardening plans.
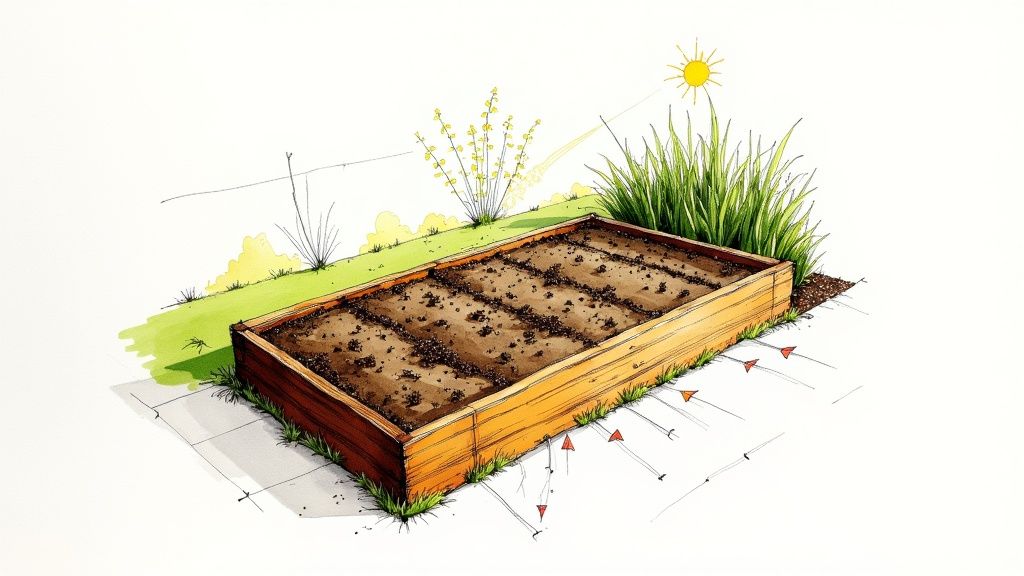
Building and Preparing Your Garden Bed
With a solid plan mapped out, it’s time for the fun part: bringing your raised garden bed to life. This is where the vision becomes reality, and you get to enjoy the satisfying process of building something that will feed you for years to come. Whether you're a seasoned DIYer or just assembling a simple kitset, getting the foundations right is absolutely crucial.
Before you even think about picking up a hammer, it's vital to get your head around effective site preparation techniques. This simple step will save you countless headaches down the track, preventing things like wobbly beds or stubborn weeds poking through your lovely soil.
A favourite method for Kiwi gardeners is the no-dig or "lasagne" garden approach. First, clear the area of any rocks or sharp debris, then mow the lawn or weeds right down to the scalp. Next, lay down a generous layer of overlapping cardboard, making sure there are absolutely no gaps for light to get through. This chemical-free barrier smothers the grass and weeds, which will break down over time and enrich your soil from below.
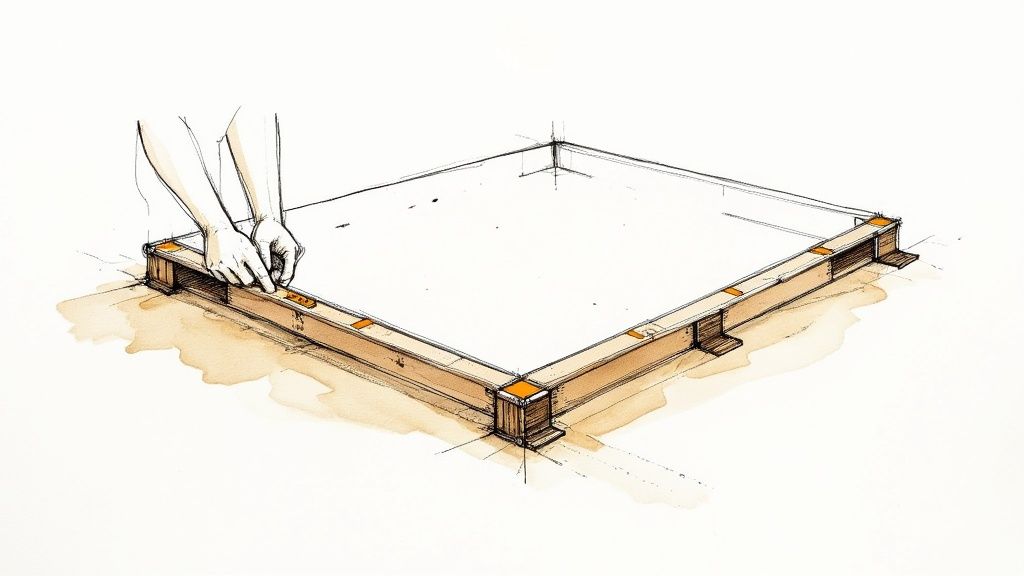
Assembling a Timber Frame
For many of us, building a simple timber raised bed is a hugely rewarding weekend project. If you're cutting your own timber, just remember the old saying: "measure twice, cut once." Using a square is a non-negotiable for getting those corners perfectly at 90 degrees — it's the key to a sturdy, long-lasting frame.
When you start putting it all together, here are a few tips I've picked up over the years:
- Reinforce Your Corners: Don’t just screw the side planks to each other. Add a post or a block in each corner on the inside of the bed. Driving screws through the sides and into this block gives you far greater strength and stops the corners from pulling apart under the immense weight of the soil.
- Check for Level: Keep a spirit level handy and check all sides of the frame as you build. An unlevel bed will cause water to pool in one corner, leading to patchy, inconsistent moisture for your plants. A few small adjustments with a spade can make a world of difference.
- Add a Centre Brace: If your bed is longer than 2.4 metres, a cross brace in the middle is a really good idea. It's just a simple piece of timber connecting the two long sides, but it will stop the wood from bowing outwards over time.
Building your own offers immense satisfaction, but don't feel you have to start from scratch. Quality kitsets are a fantastic shortcut, providing pre-cut timber and all the hardware you need. They often save you a trip to the hardware store and guarantee a professional finish.
If you're keen to dive deeper into the specifics of timber construction, you can explore the pros and cons of different woods in our guide to raised wooden garden beds.
Once your frame is built and positioned perfectly over your cardboard base, you've created a contained space, ready for the most important ingredient of all: the soil.
Creating the Perfect Soil Mix for a Bountiful Harvest
The real magic of a raised garden bed isn't the timber frame, but what you choose to fill it with. Getting the soil mix right is probably the single most important step you'll take towards a ridiculously productive garden. This is your chance to create the perfect growing environment from scratch, full of nutrients and free from the usual headaches of clay, compaction, or poor drainage.
It can be tempting to just tip a few bags of compost or potting mix in and call it a day, but that’s a shortcut that often leads to problems. Pure compost can be too intense for young seedlings and tends to pack down hard over time. On the other hand, straight potting mix can either turn into a swamp or dry out in a flash.
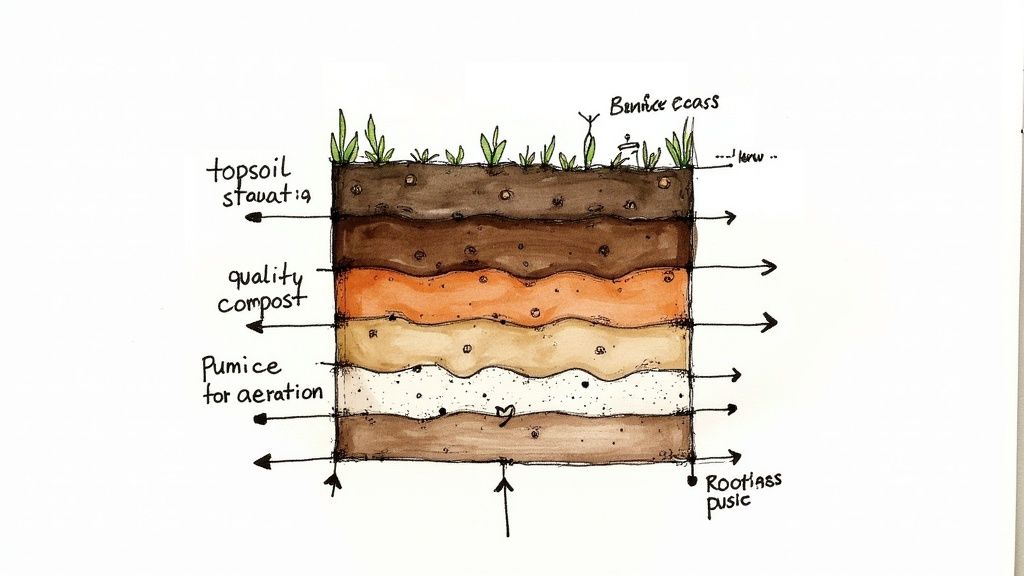
The secret, as with most things in gardening, lies in finding the right balance. After years of experimenting, a simple recipe that works wonders for most Kiwi veggie gardens is what I call the 50/40/10 rule. It creates a beautiful, friable soil that’s packed with nutrients and holds moisture just right.
The Perfect Raised Bed Soil Recipe
Your mission is to create a soil that’s both nourishing for your plants and has a great physical structure. Here’s the breakdown of my go-to mix:
- 50% High-Quality Topsoil: Think of this as the foundation. It provides the mineral-rich bulk of your bed, giving roots something to anchor into and helping retain moisture. It’s worth sourcing screened topsoil from a good landscape supplier to avoid importing a bunch of weeds or heavy clay.
- 40% Quality Compost: This is the engine room of your garden. Compost delivers a slow, steady release of essential nutrients and feeds the vast army of beneficial microbes that keep your soil alive and healthy. Making your own is incredibly satisfying; we’ve got a whole guide on how to start composting if you're keen to give it a go.
- 10% Aeration Material: This last bit is absolutely crucial for drainage. Things like pumice, coarse sand, or even fine bark create tiny air pockets throughout the soil. This prevents it from becoming a waterlogged mess after heavy rain and makes sure your plant roots can breathe.
Building this ideal soil environment from scratch is a key principle of successful horticulture. By controlling the growing medium, you can significantly reduce the risk of common pests and soil-borne diseases, giving your plants a huge advantage from day one.
This is exactly the kind of controlled approach that New Zealand’s commercial growers use to get such amazing results. Back in 2016, the industry had around 5,500 commercial growers who, by optimising their growing conditions, produced a staggering 1,133,800 tonnes of vegetables.
To get a truly bountiful harvest, enriching your bed with top-notch soil is a non-negotiable. For more ideas on sourcing great organic materials, this practical guide to green waste management solutions has some excellent strategies. Mix all these ingredients together thoroughly, and you’ll create a vibrant, living soil that will keep your garden thriving for many seasons to come.
A Seasonal Planting and Care Calendar for Your Raised Bed
With your raised bed built and filled, the fun part can finally begin. Gardening here in New Zealand is all about working with our distinct seasons, and with a bit of planning, you can pull a continuous harvest from your garden nearly all year round.
Think of your raised bed as a stage where different plants get their moment to shine. By rotating crops and planting for the season, you’ll keep your soil healthy and your kitchen well-stocked.
Spring (September – November)
As the soil in your raised bed finally starts to warm up, it’s prime time for new beginnings. Spring is the main planting season for so many of our favourite summer vegetables, but it pays to be cautious of those late frosts, especially if you’re in a cooler part of the country.
- Early Spring (September): This is the moment to sow seeds of cool-season crops directly into the bed. Think spinach, silverbeet, rocket, and radishes. You can also get a head start by sowing summer heroes like tomatoes, capsicums, and courgettes indoors on a sunny windowsill.
- Mid-to-Late Spring (October-November): Once you’re confident the last frost has passed, it’s all systems go. Carefully transplant your tomato and capsicum seedlings into the garden. Now’s also the perfect time to plant beans, peas, sweetcorn, and cucumber seeds straight into that beautiful soil you’ve prepared.
Summer (December – February)
Summer is the season of absolute abundance. But it also throws a few challenges our way, like intense sun and the occasional dry spell. The secret to a thriving summer garden really comes down to consistent watering and a little smart maintenance.
Daily watering often becomes a necessity, especially for thirsty plants like tomatoes and cucumbers. I always aim to water in the early morning; this cuts down on evaporation and helps prevent fungal diseases that can pop up in humid conditions. This is also the perfect time to lay down a thick blanket of mulch, like pea straw or lucerne, which works wonders for holding moisture in the soil and keeping weeds at bay.
A simple trick I swear by is companion planting. Tuck a few basil plants in around your tomatoes to help deter whitefly, and sprinkle some marigolds throughout the bed to discourage nematodes in the soil. It’s a completely natural, chemical-free way to manage some of those common garden pests.
Autumn (March – May)
Just as the summer heat begins to ease off, autumn opens up a fantastic second planting window. Your soil is still lovely and warm, which gives a whole new round of crops a great, quick start so they can mature in the cooler months ahead.
This is the ideal time to get your winter staples in the ground. Pop in seedlings for broccoli, cabbage, cauliflower, and kale. You can also sow seeds for broad beans, onions, and some of those hardy winter lettuces. After you’ve cleared out your spent summer plants, it’s a great opportunity to enrich your soil by mixing in a fresh layer of compost.
Winter (June – August)
The garden might slow down a bit in winter, but it definitely doesn't have to stop—especially not in a raised bed that drains so well. Winter is a time for hardy vegetables and a bit of quiet planning for the spring rush.
Many of the brassicas and leafy greens you planted back in autumn will be ready for harvesting right through the winter months. It’s also the prime time to get your garlic and shallots in the ground for a big summer harvest. I like to use this quieter period to top up my soil with more compost and nutrients, making sure the bed is in peak condition for when the busy season kicks off again.
Got Questions About Raised Bed Gardening in NZ?
Even the most meticulously planned project throws up a few questions. It's only natural. When you're starting something new like raised bed gardening, there's always a learning curve.
Here are some of the most common queries we get from fellow Kiwi gardeners, along with some straightforward answers to get you growing with confidence.
What Should I Put on the Bottom of a Raised Garden Bed?
If your new bed is sitting right on top of your lawn or an existing garden patch, your secret weapon is plain, unwaxed cardboard. Seriously.
Lay it across the entire base before you add any soil. Make sure to overlap the edges generously so there are no gaps for sunlight to peek through. This simple layer is a brilliant, biodegradable weed mat. It'll smother the grass and weeds underneath, which then rot down over the first season, adding extra organic goodies to your soil.
Most importantly, it allows earthworms and all those beneficial soil microbes to travel up into your new bed, creating a thriving little ecosystem. Whatever you do, avoid plastic weed mats – they block this vital connection to the earth and can mess with your drainage.
How Deep Should a Raised Vegetable Bed Be?
This really comes down to what you're hoping to harvest. For most of the usual suspects in a veggie garden, a depth of 30cm gives them plenty of room to stretch their roots.
This is perfect for:
- Leafy greens like lettuce, spinach, and silverbeet
- Peas and beans
- All your favourite herbs
- Brassicas like broccoli and cabbage
But, if you're dreaming of pulling up long, perfectly straight carrots, parsnips, or a bumper crop of spuds, you’ll want to go a bit deeper. Aiming for a height of at least 40-45cm will give these deep-rooted veggies all the space they need to develop properly without bumping into the compacted ground below.
Is It Safe to Use Treated Timber?
When you’re growing food, it’s always best to play it safe and stick with untreated timber. You really don't want any of the chemicals from timber treatments leaching into your soil and, eventually, into the veggies on your dinner plate.
Here in New Zealand, we're lucky to have some great, naturally durable options like macrocarpa. It resists rot for years without any chemical help. It might be a little more expensive upfront, but the peace of mind is well worth it. Standard untreated pine is a more budget-friendly choice, but just know it won't last as many seasons.
Can I Just Fill My Bed with Compost?
It’s tempting, I know. Compost is the absolute lifeblood of a healthy garden, but filling a bed with only compost can cause a few problems.
Pure compost can be a bit too rich for young seedlings and tends to compact down over time, squeezing out the air pockets that roots need. It also doesn't hold onto moisture quite as well as a more balanced soil mix.
A far better approach is to create your own blend. A fantastic, reliable recipe is about 50% quality topsoil, 40% compost, and 10% something for aeration, like pumice. This combo creates a stable, long-lasting growing medium that gives you great structure, plenty of nutrients, and excellent drainage all in one go.
Ready to create the perfect garden right in your backyard? At Jungle Story, we connect you with New Zealand's best growers and garden suppliers, offering everything you need from seeds and seedlings to tools and pots. Start your gardening adventure today at https://junglestory.co.nz.