Picking the perfect blueberry for your Kiwi garden all boils down to one thing: choosing the right variety for your local climate. It's not just about sun and soil. True success comes from matching the plant to your region, making sure it gets enough winter chill to burst into a massive harvest come summer.
From the subtropical warmth of Northland right down to the crisp air of the South Island, there’s a blueberry bush with your name on it.
Selecting the Ideal Blueberry Plant for Your NZ Garden
Before you even grab a spade, it pays to understand the main types of blueberries you’ll find in New Zealand. Getting this right is probably the single most important step you can take towards enjoying bucketloads of fresh, homegrown berries. Your climate is the ultimate decider.
Blueberries are sorted by their "chill hour" needs—that’s the amount of time they need to spend in the cold (below 7°C) over winter to produce fruit properly. This is exactly why a variety that goes gangbusters in Otago might sulk in an Auckland garden.
Understanding Blueberry Types
You'll generally come across three main groups at garden centres, and each has its own personality and preferences.
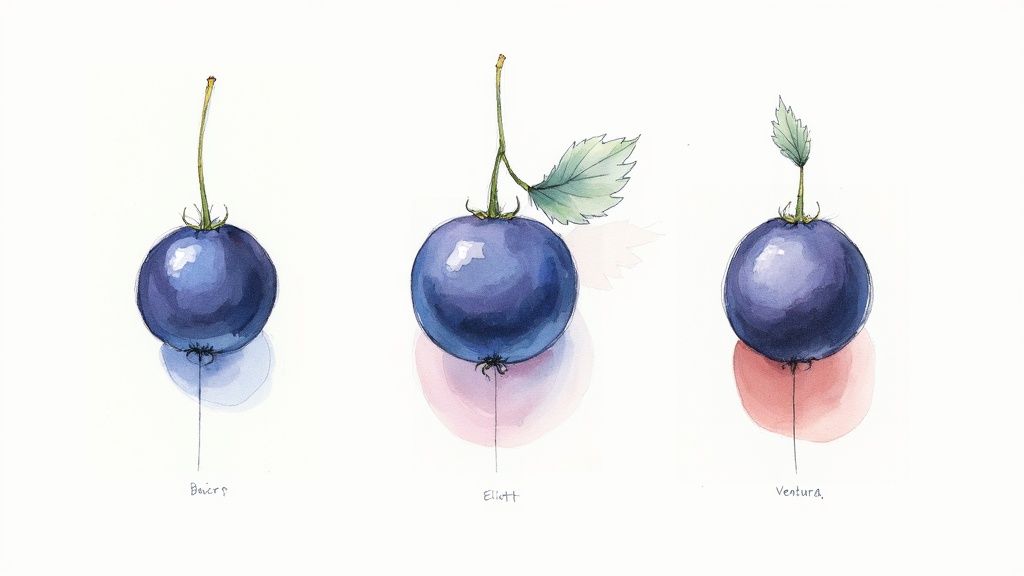
- Northern Highbush: These are the classic, traditional blueberries. They demand a proper winter chill (over 800 hours), making them perfect for gardeners in cooler spots like Canterbury, Otago, and down through parts of the Waikato. They reward you with those big, classic, flavourful berries. The ever-reliable 'Bluecrop' is a prime example.
- Southern Highbush: These are brilliant hybrids, specifically bred to have low-chill requirements (150-600 hours). This makes them the obvious choice for the warmer end of the country—think Northland, Auckland, and the Bay of Plenty. Cultivars like 'Misty' and 'Sunshine Blue' absolutely thrive in these milder climates.
- Rabbiteye: Known for being tough as old boots and great at handling heat, Rabbiteye varieties have very low chill needs. They're another fantastic option for the upper North Island and often ripen a bit later in the summer, which is great for extending your picking season.
The development of these low-chill varieties has been a total game-changer, especially for commercial growers in warmer regions. Just look at Northland—their blueberry production surged by nearly 60% in a single season, all thanks to planting cultivars that are perfectly happy in their climate.
To help you narrow it down, here’s a quick guide to some popular cultivars and where they grow best.
NZ Blueberry Cultivar Selector
| Cultivar Type | Best NZ Region | Chill Hours Needed | Key Feature |
|---|---|---|---|
| Northern Highbush | South Island, Waikato, Central NI | 800+ | Large, classic berries; needs a cold winter. |
| Southern Highbush | Northland, Auckland, Bay of Plenty | 150-600 | Perfect for warmer climates; early fruiting. |
| Rabbiteye | Upper North Island | 100-200 | Very heat tolerant; extends the harvest season. |
Think of this table as your starting point. Always check the specific tag when you buy, as it will have the most accurate info for that particular plant.
Pro Tip: Whatever you do, don't just buy one plant! Blueberries fruit so much better when they can cross-pollinate with a buddy. Planting at least two different varieties that flower around the same time is the secret to getting a truly massive harvest of bigger, juicier berries.
For instance, if you're in Auckland, pairing two Southern Highbush types like 'Misty' and 'O'Neal' is a recipe for success. Down south, a 'Bluecrop' and a 'Duke' (both Northern Highbush) make excellent garden partners.
This little bit of planning pays you back tenfold in berries. For more tips on getting fruitful pairings right, have a read of our comprehensive guide to growing fruit trees in NZ.
Creating the Perfect Acidic Soil Environment
Blueberries aren't your average garden plant. They're what we call 'acid-lovers', and getting their soil just right is absolutely the foundation for success. Without the right acidic conditions, any blueberry plant NZ gardeners choose will struggle to absorb nutrients, no matter how much you fuss over it.
The sweet spot for blueberry soil pH is between 4.5 and 5.2 — a lot more acidic than most other plants in your patch prefer.
The first, non-negotiable step is to figure out your starting point. You can easily test your soil’s pH with a simple kit from any local garden centre. This quick test tells you whether you need to make minor tweaks or take more serious action to create a welcoming home for your new plant. Don't skip this; guessing will only lead to a lot of frustration down the track.
Adjusting Your Soil pH
If your soil test comes back with a pH above 5.5, you’ll need to lower it. Luckily, this is entirely achievable with organic amendments that slowly acidify the soil over time, creating a stable, long-lasting environment where your blueberry bush can truly thrive.
Here are a few of the most effective methods:
- Elemental Sulphur: This is the most reliable and direct way to lower soil pH. Just sprinkle it over the soil according to the packet instructions several months before planting (autumn is perfect) to give it time to work its magic.
- Pine Needles and Bark: Mixing pine needles or composted pine bark into your garden bed is a fantastic natural solution. As they break down, they gently lower the soil's pH while also improving its structure and aeration.
- Acidic Compost: If you make your own compost, adding things like oak leaves, coffee grounds, and pine needles will create a wonderfully acidic soil conditioner.
One amendment worth a special mention is peat moss. While its use is debated due to sustainability concerns, it remains incredibly effective at creating acidic, moisture-retentive soil. For gardeners who want to go this route, using a high-quality peat moss can give your blueberry plant a fantastic start.
To Plant in the Ground or in a Pot?
For many Kiwi gardeners, especially those dealing with heavy clay or alkaline soils, growing blueberries in large containers is a brilliant shortcut to success. A pot gives you complete control over the growing medium.
You can simply fill a large container (at least 40-50 litres) with a pre-made acidic potting mix designed for plants like azaleas and camellias. Easy.
A key benefit of container growing is perfect drainage. Blueberries hate 'wet feet', and root rot is a common problem in heavy, waterlogged soils. Pots ensure excess water can easily escape, protecting the plant's sensitive root system.
Whether you choose the garden or a pot, pick a spot that gets at least six hours of direct sun every day. Prepare the planting site by digging in plenty of rich organic matter to create a free-draining, fertile, and perfectly acidic home for your blueberry plant.
Getting Your Blueberries in the Ground: A Practical Guide

Alright, you’ve sorted the perfect acidic soil. Now for the fun part—getting your blueberry plant settled into its new home. As with most things in a Kiwi garden, timing is key. For blueberries, you're looking at two ideal windows: autumn or early spring.
Planting in autumn gives the root system a fantastic head start. It has all the cooler, wetter months to get established before the summer heat really kicks in. Spring planting is a great option too, you’ll just need to be a bit more vigilant with the watering can as the days get longer and warmer. It's the same principle you'd use when figuring out the best time for planting tomatoes in New Zealand—get the timing right, and you set your plants up for success.
The Planting Process
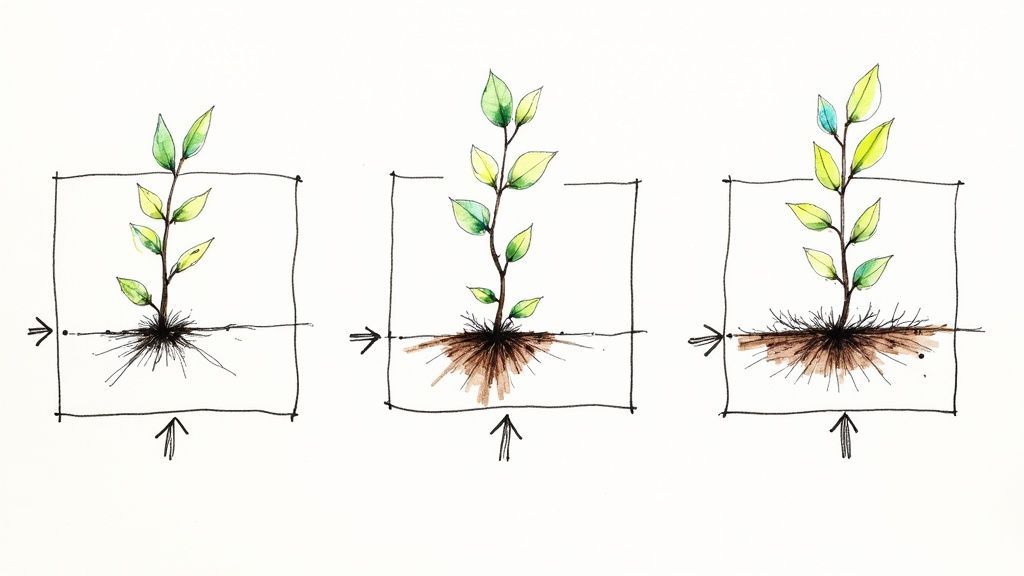
First up, dig a hole that’s about twice as wide as the pot your plant came in, but no deeper. You want to encourage those roots to spread outwards into all that lovely soil you prepared, not downwards into the unknown.
Next, ease the blueberry plant out of its container. Take a look at the roots. Are they a tight, coiled-up mess? That's what we call 'root-bound'. If so, gently tease them apart with your fingers to break up the mat. This small step is crucial, as it prompts the roots to explore their new home instead of just continuing to grow in circles.
Pop the plant in the hole, making sure the top of its root ball sits level with, or even slightly proud of, the surrounding soil. Planting too deep is one of the most common mistakes and can easily suffocate the roots. Backfill the hole with your amended soil, tamping it down gently as you go to get rid of any sneaky air pockets.
A Tough but Crucial First-Year Tip: This is going to feel completely wrong, but trust me on this. As your new plant settles in and starts to produce flowers, you need to pinch every single one off. By removing the flowers in the first season, you stop the plant from putting all its energy into making fruit. Instead, it will pour all those resources into building a deep, powerful root system.
This one act of patience is the single best investment you can make. It practically guarantees a much tougher plant and leads to dramatically bigger harvests for years to come.
Nailing That First Year of Care
Consistent care during the first twelve months is what separates a thriving blueberry bush from a struggling one. You really only need to focus on two things: watering and mulching.
-
Watering: Blueberries have shallow roots, which means they can dry out surprisingly fast, especially during their first Kiwi summer. Water them deeply and regularly. You want the soil to stay consistently moist, but never a boggy mess. A good, long soak once or twice a week in dry weather is far more effective than a quick sprinkle every day.
-
Mulching: This is non-negotiable. Apply a thick layer (5-10 cm) of acidic mulch around the base of your plant. Things like pine needles, shredded bark, or even sawdust work brilliantly. Mulch is a triple-threat: it helps the soil hold onto moisture, keeps the weeds down, and continues to acidify the soil as it slowly breaks down. Just remember to keep the mulch a few centimetres away from the main stem to prevent any chance of rot.
Keeping Your Blueberry Bush Happy and Productive
Alright, your blueberry plant is in the ground and settling in. Now the real fun begins – the simple, rewarding rhythm of looking after it. Getting this ongoing care right is what turns a hopeful young bush into a berry-producing machine that will reward you for years, even decades.
These next steps are all about giving your plant what it needs to thrive and, most importantly, deliver those bumper harvests we’re all after.
Watering is probably the single most important job, especially with the long, dry summers we get across so much of New Zealand. Blueberries have these fine, shallow root systems that are really sensitive to drying out. You're aiming for soil that’s consistently moist, a bit like a wrung-out sponge. It should never be sopping wet, but you can’t let it get bone dry either.
A good, deep soak once or twice a week during the really hot, dry spells is much better than a quick sprinkle every day. Light watering just encourages the roots to stay near the surface, which isn't what you want. If you're growing your blueberry plant NZ style in a pot, you’ll need to be even more on top of it, checking the soil every couple of days.
What to Feed Your Plant (And When)
Blueberries aren’t what you’d call heavy feeders, but a bit of a boost in early spring really gives them the get-up-and-go they need for strong growth and a heavy fruit set. The trick is to use a fertiliser made specifically for acid-loving plants.
Keep an eye out for feeds designed for things like azaleas, camellias, or rhododendrons. These blends have the right kind of nitrogen (ammonium-based) that helps keep the soil pH low, just how blueberries like it. I find a slow-release granular fertiliser, applied just as you see new growth emerging, is a brilliant, fuss-free option.
A word of warning: steer clear of general-purpose garden fertilisers or anything high in nitrates. They can mess with the soil pH and actually damage the plant's delicate roots over time. Stick with the acidic formulas—you won't regret it.
One good application in spring is generally all they need. It’s easy to overdo it, and too much fertiliser can just lead to a whole lot of leafy growth and not many berries. When it comes to feeding blueberries, less is definitely more.
The Art of Pruning a Blueberry Plant in NZ
Pruning feels like a big deal, but it’s the secret weapon for keeping your blueberry bush healthy and cranking out the fruit year after year. The basic idea is simple: you want to encourage the plant to grow new, strong canes, because that’s where the best berries come from.
The perfect time to get the secateurs out in New Zealand is during winter dormancy, usually anytime from June to August. The bush will be leafless, which makes it so much easier to see the plant's structure and figure out what needs to go.
Here’s my simple game plan for the annual winter prune:
- Get rid of low-hanging branches. Anything sprawling along the ground can be snipped off. They won’t produce much fruit and just invite pests to move in.
- Cut out any dead or weak wood. Take out anything that looks dead, damaged, or just plain spindly. This tidies up the plant and makes sure energy goes to the productive parts.
- Open up the centre. You’re aiming for an open, vase-like shape. This lets air move through freely, which is a massive help in preventing fungal problems. Trim out any branches that are crossing over or crowding the middle of the bush.
- Take out the old-timers. On a mature bush (four years or older), look for the one or two oldest, thickest canes. They often look a bit grey and woody. Cut these right back to the base of the plant. This is the magic step that tells the plant to send up fresh, strong canes from the crown – and those new canes will be your fruit factories in the seasons to come.
This bit of strategic trimming creates a constant cycle of renewal. It’s how you guarantee your blueberry plant stays healthy, manageable, and a star performer in your garden.
Dealing with Pests and Problems on Your NZ Blueberry Patch
Even the most carefully tended garden can throw you a curveball. When you're growing blueberries here in NZ, knowing how to spot and sort out the common issues is what separates a frustrating season from a bumper crop. From sneaky birds to baffling yellow leaves, most problems are surprisingly simple to fix once you know what you’re looking for.
Let's be honest, your biggest battle will almost certainly be with the local birdlife. The moment those berries start showing a hint of colour, you can guarantee the blackbirds, silvereyes, and waxeyes have them marked on their calendars. They can strip a bush clean before you’ve had your morning coffee, so getting your defences up early is a must.
Keeping Your Berries Safe from Birds
The only truly effective and kind way to protect your harvest is with good netting. The real trick is to build a simple frame around your plants first—use whatever you have, like stakes, bamboo canes, or even some PVC piping. Then, drape your bird netting over the frame.
Make sure you pull the net taut and secure it right down to the ground. A few bricks or some tent pegs work wonders. You want to leave absolutely no gaps for a crafty bird to sneak through.
Whatever you do, don't just throw the net directly over the bush. Birds will happily sit on top and peck the fruit right through the holes. Worse, they can get tangled up, which is a stressful situation for everyone. A proper frame keeps the net well away from the berries and ensures your entire crop stays safe.
How to Spot and Stop Common Diseases
Blueberries are pretty tough characters in New Zealand, but a couple of fungal diseases can show up, especially when things get a bit damp or humid.
- Root Rot: This is the big one, and it's almost always caused by heavy, waterlogged soil. If you see weak, yellowing growth for no good reason, suspect root rot. Your best defence is prevention—make sure that soil is free-draining from day one and go easy on the watering.
- Mummy Berry: This fungus is as creepy as it sounds. It makes the young berries shrivel up, go hard, and turn a weird greyish-white, just like tiny mummies. Good air circulation is your friend here, so don't be afraid to give your bushes a good prune in winter to open them up.
The best way to deal with fungal problems is to stop them from starting. Always prune for an open, airy plant structure and make a habit of clearing away any fallen leaves or old fruit from around the base of the plant at the end of each season.
Figuring Out What's Missing in Your Soil
Sometimes, the culprit isn't a pest or a disease—it's what’s happening in the soil. Yellowing leaves are the classic sign of an unhappy blueberry plant.
More often than not, the problem is iron chlorosis. You'll notice the leaves turning yellow while the veins stay stubbornly green. This is a dead giveaway that your soil's pH is too high (not acidic enough), which 'locks up' the iron so the plant can't use it. You can get a quick fix with a dose of chelated iron, but for a long-term solution, you need to lower that soil pH with a sprinkle of elemental sulphur.
Even with perfect care, your plants are still at the mercy of our unpredictable Kiwi weather. The NZ blueberry sector has faced massive setbacks, including one late frost that wiped out over 90% of a Waikato grower's crop. It's a stark reminder of how vulnerable even commercial operations can be. You can read more about the resilience of the New Zealand blueberry industry and the challenges they face.
Your Blueberry Growing Questions Answered

Even with the best advice, a few specific questions always seem to pop up when you're starting a new gardening project. Here, we tackle some of the most common queries we hear from Kiwi gardeners diving into the wonderful world of growing their own blueberries.
These quick answers should help clarify a few key points, so you can feel confident as you nurture your blueberry plant nz style, from a small bush into a productive garden centrepiece.
How Long Until My Plant Produces Fruit?
Patience is a virtue, especially in the garden! You might be tempted by a few berries in the second year after planting, but you should expect your first proper, decent-sized harvest in year three. This is directly linked to removing all the flowers in the first year.
That small act of sacrifice pays off big time. It allows the plant to pour all its energy into establishing a powerful root system, setting it up for much better yields from the third year onwards. A healthy blueberry plant will typically hit its peak production by year five or six, providing you with bowls of delicious berries for many summers to come.
Do I Really Need More Than One Blueberry Plant?
This is a fantastic question and the answer is a definite yes. While some blueberry cultivars are technically labelled as 'self-fertile', you will always get a significantly larger harvest with bigger, juicier berries if you plant at least two different varieties that flower around the same time.
This process is called cross-pollination, and it’s the single best thing you can do to maximise your crop. Think of it as giving your plants a friend to work with. When you're at the garden centre, simply ask for two types that are known to be good pollination partners for each other.
Why Are My Blueberry Plant’s Leaves Turning Yellow?
Yellowing leaves with distinctly green veins are a classic sign of a condition called iron chlorosis. This almost always means the soil pH is too high—in other words, not acidic enough for the plant.
When the soil isn't acidic, it 'locks up' the available iron, making it impossible for the plant to absorb this crucial nutrient. The first step is to test your soil's pH. If it's creeping above 5.5, you'll need to acidify it with a product like elemental sulphur or an acidic fertiliser. For a quick, temporary fix while you correct the soil, a foliar spray of chelated iron can help green up the leaves.
Can I Grow Blueberries Successfully in a Pot?
Absolutely! Growing blueberries in containers is a perfect solution, especially if your garden has heavy clay or alkaline soil. It gives you complete control over the growing environment.
Choose a nice large container—at least 40-50 litres is a good size—with plenty of drainage holes at the bottom. Fill it with a high-quality acidic potting mix, which is often sold for acid-loving plants like camellias and azaleas.
Just remember that potted plants tend to dry out much faster than those in the ground, so you'll need to be more vigilant with watering, especially during our hot Kiwi summers. With a little extra attention, your potted blueberry plant will thrive.
Ready to start your own blueberry patch? At Jungle Story, we connect you with trusted New Zealand sellers offering a wide range of healthy, high-quality blueberry plants perfect for any garden. Find your ideal variety and get growing today!