Pruning a feijoa tree is all about making thoughtful cuts after you've harvested the fruit. This helps let more sunlight and air into the tree, which is exactly what you want for a bumper crop next season. The best time to get this done in New Zealand is late autumn or early winter. Your main goal is to clear out any dead or crossing branches to create a nice, open shape.
Why Pruning Feijoas Is Worth Your Time
Before you grab the secateurs, it's good to know why trimming your feijoa is one of the most satisfying jobs in the garden. This isn't just about a quick tidy-up; a good prune is your secret weapon for growing bigger, tastier fruit.
By snipping away the extra foliage, you're telling the tree to push all its energy into making fruit instead of growing more leaves and stems. It’s a simple change that can make a huge difference to your harvest.
Better Fruit and a Healthier Tree
Opening up the canopy does more than just boost your fruit supply. It seriously improves airflow, which is a game-changer for preventing the common fungal problems that love New Zealand's humid climate. A well-pruned tree is simply a healthier tree, far less likely to get bogged down with diseases or pests.
A well-shaped tree isn't just a prettier sight; it's also far easier to harvest from, saving your back when it's time to gather those delicious feijoas from the ground.
So, what are the main wins from a good prune?
- Increased Fruit Size and Quality: When sunlight can reach the inner branches, you get better ripening and much sweeter flavours.
- Improved Tree Health: That all-important air circulation really cuts down the risk of fungal diseases setting up shop.
- Easier Harvesting: An open, accessible structure makes picking fruit simpler and a lot more enjoyable.
For any gardener wanting to get the most from their backyard orchard, getting the hang of pruning is a must. It's one of the most fundamental skills for growing healthy fruit trees in NZ.
When's The Best Time to Prune Feijoas?
When it comes to feijoas, timing is everything. Get it right, and you're setting the tree up for a bumper crop next season. Unlike many other fruit trees that you might tackle in the middle of winter, the golden rule for feijoas is simple: prune them as soon as you’ve picked the last fruit.
This magic window usually opens up in late autumn and stretches into early winter. Here in New Zealand, that generally means sometime between May and July, though it'll shift slightly depending on your local climate and the variety you're growing.
Why This Timing is So Crucial
Pruning right after harvest works in perfect harmony with the feijoa's natural rhythm. The tree has just finished the exhausting work of producing fruit and is about to slow down for winter. A good trim now encourages it to push out fresh, vigorous new growth in spring – and it's on this new growth that next year's fruit will form.
A common mistake is leaving the pruning too late, say, until late winter or early spring. If you do this, you’ll likely be snipping off the new shoots that have already started developing. You're literally cutting away your future fruit.
On the flip side, pruning too early while fruit is still on the tree isn't ideal either. It can stress the plant, diverting precious energy away from ripening the last of your harvest. Stick to that post-harvest window, and you allow the tree to focus its energy on recovering and getting ready for the season ahead.
A great rule of thumb is to avoid taking off more than one-third of the tree’s canopy in one go. This helps prevent shock and encourages a strong, healthy flush of new growth.
While we're talking specifically about our local climate, understanding the principles of general fruit tree pruning timing can give you a broader sense of how different trees respond to pruning throughout the year. Nailing the timing is the first, and most important, step to a healthy, productive feijoa tree.
Essential Tools for Clean and Healthy Pruning
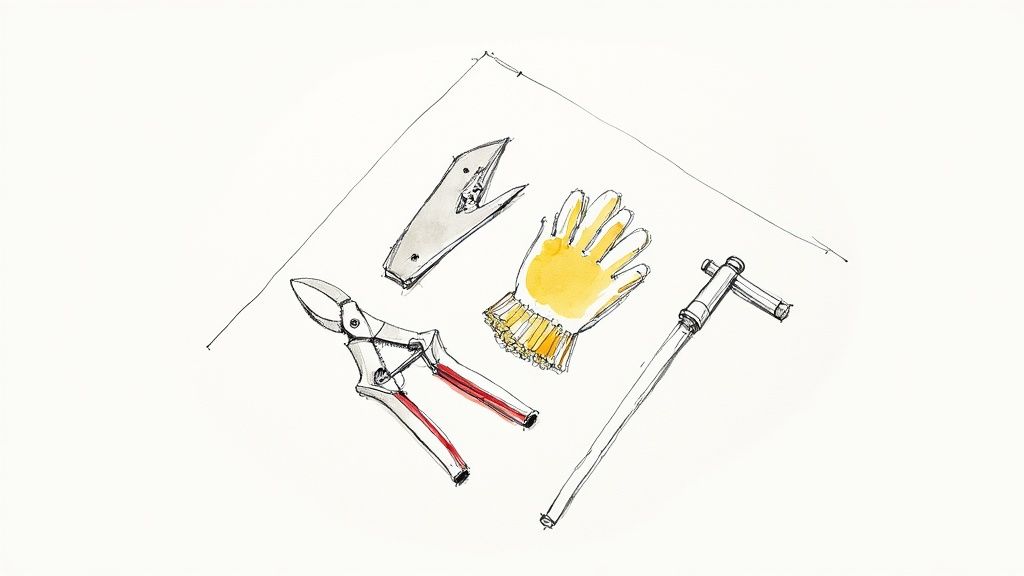
Heading out to prune your feijoa without the right gear is a bit like trying to cook a gourmet meal with a butter knife. You might get it done, but the results won't be pretty. Using blunt or dirty tools can easily crush stems instead of cutting them, which stresses the tree and opens the door to nasty diseases.
Think of it this way: a clean, sharp cut is like a minor scratch that heals quickly. A ragged, torn branch is a major wound that’s much harder for the tree to recover from.
Your Feijoa Pruning Toolkit
To give your tree the best care, you really only need a few key items in your arsenal. Here’s a quick rundown of what I always have on hand.
| Tool | Best For | Maintenance Tip |
|---|---|---|
| Bypass Secateurs | Cleanly snipping through smaller stems and fresh, green growth up to the thickness of your little finger. | Wipe blades with methylated spirits after use to prevent spreading disease. |
| Loppers | Getting through branches thicker than your thumb, up to about 4 cm in diameter. The long handles give you great leverage. | Keep the hinge mechanism clean and lightly oiled for a smooth cutting action. |
| Pruning Saw | Tackling any mature, woody branches that are too thick for your loppers. | Ensure the blade is sharp and rust-free. A dull saw will tear the bark. |
These three tools will cover almost every pruning job you’ll face with your feijoa. A good set of pruning scissors is a fantastic starting point and a worthwhile investment.
The Golden Rule: Keep Your Tools Clean
I can't stress this enough: tool hygiene is non-negotiable. It’s arguably more important than the brand of tool you buy. Every time you cut into a plant, you're performing a small surgery, and sterilising your blades prevents you from spreading pathogens from one branch to another—or worse, from one tree to the next.
Thankfully, keeping your gear clean is dead simple.
- After pruning a major branch, give the blades a quick wipe with an old rag to get rid of any sap or debris.
- Before moving to a new tree, wipe the blades down with a cloth soaked in methylated spirits. A bleach solution (1 part bleach to 10 parts water) also works a treat to kill off any lurking bacteria or fungal spores.
This simple habit of cleaning your tools is one of the most effective things you can do for your feijoa's long-term health. A clean cut promotes fast healing, ensuring your tree stays healthy and productive for many seasons to come.
A Practical Guide to Shaping Your Feijoa Tree
With your tools clean and sharp, it’s time for the most satisfying part of the job. The main goal when you trim a feijoa is to create a strong, open framework, often called a 'vase' shape. This structure is key because it lets sunlight and air right into the middle of the canopy, which helps the fruit ripen properly and keeps fungal diseases at bay.
Before you make a single cut, step back and have a really good look at your tree's overall structure. Don’t just rush in. The health of the tree always comes first, so your initial task is to spot what shouldn’t be there.
The Three Ds: Dead, Damaged, and Diseased
Your first cuts should always be focused on the 'three Ds'. This is just good practice for any tree, from feijoas to figs. It’s a foundational pruning habit, much like the one we mention in our guide for growing thriving fig trees in New Zealand, where a healthy structure begins with getting rid of the problem branches.
- Dead Wood: These branches are easy to spot. They'll be brittle, often darker in colour, and won't show any green under the bark if you give it a little scratch. They’re just taking up space and can become a gateway for pests.
- Damaged Wood: Keep an eye out for branches that are cracked, broken from a recent storm, or have bits of bark stripped away. These are weak points that are incredibly vulnerable to infection.
- Diseased Wood: Any branch showing signs of fungal growth, unusual lumps (cankers), or strange discolouration needs to go immediately. Make sure you cut back into healthy, green wood, well below any sign of the problem.
Getting this wood out of the way first cleans up the tree nicely and makes it so much easier to see the real structure you’re working with.
Creating Space and Boosting Airflow
Once all the unhealthy wood is gone, your next mission is to decongest the canopy. If left to their own devices, feijoas can become a tangled mess. This shades out the inner fruit and creates a damp, humid environment—perfect for mildew and other nasties.
Look for any branches that are growing inward towards the centre of the tree. Also, hunt down any that are crossing over and rubbing against each other. That constant friction creates little wounds that are an open invitation for disease. When you find two crossing branches, pick the one that's healthier and better placed, then remove the other one completely, right back to where it started.
A good rule of thumb is to aim for a canopy that a bird could fly through without its wings touching the branches. This little mental picture is a great guide for creating that perfect, open structure.
Finally, it’s time to ‘lift the skirt’ of your feijoa. This just means removing the lower branches that hang down close to the ground. Clearing everything up to about knee-height does wonders for air circulation around the trunk and makes it a lot easier to find and gather fruit when it drops. While you're there, snip off any weak, spindly shoots that clearly won't be strong enough to hold fruit.
After the Pruning: What Happens Next?

Once you've put your tools away, the job isn't quite done. Good aftercare is what really sets your feijoa tree up for success, helping it recover quickly and put all its energy into growing strong for the next season. The first, most crucial step is a proper tidy-up.
Don't just leave the pruned branches and leaves lying around. This creates a five-star hotel for pests and a breeding ground for nasty fungal diseases. Take the time to clear everything away from the base of your tree.
A question I get asked a lot is about using pruning sealants on the cuts. Honestly, for feijoas, it's almost never needed. These trees are tough customers and heal up just fine on their own. Sealing the wounds can actually trap moisture, which can do more harm than good.
Common Pitfalls Kiwi Gardeners Face
Even with the best intentions, a few common mistakes can trip up even experienced gardeners. Steer clear of these, and your tree will thank you with a bumper crop.
The biggest mistake? Getting a bit too carried away with the loppers. Never remove more than one-third of the tree’s total canopy in a single go. It’s a huge shock to the system and can seriously stunt its growth and fruit production for the next season. It's a classic case of less being more.
Another easy mistake is cutting too close to the main stem or trunk. This can damage the branch collar—that slightly swollen bit where the branch joins a bigger one. The collar is essential for the tree to heal the wound properly.
And finally, timing is everything. Pruning in spring or summer is a recipe for disaster, as you’ll be chopping off the very growth that produces your flowers and fruit. Always, always stick to that post-harvest window in late autumn or early winter. As part of your all-round tree care, keeping an eye out for pests is also a smart move; consider options like organic aphid control for your garden to keep things in balance.
Your Feijoa Pruning Questions Answered
Even with the best of intentions, it’s easy to feel a bit stuck when you’re standing in front of your tree, secateurs in hand. Here are a few straightforward answers to the questions we hear most often from fellow Kiwi gardeners getting stuck into their feijoas.
What If My Feijoa Tree Is Wildly Overgrown?
If you've moved into a new place and inherited a feijoa that looks more like a tangled mess than a tree, don't panic. The worst thing you can do is try to fix it all in one go. A massive prune will only shock the plant.
Instead, think of it as a two or three-year project. The first winter, just focus on cleaning it up. Cut out all the dead, damaged, or obviously diseased wood (the "three Ds"). That’s it for year one.
Next winter, you can get a bit more ambitious. Thin out about one-third of the most crowded, crossing-over branches to start opening up the structure. This gradual approach is much gentler and encourages strong, healthy growth rather than a panic response from the tree.
Should I Prune a Feijoa Hedge Differently?
Yes, absolutely. With a hedge, your goal is a dense, tidy shape, not necessarily maximum fruit from every single branch. While the best timing (after fruiting) and the initial health check for dead wood are the same, the shaping is where it differs.
Do your main structural prune in winter, but then plan for a light shear once or twice during the growing season to keep it looking sharp. Just be careful not to get carried away with summer trimming. Any heavy cutting then will remove the very wood that's meant to produce next season's fruit.
Major summer pruning is a definite no-go for feijoas. The tree fruits on the new growth produced during spring and summer, so any significant cutting then means you are literally snipping off your future harvest. The only exception is if a branch breaks or shows signs of disease—get that off straight away.
At Jungle Story, we're passionate about helping New Zealand gardeners succeed. Find everything from robust fruit trees to the perfect gardening tools on our online marketplace. Explore our collection at https://junglestory.co.nz.