If you want a fantastic crop of raspberries year after year, there's one job you simply can't skip: the annual prune. Getting this right is probably the single most important thing you can do for your raspberry patch. The best time to tackle this is during the plant's downtime, usually from late autumn through to early spring.
This yearly haircut clears out all the old, tired canes that have done their dash, making space for fresh, vigorous new growth. The result? A much bigger harvest and healthier, happier plants.
Why You Can't Afford to Skip Pruning Your Raspberries
Before you even think about picking up the secateurs, it’s worth understanding why you're about to make those cuts. This isn't just about tidying things up; it's a strategic move that works with the raspberry's natural lifecycle to give you the best possible results.
If you let a raspberry patch go, it very quickly becomes a tangled, thorny jungle. This kind of overcrowding is a recipe for disaster and will absolutely sabotage your berry harvest.
- You'll get fewer berries: Old, useless canes hang around, competing with the new shoots for sunlight, water, and nutrients. This means you end up with a disappointing crop of small, sad-looking fruit.
- Disease becomes a real risk: A dense thicket of canes stops air from moving freely. This creates the damp, still conditions that fungal diseases thrive in – a classic problem for gardeners in many parts of New Zealand.
- Pests move in: An overgrown patch is the perfect five-star hotel for pests to hide out over winter. Come spring, they'll be ready and waiting to attack your plants.
Primocanes vs. Floricanes: Know Your Canes
The secret to pruning like a pro is knowing the difference between the two types of raspberry canes. Raspberries have a two-year lifecycle, and we have special names to tell the canes apart.
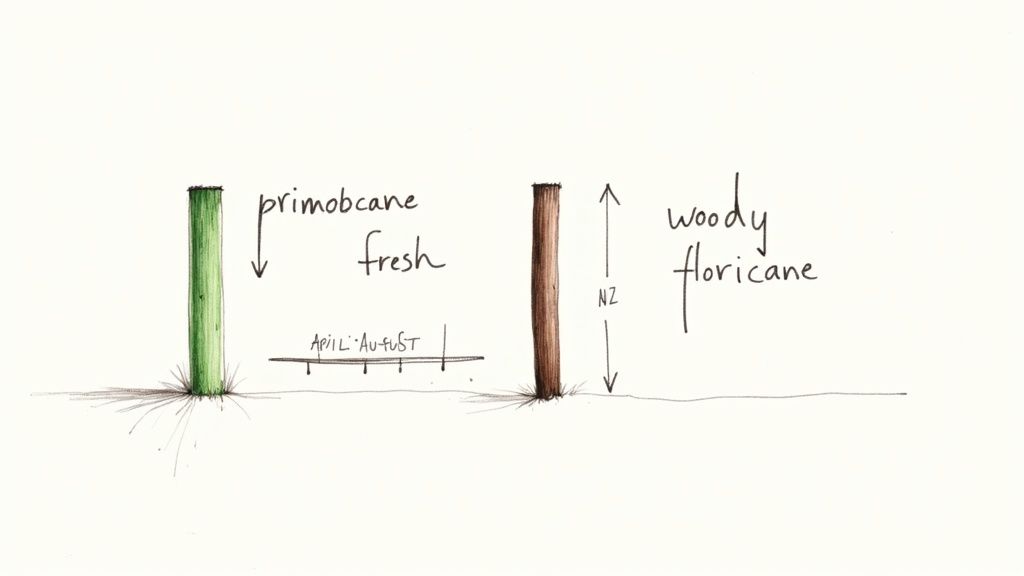
Primocanes are the new kids on the block. They're the fresh, first-year canes that shoot up in spring. They're usually green and quite flexible, but they won't give you any fruit in their first year (unless you're growing an autumn-fruiting type).
After they've been through a winter, these primocanes mature and become floricanes.
The following summer, these second-year floricanes are the ones that burst into flower and produce all your delicious raspberries. Once they've finished fruiting, their job is done. They'll start to die back, turning brown, woody, and brittle. These are the canes you need to get rid of.
The Best Time for Pruning Raspberries in NZ
For most raspberry varieties we grow here in New Zealand, the sweet spot for pruning is during the dormant season. I aim for sometime between late autumn and early winter, roughly from April to August. Pruning while the plant is resting minimises stress and sets it up perfectly for an explosion of growth in spring.
If you're growing summer-fruiting raspberries (which are super common in NZ), the main job is to cut out all the old floricanes that have just finished fruiting. Get them right down at ground level as soon as the harvest is over. It’s a crucial step that helps stop diseases from taking hold and opens up the plant to light and air for all the new growth coming through. For some extra tips on managing your berry patch, it's worth checking out the advice from the team at The Plant Company.
To make it even clearer, here's a quick rundown of what to do and when throughout the New Zealand seasons.
New Zealand Raspberry Pruning Calendar
This table is a handy year-round guide. Just match the season to your raspberry type to see what needs doing.
| Season (NZ) | Time of Year | Summer-Fruiting Raspberries | Autumn-Fruiting Raspberries |
|---|---|---|---|
| Summer | Dec - Feb | Harvest fruit. Prune out old, brown floricanes immediately after fruiting finishes. | Harvest fruit. Minimal pruning needed. |
| Autumn | Mar - May | Tie in new green primocanes to supports. Final chance to remove old floricanes if not done yet. | Canes will continue fruiting until the first frost. |
| Winter | Jun - Aug | Main pruning season. Thin out new primocanes, leaving 6-8 of the strongest canes per plant. | Cut all canes down to ground level after they have finished fruiting. |
| Spring | Sep - Nov | Tidy up any winter damage. Tip-prune canes to encourage side-branching for more fruit. | New canes will emerge from the ground. |
Keep this calendar in mind, and you'll find it much easier to stay on top of your pruning and keep your raspberry patch in peak condition for a massive harvest.
Get The Right Gear For a Clean and Easy Prune
Heading out to prune your raspberries with the right tools isn't just about getting the job done faster; it’s fundamental to keeping your plants healthy. A clean, sharp cut heals quickly, which drastically reduces the risk of disease setting in—a constant battle in New Zealand's often damp climate.
Leave a ragged, torn cut with a blunt tool, and you've basically just put out a welcome mat for nasty fungal and bacterial problems.
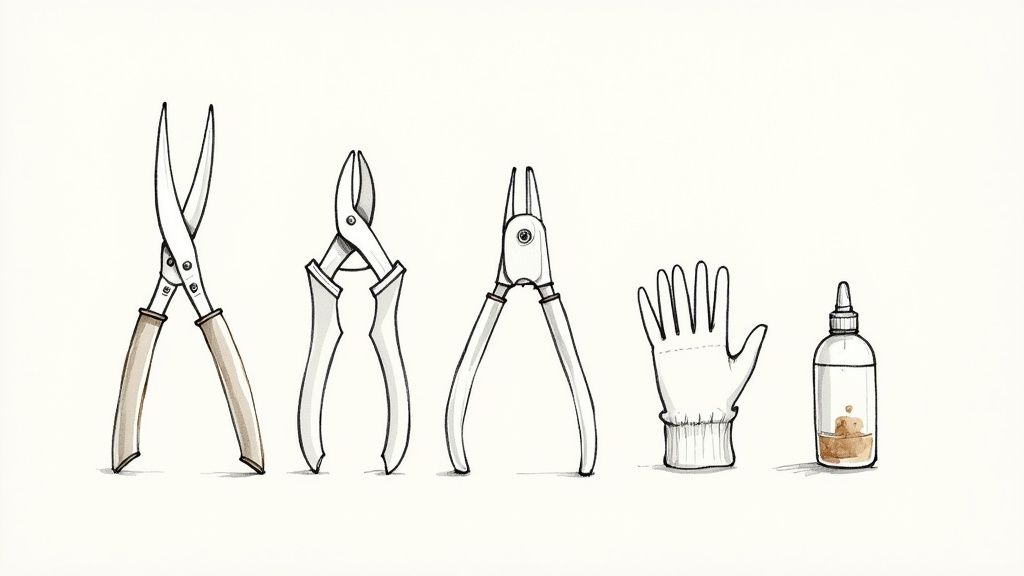
Your most trusted ally in this task will be a quality pair of bypass secateurs. Don't get them confused with the anvil type, which crushes stems. Bypass secateurs have two blades that slice past each other just like scissors, creating a clean, surgical cut on live canes. This clean action causes minimal damage and helps the plant bounce back in no time. If you're looking for a great pair to start with, something like these professional pruning scissors will serve you well.
Essential Gear for Pruning Raspberries
While your secateurs will do most of the heavy lifting, a couple of other items will make your time in the raspberry patch much more pleasant and effective. Trust me, you don't want to underestimate how prickly these plants can be.
- Long-Handled Loppers: For those thicker, woodier canes right at the base of the plant—especially on older, slightly neglected patches—loppers provide the extra leverage you need. They'll save you from straining your hands and wrecking your good secateurs.
- Thorn-Proof Gloves: A sturdy pair of gardening gloves is an absolute non-negotiable. Raspberry canes are covered in fine, sharp thorns that will leave your hands and arms looking like you’ve been wrestling a cat. If you can, get a pair that offers protection right up your forearms.
Before you even think about making that first cut, the most important job is to make sure your tools are clean and sharp. It's a step so many gardeners skip, but it’s absolutely vital for preventing the spread of disease from one bush to the next.
Tool Maintenance Is Plant Healthcare
Cleaning your tools is dead simple. Just wipe the blades down with a cloth soaked in methylated spirits or even a basic household disinfectant.
Sharpening is just as straightforward. You can use a simple file or a dedicated sharpening stone to get that smooth, effortless cutting edge back.
Having the right gear is one thing, but knowing how to use it is another. It’s worth taking a moment to get a better handle on understanding blade selection for different types of cuts to make sure your tools are always up to the task at hand.
Your Practical Guide to Pruning Summer-Fruiting Raspberries
Alright, let's get our hands dirty and talk about the most common type of raspberry you'll find in Kiwi backyards. Summer-fruiting varieties, like the ever-popular Tulameen raspberry, have a beautifully simple two-year cycle. Once you get your head around that, pruning becomes second nature.
The whole game is about removing the old canes that have finished fruiting (these are called floricanes) to make room for the new canes that will give you next year's crop (the primocanes). Get this one thing right, and you're on your way to a thriving, productive raspberry patch.
Identifying Which Canes to Cut
First up, you need to play detective in your raspberry patch. Your mission is to tell the difference between the old, tired floricanes and the fresh, vigorous new primocanes. It's actually easier than it sounds.
The old floricanes look exactly like they’ve finished their big race. They’ll be a darker brown or even greyish colour, feel more brittle, and you’ll often spot the remnants of old fruit stalks clinging to them. In stark contrast, the new primocanes are bursting with life – they’ll be greener, more flexible, and just look a whole lot healthier.
Grab your sharpest pair of secateurs and cut every single one of those old floricanes right down at ground level. Don't be shy here. Their job is done, and leaving them around is just an open invitation for pests and diseases, not to mention they crowd out all that promising new growth.
Selecting and Spacing Next Year's Canes
Once the old canes are cleared out, your attention shifts to the fresh primocanes. This is where you get to play selector and choose which canes are going to carry next year's harvest. Spoiler: you’re not going to keep them all.
The idea is to pick out the strongest, healthiest-looking canes. Anything that looks a bit weak, spindly, or damaged can be snipped out at the base. What you're aiming for is a nice, orderly row of strong canes with plenty of elbow room.
Aim for a final spacing of about 10-15 cm between each cane. I know, it might feel a bit sparse at first, but this is crucial. It promotes good airflow and lets sunlight get right in, which is your best defence against fungal problems and the secret to bigger, sweeter berries.
Local research on raspberry production here in New Zealand really drives home how vital good pruning is. If you neglect it, you could see your yield drop by 20-30% as old canes suck up nutrients and become a haven for pests. On the flip side, while being a bit too aggressive with thinning might slightly reduce the total number of berries, it often leads to a much higher quality harvest with much bigger fruit. It’s all a balancing act.
Tipping Canes for More Fruit
With your best canes selected and spaced, there's one last little trick for late winter or early spring called 'tipping'. It's as simple as it sounds: you just snip off the very top of each cane.
This one small cut works wonders, encouraging the cane to produce more lateral (side) branches. And since raspberries fruit on these laterals, more branches literally means more fruit. Just trim the tops back to a height that’s manageable for you to pick from – often around a metre and a half is perfect.
Supporting and Tying In
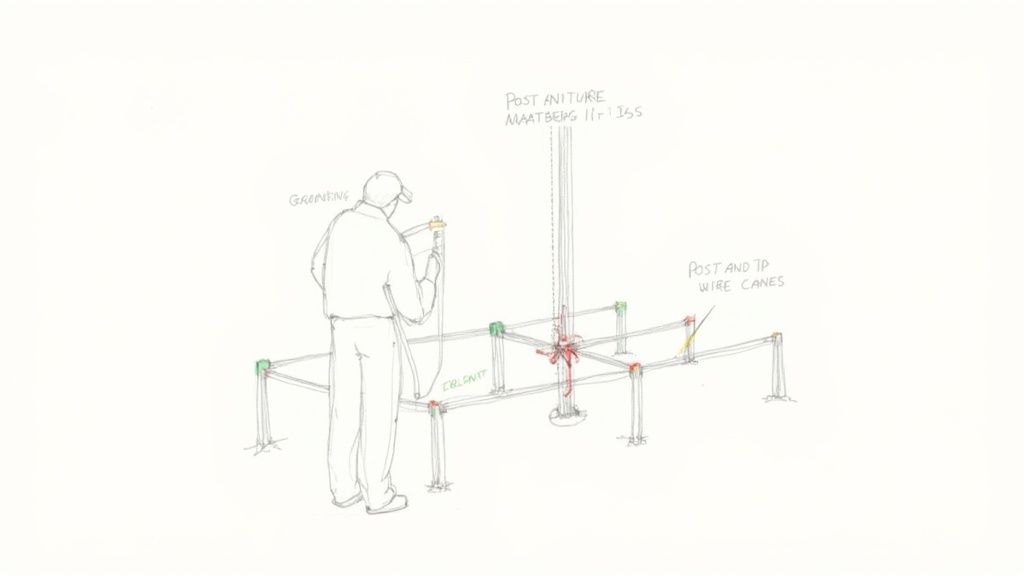
Raspberry canes can get pretty top-heavy when they're loaded with fruit, especially in a blustery Kiwi garden. Setting up a simple support structure is a really smart move.
A basic post-and-wire system is all you need. Pop some sturdy posts in at either end of your row and run two or three horizontal wires between them. After you've finished all your pruning and tipping, you can gently tie your chosen canes to these wires.
Use soft garden twine and tie each cane loosely, giving it enough room to sway a little in the wind without snapping. This not only keeps things tidy and prevents wind damage but also makes harvesting an absolute breeze. With that done, your summer-fruiting raspberries are perfectly set for a bumper season ahead.
How to Prune Autumn-Fruiting Raspberry Varieties
If you've planted autumn-fruiting raspberries, you’re in for a treat. You’ve picked the easiest variety to prune by a country mile, which is why they’re such a favourite for Kiwi gardeners.
The magic behind these plants is that they fruit on primocanes—the new canes that shoot up in that very same year. This takes all the guesswork out of trying to tell old and new growth apart.
The method itself is refreshingly brutal: once they’ve finished fruiting for the season, you chop every single cane right back to the ground. Simple as that.
The Standard Pruning Method for a Big Autumn Harvest
The best time for this big chop here in New Zealand is late autumn or winter, so anytime from May through to August. You’ll want to wait until you’ve savoured the last berry and the leaves are starting to yellow and fall off.
Then, grab your secateurs or loppers and cut everything down to soil level.
Come spring, you’ll be rewarded with a burst of fresh, healthy canes. These will grow like mad through the season and give you a fantastic harvest from late summer right into autumn.
This no-fuss approach is exactly why autumn-fruiting varieties have become so popular. Over the last few decades, there’s been a real push in New Zealand to extend the raspberry season, and these plants are perfect for the job. Their simple pruning encourages a strong, simultaneous flush of growth for one big, concentrated autumn crop. You can find more great info on local raspberry growing trends over at The Plant Company.
Hitting the reset button—that's what you're doing when you cut all the canes to the ground. It’s a simple move that gets rid of any overwintering pests or diseases and funnels all the plant's energy into producing a single, heavy crop on brand-new wood.
The Double-Cropping Trick: An Advanced Technique
Feeling a bit adventurous? There's another way to do it that can squeeze two crops out of the same plants: a small one in summer and the main one in autumn. This is often called double-cropping.
Here’s how it works. Instead of cutting everything down in winter, you only target the canes that fruited in the autumn. You'll see they only produced berries on their top half. For these specific canes, you just prune off the part that has already fruited, leaving the lower section standing.
- Prune the fruited tips: Snip off the top section of last year's canes, cutting just below where the lowest raspberry was.
- Leave the lower section: This bit of leftover cane will act like a summer-fruiting variety and give you a small, early crop.
- New growth still comes: At the same time, new primocanes will shoot up from the base as usual to produce your main autumn harvest.
While this method sounds great in theory, it does have its downsides. The summer crop is often pretty small, and leaving old canes around can sometimes invite disease. For most of us gardening at home, the single-cut method is the most reliable way to guarantee a healthy, bountiful autumn harvest, which is why it’s the go-to approach for pruning raspberries NZ.
Post-Pruning Care to Ensure a Bumper Crop
Once the last cane is cut, your work in the raspberry patch isn’t quite done. What you do next is just as important for setting your plants up for a healthy, productive season. This immediate aftercare is what makes all that pruning effort pay off with a massive harvest of delicious berries.
The first, and most critical, job is a thorough clean-up. Don't be tempted to leave the pruned canes lying around. This discarded material is the perfect overwintering spot for pests and fungal spores, which will emerge in spring ready to wreak havoc on your new growth.
By getting all the clippings out of there, you dramatically reduce the risk of disease. If you can, burning the old canes is the surest way to destroy any lingering problems. If that’s not an option, get them into your green waste bin rather than your compost.
Feeding Your Raspberries for Spring Growth
With the patch clean and tidy, it’s time to give your plants a good feed. Pruning during their dormant winter period is the perfect time to replenish the soil’s nutrients, making sure they have everything they need to burst into life when spring arrives.
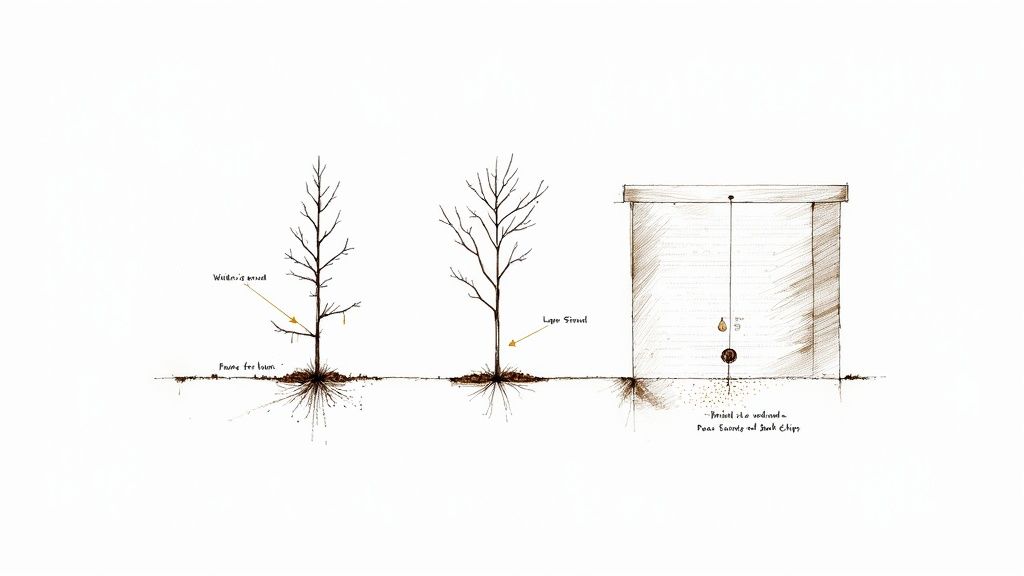
The best way to do this is by applying a thick layer of well-rotted compost or manure around the base of the canes. A good 5-7 cm layer will slowly release nutrients into the soil over the coming months, giving the plants the energy for strong cane development and, ultimately, more fruit.
Post-pruning feeding is like refilling the pantry after a long season. You're stocking the soil with essential nutrients that the raspberry plants will draw on to fuel the incredible growth spurt that happens in spring.
For those keen on expanding their edible garden, understanding how to nurture different plants is key. For more insights on growing productive plants in New Zealand, check out our helpful guides on growing fruit trees in NZ, which share many of the same principles of seasonal care.
The Final Touch: Mulching for Protection
The final step is to lay down a generous layer of mulch over the compost. It's a simple action with multiple benefits that protect and nurture your raspberry patch through the last of the cold weather and into the growing season.
Mulching helps to:
- Retain Moisture: It acts as a blanket, reducing water evaporation from the soil as the days get warmer.
- Suppress Weeds: A thick layer of mulch makes it tough for competing weeds to get a foothold in spring.
- Protect Roots: It insulates the soil, protecting the raspberry's shallow root system from any late, unexpected frosts.
Materials like pea straw, bark chips, or even shredded leaves make for an excellent mulch. A good, thick layer will break down over time, further improving your soil structure. This holistic approach to post-pruning care completes the process, ensuring your raspberry plants are perfectly positioned for a truly bumper crop.
Common Raspberry Pruning Questions Answered
Even with the best of intentions, sometimes you get to the berry patch, secateurs in hand, and questions pop up. It happens to all of us. Let's tackle some of the most common queries Kiwi gardeners have so you can prune with total confidence.
What Happens If I Forget to Prune My Raspberries in Winter?
First off, don't panic! Missing the ideal winter pruning window isn't a catastrophe. It's always better to prune late than to not prune at all.
If you have summer-fruiting varieties, you can still get in there in early spring and cut out all the old, dead canes. The patch might look a bit more crowded than you'd like, which can slightly increase the risk of disease, but getting that old wood out is still a huge help.
For autumn-fruiting types, if you miss the big winter cut-down, just do it in early spring. The only real consequence is that your harvest will be delayed by a few weeks. The real problem is skipping the prune altogether. That leads to a tangled mess where old and new canes fight for light, water, and nutrients, leaving you with fewer, smaller berries and a perfect hideout for pests.
The most forgiving thing about raspberries is that they almost always bounce back. A late prune is far better than no prune at all. Your primary goal is always to remove old wood and reduce congestion, regardless of the exact timing.
Can I Prune My Raspberries Right After They Fruit in Summer?
Yes, you absolutely can! This is a brilliant strategy, especially for the summer-fruiting types.
By taking out the canes that have just finished fruiting straight after you've picked the last berry, you dramatically improve airflow around the new canes. This is a game-changer during our warmer, more humid months, as it seriously cuts down the risk of fungal diseases taking hold. It also means the plant funnels all its energy into beefing up the fresh primocanes that will carry next year's crop.
Just remember, for autumn-fruiting varieties, you'll need a bit more patience. Hold off until the entire harvest is done, which could be as late as May in some parts of New Zealand, before you make any cuts.
How Do I Tell the Difference Between Old and New Raspberry Canes?
This is probably the single most important skill to master for a successful prune, particularly with summer-fruiting raspberries. Once you know what to look for, the difference is surprisingly clear.
- New Canes (Primocanes): These are this year's growth. They look fresh and full of life – generally bright green, quite flexible, and with smoother bark.
- Old Canes (Floricanes): These are the second-year canes that have already fruited. They’ll look much woodier, a darker brown or even grey, and often feel brittle to the touch. You might also spot the dried-up remnants of old fruit stalks still clinging to them.
As you head into late autumn and winter, it becomes even easier. The old canes start dying back properly, making them really stand out from the new growth. Getting this simple identification right will completely transform your pruning and your harvest.
At Jungle Story, we're passionate about helping Kiwi gardeners succeed. Explore our wide range of edible plants, quality tools, and expert advice to create the garden of your dreams. Visit us today at https://junglestory.co.nz and let's grow something amazing together.