Growing passionfruit here in New Zealand is one of the most satisfying things you can do in the garden. It's a fantastic way to turn a sunny, forgotten corner into a source of those incredible tangy, fragrant fruits. The whole secret really comes down to two things: picking the right variety for your local climate and giving it a fantastic start in well-prepared soil.
If you can provide a sunny, sheltered spot and rich, free-draining soil, you're already 90% of the way to a bumper crop.
Setting the Stage for Passionfruit Success
Getting the setup right from day one is everything. I can't stress this enough. This isn't just about digging a hole and hoping for the best; it’s about creating the perfect home for your vine to settle into and thrive for years to come. A little bit of effort now pays off with rapid growth and, most importantly, heaps of delicious fruit later.
Before you even grab a spade, think about the three pillars for a happy passionfruit vine: the right plant, the right place, and the right prep. Get these sorted, and the rest of the journey is surprisingly easy.
Choosing Your Passionfruit Cultivar for NZ Gardens
Not all passionfruit are the same, especially when you're dealing with the incredible variety of microclimates we have across New Zealand. Picking a cultivar that's well-suited to your region is the first, most crucial decision you'll make. A few varieties have proven themselves time and again in Kiwi gardens, so they're a great place to start.
Here's a quick look at some of the most popular passionfruit varieties available in New Zealand. This table should help you match a vine to your specific garden conditions and taste preferences.
| Cultivar Name | Ideal NZ Region | Fruit Flavour & Size | Key Growing Notes |
|---|---|---|---|
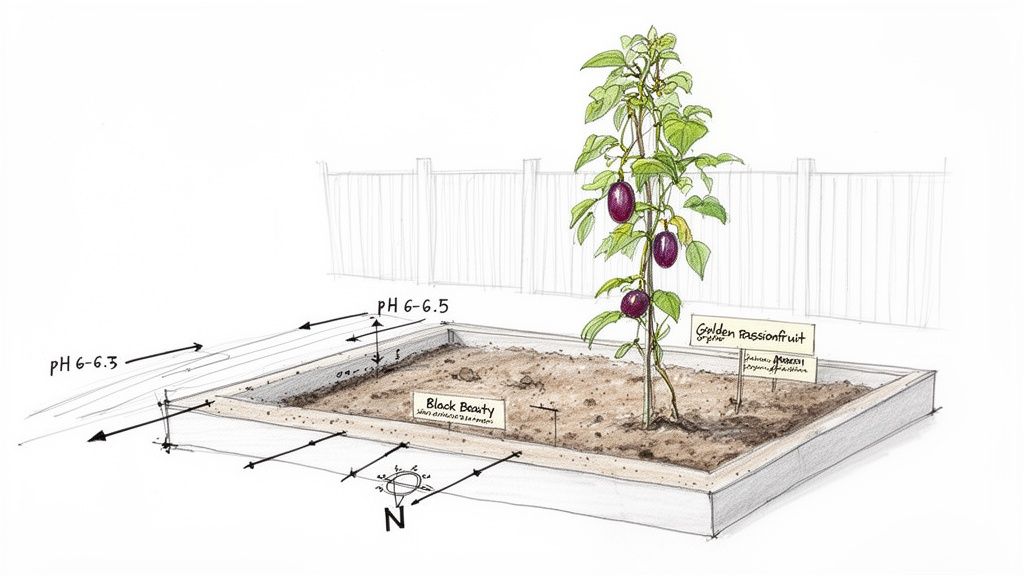
| 'Black Beauty' | Warmer, frost-free areas (upper North Island) | Classic tangy, aromatic flavour. Medium-sized purple fruit. | The go-to variety for most home gardeners. Vigorous and fruits heavily. |
| 'Golden Passionfruit' | Subtropical areas (Far North) | Milder, less acidic flavour. Large, yellow-skinned fruit. | Also known as Panama Gold. Needs consistent warmth and a long growing season. |
| 'Red Banana' | Cooler but mild regions (e.g., Nelson, coastal BOP) | Sweet, aromatic pulp. Long, banana-shaped red fruit. | A bit more tolerant of cool weather but still needs frost protection. Beautiful ornamental vine. |
| 'Sweet Granadilla' | Warm, sheltered, frost-free spots | Very sweet, less acidic. Large, orange-skinned fruit. | Less common but prized for its sweet flavour. Needs a very protected, warm microclimate. |
Ultimately, the best choice is a vine that won't have to struggle against your local weather. As a wise old gardener once told me, "Don't fight your climate; work with it." It's the simplest way to guarantee a good harvest.
Finding and Prepping the Perfect Spot
Once you've got your plant, it's time to scout the perfect location. Passionfruit vines are absolute sun-worshippers. They need a spot that gets at least six to eight hours of direct sun every day to really get going and produce fruit. A north-facing wall or a sturdy fence is usually the perfect spot, as it soaks up the sun and radiates warmth back onto the vine.
Shelter is just as important as sun. These vines really hate being battered by strong winds, which can easily shred their leaves, knock off flowers, and generally stress the plant out. Finding a spot that's protected from those prevailing southerlies or westerlies will make a world of difference to its health and productivity.
With the location sorted, it's time to look at the soil. Passionfruit are hungry plants that need rich, fertile ground, but the most critical factor is that it must be free-draining. They simply will not tolerate "wet feet" and are very prone to root rot if left in boggy soil.
If your garden has heavy clay, don't despair! The easiest solution is to build a raised garden bed or simply plant on a generous mound of improved soil. Before planting, dig in plenty of good stuff like well-rotted compost, sheep pellets, or other organic matter. This not only feeds the plant but also improves the soil structure, creating the five-star home your new passionfruit vine deserves.
Planting and Training Your Vine for Success
You've done the hard yards prepping your soil and picking the perfect plant. Now for the exciting part – getting your passionfruit vine in the ground and giving it the best possible start.
Getting the planting and initial training right from day one is absolutely crucial. It’s what separates a straggly, disappointing vine from one that’s strong, healthy, and dripping with fruit. Think of it as setting the foundation for years of delicious harvests.
Getting Your Vine in the Ground
The ideal time to plant passionfruit in New Zealand is spring. The soil has had a chance to warm up, the frost risk has hopefully passed, and your vine has the whole season ahead to settle in before winter arrives.
When you're ready, dig a hole that’s about twice as wide as the pot your vine came in, but no deeper. Gently ease the plant from its container and have a look at the roots. If they’re tightly coiled, carefully tease the bottom ones out to encourage them to spread into their new home.
Place the vine in the hole, making sure the top of its root ball sits level with the surrounding soil. Backfill with the earth you dug out, tamping it down lightly to get rid of any air pockets. Finish with a deep, slow watering right away – this is non-negotiable. It helps settle the soil and minimises transplant shock.
A Quick Tip: Be careful not to pile soil or mulch right up against the vine's main stem. Leaving a small, clear ring around the base improves airflow and is your best defence against collar rot, which can be a real problem for passionfruit.
Choosing and Setting Up Your Support Structure
Passionfruit are natural-born climbers; their little tendrils are designed to grab and cling to anything they can wrap around. A plain wall or solid fence won't cut it. They need a proper support structure, and whatever you choose will dictate the vine’s shape for life.
A few proven options work brilliantly in Kiwi gardens:
- A solid trellis: The classic choice for a good reason. Whether it's a simple T-trellis out in the open or a fan-shaped one against a sunny wall, trellises provide the perfect framework.
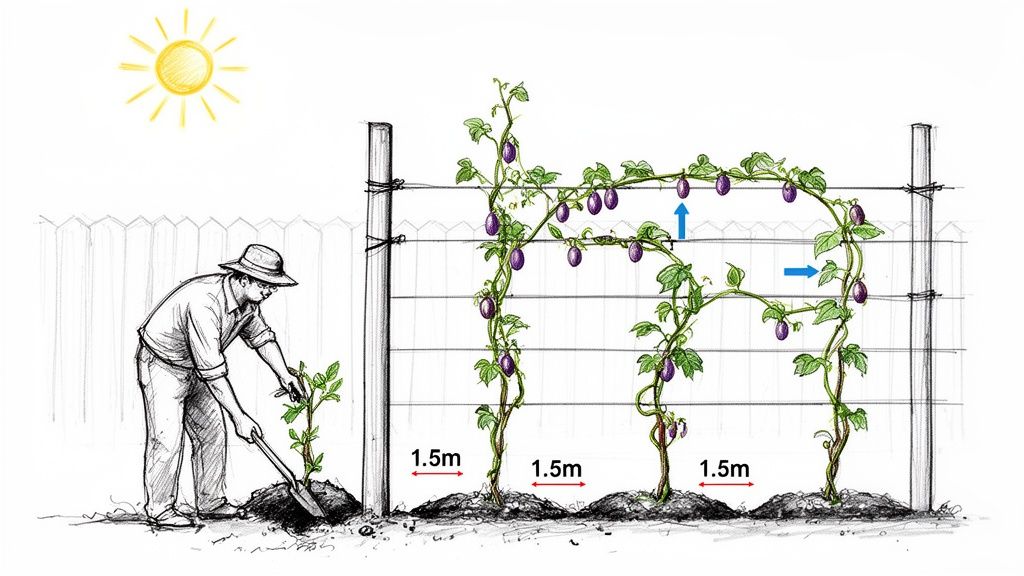
- Wire-strung fences: This is a great way to make a boundary fence productive. Simply run horizontal wires across the fence posts, spacing them about 30cm apart.
- Pergolas and arches: For a truly stunning effect, train your vine over a pergola. It creates a beautiful, leafy canopy with fruit hanging down just waiting to be picked.
Whatever you build, make sure it’s seriously sturdy. A mature vine loaded with fruit gets incredibly heavy, especially in the wind and rain. It's much easier to over-engineer it from the start than to fix a collapsed structure tangled in a massive vine. If you're looking for more inspiration, it's worth learning about what works for other NZ climbing plants.
The Art of Training Your Young Vine
The goal here is simple: create a strong, open framework. You want a single main leader growing straight up to the top of your support, which will then branch out to form the fruiting arms.
After planting, pick the strongest-looking shoot to be your main leader and gently tie it to the base of your trellis or wire. As it grows skyward, rub off any little side shoots that try to sprout from the main stem. This forces all the plant's energy into that upward growth, helping it reach the top faster.
Once the leader gets to the top wire of your support, pinch out the very tip. This simple snip tells the vine to stop growing up and start growing out. Two new shoots will likely emerge just below your cut; select the best two and start training them horizontally in opposite directions along the top wire, forming a 'T' shape.
These two horizontal arms are your main event. All your fruit-bearing shoots, called laterals, will hang down from them like a curtain. This structure gives fantastic sun exposure and airflow – the perfect recipe for a massive harvest.
Mastering Your Feeding and Watering Schedule
Consistent care is what separates a struggling vine from one dripping with fruit. Once your passionfruit is planted and trained, getting into a simple yet effective irrigation and feeding routine is the next big step. This isn't about complicated formulas; it's about giving your vine the right things at the right time, especially when growing passionfruit in NZ's unique seasons.
The Golden Rule of Watering
Passionfruit vines are thirsty, particularly during their peak growing and fruiting periods from late spring through autumn. But they absolutely despise having constantly saturated roots—a condition often called "wet feet" that can quickly lead to fatal root rot. The goal is to strike that perfect balance.
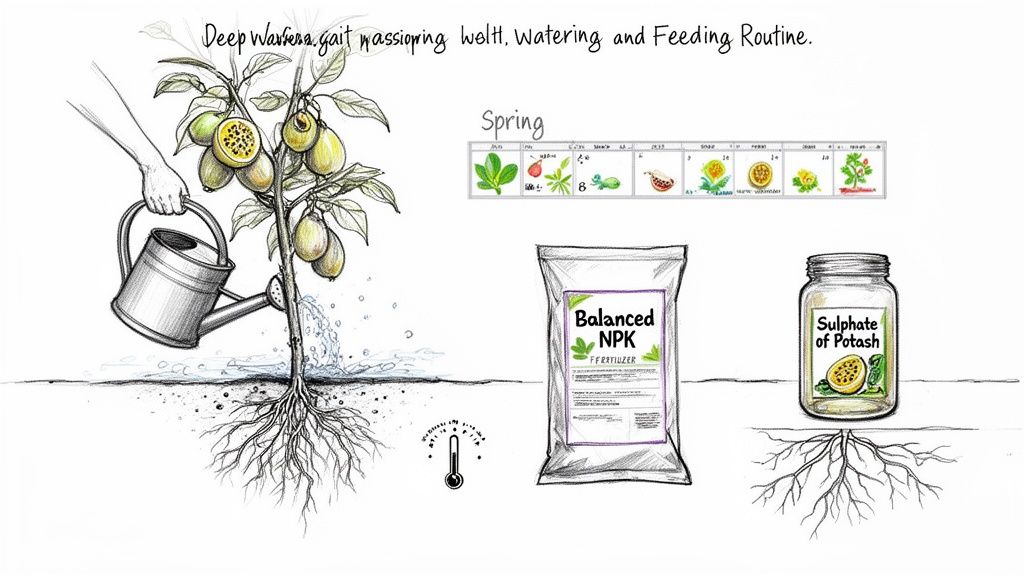
Forget little and often; the best approach is deep, infrequent watering. Aim to give the root zone a really thorough soaking once or twice a week during the hot, dry months. This encourages the roots to grow deeper into the soil searching for moisture, making the vine far more resilient during those inevitable dry spells.
A simple test is to poke your finger a few centimetres into the soil near the base of the vine. If it feels dry, it's time to water. If it's still damp, you can probably wait another day or two.
What to Feed Your Passionfruit and When
These vigorous vines are hungry feeders, and a well-timed application of fertiliser can make a world of difference to your harvest. Their needs change throughout the year, so tailoring your feeding schedule to the season is key.
In spring (September to November), your vine is waking up and putting on a huge amount of leafy growth. This is when it needs a good feed with a balanced, general-purpose fertiliser that's rich in nitrogen. Think of nitrogen as the fuel for creating all those lush green leaves and new shoots that will eventually bear flowers. Sheep pellets or a quality citrus and fruit tree food are excellent choices.
As summer progresses and the vine starts to flower and set fruit, its nutritional needs shift. From December onwards, you'll want to reduce the nitrogen and increase the potassium (also known as potash).
Potassium is the magic ingredient for flower and fruit production. It helps the plant develop strong, healthy fruit with better flavour and sweetness. A lack of potassium is a common reason for flowers dropping off without setting fruit.
You can apply sulphate of potash every few weeks during the flowering and fruiting season to give your vine the boost it needs. This simple step is one of the most effective ways to ensure a bumper crop. If you need a deeper dive into the world of plant nutrients, our guide to the best fertilisers for plants can help.
Seasonal Passionfruit Care Calendar for New Zealand
Keeping track of what to do and when can feel a bit much. This simple calendar breaks down the key tasks for feeding and watering your passionfruit throughout the New Zealand year.
| Season | Key Tasks | Feeding & Watering Notes |
|---|---|---|
| Spring (Sep-Nov) | Encourage new growth, monitor for early pests. | Apply a balanced, high-nitrogen fertiliser. Water deeply once a week as the weather warms. |
| Summer (Dec-Feb) | Flowering & fruit set, hand-pollinate if needed. | Water deeply 1-2 times per week. Begin feeding with sulphate of potash every few weeks. |
| Autumn (Mar-May) | Main harvest period. | Continue deep watering. Keep up with potash feeds to support late fruit development. |
| Winter (Jun-Aug) | Vine is dormant. Time for pruning. | Reduce watering significantly, only watering if the soil is very dry. Cease all feeding. |
Following this natural rhythm ensures your vine gets precisely what it needs at the right time. It takes the guesswork out of the equation and sets you up for a successful harvest. A well-fed and watered vine is also a healthy vine, far better equipped to fend off pests and diseases.
Pruning for Health and a Bumper Crop
Pruning can feel like one of the more daunting garden tasks, but for a passionfruit vine, it's absolutely non-negotiable. Think of it less as a harsh haircut and more as a strategic refresh that keeps your vine healthy, vigorous, and—most importantly—productive year after year. A well-pruned vine is a happy vine.
Without a regular trim, passionfruit vines quickly descend into a tangled, unproductive mess. This dense growth kills airflow, creating the perfect damp, shady spot for fungal diseases to set up camp. It also stops sunlight from getting to the inner parts of the vine, which is exactly where your future fruit needs to develop.
The Why and When of Pruning Passionfruit
The reason we prune is beautifully simple: passionfruit only produces fruit on new growth. Those shoots that fruited this season won't do it again next year. By cutting back this old wood, you're telling the vine to send out a fresh burst of laterals, which will carry the next season's bumper crop.
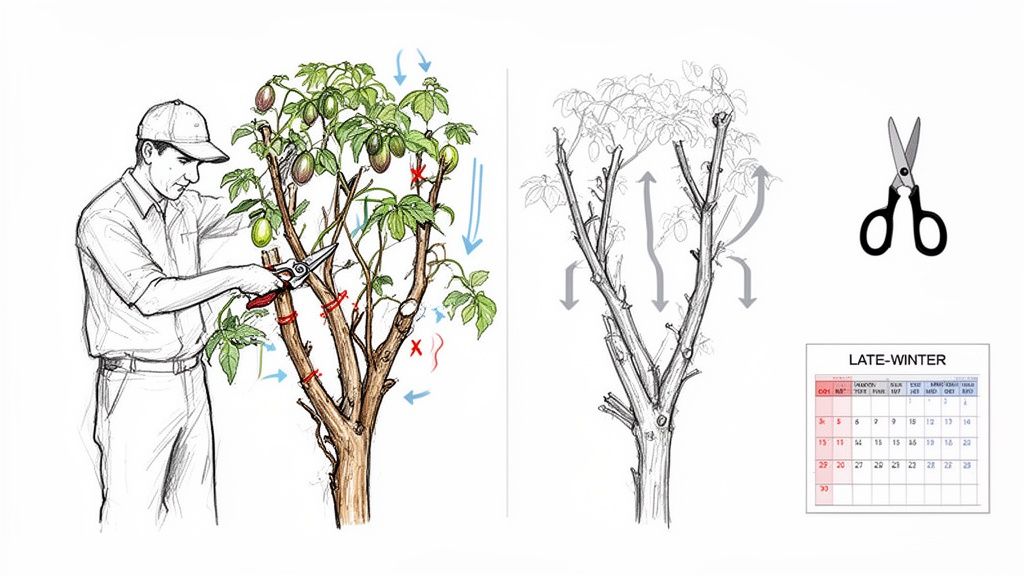
The best time for this big annual prune in New Zealand is late winter or very early spring—usually late August or early September. The trick is to wait until the vine is dormant and the risk of any hard frosts has passed. If you prune too early, you risk encouraging delicate new shoots that get zapped by a late cold snap, which is a real setback.
A Practical Approach to Pruning
Getting started is easier than you think. Your goal is to tidy the vine, get rid of all the unproductive wood, and maintain that core 'T' shape you set up when you first planted it. Don't be shy; these are vigorous plants that bounce back beautifully from a good cut-back.
Here’s what to do with your secateurs:
- Clear out weak or dead wood: Start with the easy stuff. Cut out any branches that look unhealthy, damaged, or have died off over winter. This is just good garden hygiene.
- Cut back last season's laterals: Find the shoots that carried fruit last summer. These are the ones hanging down from your main horizontal leaders. Prune these back hard, leaving just two or three buds (about 15-20 cm) from the main leader.
- Thin out the tangle: If you’re faced with a chaotic mess of overlapping vines, be ruthless. Remove some of the weaker shoots entirely to open up the structure. Good airflow is your best friend for preventing disease.
The aim is to create an open, curtain-like structure. This lets sunlight and air get to the entire vine, encouraging strong new growth and helping ripen the fruit evenly. It might feel severe, but your vine will thank you with incredible vigour.
This yearly cycle of growth and pruning is what keeps the harvest coming. Careful management is key, a fact well-known in the commercial industry. For over two decades, growers from the warm north of Kaitaia down to sunny Nelson have optimised their practices to achieve a harvest window that can span from mid-summer right through to late winter.
What Not to Do When Pruning
While it pays to be confident, there are a couple of classic mistakes to avoid. The most critical is to never cut into the main leader or the main horizontal arms that form your primary framework. These are the permanent structure of your vine, and hacking into them can cause serious damage.
Also, resist the urge to just give the vine a light trim around the edges. This doesn't actually stimulate the new fruiting wood you need. You have to get right in there and cut back those old laterals to encourage that vital new growth. If you're looking to build your confidence, our guide on how to properly prune fruit trees has some great foundational tips that apply here too.
Troubleshooting Common Pests and Diseases
Even with the best care in the world, your passionfruit vine is bound to run into a few troubles now and then. The trick is to spot issues early and deal with them swiftly before they get out of hand. A quick response is often the difference between a minor setback and a real problem.
Your best defence is always a healthy, happy plant. A stressed vine—whether from too little water or not enough food—is an open invitation for pests and diseases. Keep your garden tidy and stick to a good care routine, and you’ll head off most issues at the pass.
Identifying and Managing Common NZ Pests
Passionfruit vines can, unfortunately, attract a few unwelcome visitors. Getting to know the main offenders is the first step to showing them the door.
One of the most common culprits you’ll encounter is the passion vine hopper. You’ll spot the adults as small, brown, moth-like insects that jump away when you get close. They leave behind tell-tale clumps of white fluff on the stems, which are actually their nymphs. They live by sucking the sap from new growth, which can really weaken the plant.
Another persistent pest is the scale insect. These show up as small, hard, brown or black bumps, often clustered along stems and on the undersides of leaves. Just like hoppers, they feed on sap, leading to yellowing leaves and a general lack of vigour.
Here are a few garden-friendly ways to manage them:
- Go Manual: For a light infestation, a sharp blast of water from the hose is often enough to knock hoppers and their fluffy nymphs off the stems. Scale can be physically scraped off with a thumbnail or an old toothbrush.
- Bring in the Oils: If you're facing a more serious outbreak, spraying with neem oil or a good horticultural oil is incredibly effective. These oils work by smothering the insects and are much kinder to your garden's ecosystem than harsh chemical sprays. Always apply them in the cool of the evening to avoid any risk of leaf burn.
Tackling Fungal Issues and Leaf Problems
New Zealand’s humid climate, especially in the upper North Island, can be a breeding ground for fungal diseases. These problems love to appear when there's poor airflow around the vine or when watering is a bit erratic.
Greasy spot, also known as brown spot, is a frequent fungal foe. It starts as dark, greasy-looking blotches on the leaves. These spots eventually turn brown, causing the leaf to yellow and drop off.
A more serious threat is root rot, which is almost always a result of waterlogged, soggy soil. If your vine suddenly starts to wilt and its leaves turn yellow for no obvious reason, check the soil moisture. Poor drainage is usually the culprit.
The best way to deal with fungal diseases is to prevent them from starting in the first place. Make sure your vine is pruned well to encourage good air circulation, and always water at the base of the plant, not over the foliage. Sorting out your soil drainage is absolutely non-negotiable for preventing root rot.
Yellow leaves aren’t always a sign of disease, though. Sometimes, it’s just your vine’s way of asking for a specific nutrient. A magnesium deficiency, which is quite common in New Zealand soils, often causes yellowing between the leaf veins. An easy fix is to dissolve a tablespoon of Epsom salts in a watering can and give the root zone a good soak.
To get a better handle on potential issues, a broader understanding of identifying and treating tree pests and diseases can be a huge help. While this guide is focused on trees, the fundamental principles are often the same and can give you great insight.
Solving Flower Drop Frustrations
It’s a truly frustrating sight: a vine covered in beautiful flowers, only to watch them all fall off before they can turn into fruit. This is a common headache, but it usually comes down to a few fixable causes.
More often than not, the problem is simple poor pollination. If you don’t have enough bees visiting your garden, you might need to play cupid and hand-pollinate the flowers yourself.
Environmental stress is another major factor. Sudden temperature swings, inconsistent watering, or a lack of essential nutrients like potassium can all cause the vine to panic and drop its flowers to conserve energy. Keeping a consistent, steady care routine is your best bet for preventing this from happening.
Common Questions About Growing Passionfruit
Even the greenest of thumbs can run into a few snags when growing passionfruit in New Zealand. From flowers that mysteriously drop off to wondering exactly when to pick that first perfect fruit, some questions pop up time and time again. Let’s tackle some of the most common queries from Kiwi gardeners, so you can get the best out of your vine.
Why Are My Passionfruit Flowers Dropping Off?
It's a frustrating sight: a vine covered in beautiful, promising flowers, only for them to fall off before any fruit appears. This is a common headache, but it usually comes down to one of two things – pollination problems or environmental stress.
Passionfruit flowers need bees to get the job done. If your garden is a bit light on bee traffic, especially on cool or windy days, pollination might not be happening effectively. The good news is you can step in and play the part of the bee yourself. Just take a small, soft artist's paintbrush and gently swirl it inside one flower to pick up pollen, then transfer it to the stigma of another.
Stress is the other major culprit. A passionfruit vine is a bit of a creature of habit. Sudden temperature swings, erratic watering (going from bone dry to sopping wet), or a lack of key nutrients like potassium can cause the vine to panic and drop its flowers to conserve energy. Keeping a consistent care routine, especially during that crucial flowering period, is your best defence.
How Do I Know When Passionfruit Are Ready to Harvest?
This is the best part, and it mostly just requires a bit of patience! The number one, most reliable sign that a passionfruit is perfectly ripe is when it drops from the vine all by itself. A ready-to-eat fruit will have a deep, rich purple skin (for common varieties like 'Black Beauty'), feel surprisingly heavy for its size, and might even be slightly wrinkled.
Try to resist the temptation to pick fruit directly from the vine unless it comes away with the absolute gentlest of touches. Passionfruit picked too early won't ripen any further; they’ll just shrivel up and have a sharp, sour taste. Make a habit of checking the ground under your vine every day or two through late summer and into autumn.
A freshly dropped passionfruit is at its absolute peak of flavour. The pulp will be juicy, aromatic, and have that perfect balance of sweet and tart that makes them so irresistible.
Can I Grow a Passionfruit Vine in a Pot?
Yes, absolutely! Growing in a large container is a brilliant option if you're working with a balcony, patio, or small courtyard. It also gives you total control over the soil and makes it much easier to protect the vine from frost in cooler parts of the country.
The secret is to go big with your pot—think at least 50-60 litres in volume. Something the size of a half wine barrel is perfect. This gives the vine’s vigorous root system the space it needs to thrive. You’ll also need to set up a sturdy support, like a bamboo tripod or a small trellis, right in the pot for the vine to climb.
Just remember that container-grown plants have slightly different needs. They dry out much faster than plants in the garden, particularly on hot, windy days, so you'll need to keep a close eye on the soil moisture. They also require more frequent feeding because nutrients get washed out with every watering. A regular dose of a balanced liquid fertiliser during the growing season will keep your potted passionfruit happy and productive.
Ready to start your own passionfruit journey or add to your edible garden? At Jungle Story, we connect you with trusted local growers offering a fantastic range of fruit vines, garden tools, and everything you need for a successful harvest. Explore our marketplace today at https://junglestory.co.nz and bring home a taste of the tropics.