Learning how to prune your lemon tree is probably one of the most rewarding things you can do to get a bumper crop and a healthier plant. At its core, it's all about clearing out the dead or unproductive wood. This simple act helps air flow through the branches and pushes the tree's energy into growing strong limbs and, most importantly, delicious lemons.
Getting those cuts right, and at the right time of year, is the secret sauce.
Why Pruning Your Lemon Tree Is a Kiwi Gardening Essential
For Kiwi gardeners, giving your lemon tree a good prune is more than just a quick tidy-up—it's a must-do for any responsible tree owner. It doesn't matter if you've got a massive Yen Ben in the backyard or a Meyer in a pot on your city balcony; this yearly task is absolutely vital for your tree's health and the lemons you'll be slicing into your G&T. The payoff is much more than just a nice-looking tree.
A regular, thoughtful prune actually gives the tree a kick-start, encouraging it to put on vigorous new growth. When you snip away the old, tired branches, you're making way for fresh wood that will carry the next season's fruit. This keeps your tree in a productive cycle, year after year, instead of letting it waste energy on weak, crowded limbs.
Improving Tree Health and Fruit Quality
One of the biggest wins from pruning is better air circulation through the canopy. We all know how damp it can get in New Zealand, especially in places like Auckland or the Bay of Plenty. A dense, overgrown lemon tree in that sort of climate is a sitting duck for fungal problems like brown rot or sooty mould.
By thinning out the middle of the tree to create an open, vase-like shape, you let air and sunlight get right into the heart of the plant. This one move helps the leaves dry out faster after a downpour and seriously cuts down the risk of disease grabbing hold.
That extra sunlight also works wonders on the fruit itself. Lemons that get more sun develop a much better colour and a richer flavour, making for a far tastier harvest.
A Critical Defence Against Pests
Lastly, a good pruning strategy is your best weapon against pests, especially the dreaded lemon tree borer. This local nuisance loves to attack trees that are stressed, damaged, or overcrowded.
By removing what we often call the 'three Ds' of pruning—dead, damaged, or diseased wood—you're closing the door on borers and other insects looking for an easy entry point. Keeping a strong, open structure makes your tree a much less appealing home for these pests, helping to protect its long-term health and vitality.
Getting Your Pruning Timing Right for New Zealand Seasons
When it comes to pruning a lemon tree, what you cut is only half the story. For us Kiwi gardeners, when you cut is arguably the most important piece of the puzzle.
A quick search online might tell you to prune in late winter, but that's Northern Hemisphere advice. Following it here can, unfortunately, lead to disaster. Why? Because we have a homegrown menace to deal with: the native lemon tree borer. This pest changes all the rules.
The Lemon Tree Borer Problem
Understanding the life cycle of this pest is the absolute key to protecting your tree. The adult borer moth is on the wing from spring right through into autumn. During this long, active period, it’s irresistibly drawn to the scent of freshly cut wood, making your lemon tree a prime target for laying its eggs.
A prune during these warmer months essentially sends out an open invitation for infestation. This is why experienced New Zealand gardeners work to a different calendar, one that puts the tree's health ahead of conventional wisdom from overseas.
When to Make the Cut in NZ
The ideal time for any heavy pruning in New Zealand is from late autumn through winter. This generally means waiting until April or later, once the borer moths have finished their flight season.
Pruning during this cooler, quieter period ensures that the fresh wounds on your tree aren't releasing tempting scents when the pests are most active. This approach gives the cuts time to start healing before the borer population re-emerges in spring, dramatically reducing the risk of damage and the dreaded dieback that can follow.
In New Zealand, knowing when to prune a lemon tree is as critical as knowing how. The native lemon tree borer (Oemona hirta) is the reason. A Waikato pruning calendar, for example, notes that citrus pruning is safest in winter (June - August), precisely because borer moths are active from spring through autumn and are strongly attracted to fresh cuts.
Expert advice also warns that adult borer are still flying in early autumn, recommending we delay any major pruning until April or later. This timing really matters in a country where citrus is a modest but valuable crop, producing 25,000–35,000 tonnes of fruit a year. Many Kiwi growers now split their approach: heavy structural work in the cooler months, and light shaping in late spring or summer when trees recover quickly.
Lemon Tree Pruning Calendar for New Zealand Gardeners
Here’s a quick reference guide to help you plan your pruning tasks throughout the year, with a special focus on keeping that pesky lemon tree borer at bay.
| Season (NZ) | Recommended Pruning Task | Primary Goal | Borer Risk Level |
|---|---|---|---|
| Winter (Jun - Aug) | Heavy structural pruning. | Reshape the tree, remove large/dead branches. | Very Low |
| Spring (Sep - Nov) | Light trimming after fruiting. | Remove spent flowers, tidy up canopy. | High |
| Summer (Dec - Feb) | Very light maintenance only. | Snip off water shoots or crossing twigs. | Very High |
| Autumn (Mar - May) | Wait until late April/May for major cuts. | Prepare for winter structural pruning. | High (decreasing) |
This calendar helps visualise why timing is everything. Stick to this schedule, and you’ll give your lemon tree the best chance to thrive without inviting unwanted guests.
Heavy Pruning vs. Light Trimming
It’s really important to know the difference between a major haircut and a light tidy-up, as you can do them at different times.
-
Heavy Structural Pruning: This is the big stuff. You’re removing large, established branches to reshape the tree, improve its core framework, or cut out significant damage. This is the work that must be saved for the low-risk winter period (April to August).
-
Light Maintenance Trimming: Think of this as a quick spruce-up. Snipping off small, twiggy growth, removing spent flower clusters, or lightly shaping the canopy for looks. Because these cuts are small and heal quickly, you have a bit more flexibility. A light trim can often be done in late spring after the main fruiting period, as the tree’s active growth helps it recover swiftly.
The golden rule is simple: if the branch you need to cut is thicker than your thumb, wait until winter. Small, superficial cuts can be made more freely, but always stay vigilant for any signs of borer activity.
This timing strategy is a core principle for fruit growers in New Zealand. You can learn more about how it applies to other varieties in our complete guide on how to prune fruit trees. By adopting this NZ-specific approach, you can keep your lemon tree healthy, well-shaped, and productive without exposing it to our most persistent citrus pest.
Your Essential Pruning Toolkit and Safety Gear
Before you even think about making a cut, getting your gear sorted is the first and most important step. Using the right equipment doesn’t just make the job quicker and easier; it’s crucial for the health of your tree and your own safety. A clean, precise cut from a sharp tool heals fast and minimises the risk of disease, while a bit of safety gear will save you from some nasty scratches.
You don't need a whole shed full of fancy tools, just a few quality essentials. Think of them as a long-term investment in your lemon tree's future.
The Three Must-Have Pruning Tools
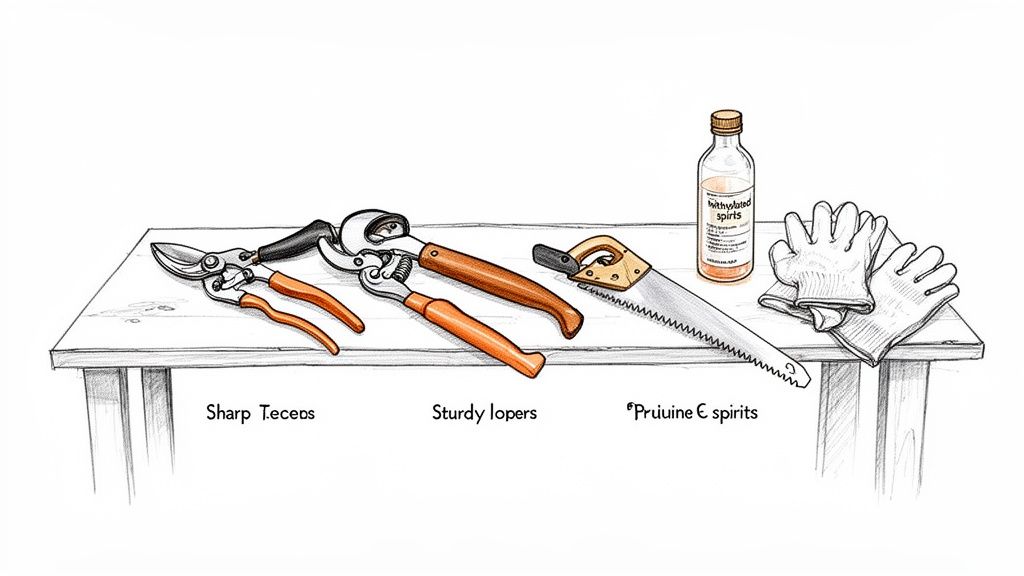
For most backyard lemon trees, you can get just about any pruning job done with these three core tools. My advice? Buy the best you can afford. Sharp, well-made blades are absolutely non-negotiable for making clean cuts.
-
Secateurs (Hand Pruners): These will be your go-to for the majority of the work. They’re perfect for snipping off smaller branches and twigs up to about the thickness of a pencil. Make sure you get a bypass style, where two curved blades slide past each other like scissors. They make a far cleaner cut than the anvil type, which can crush and damage the stems.
-
Loppers: Think of loppers as super-powered secateurs with long handles. That extra leverage lets you slice through thicker branches—usually up to 4-5 cm in diameter—without a struggle. They’re a must-have for tackling more established limbs that your hand pruners just can’t handle.
-
Pruning Saw: When a branch is too chunky for your loppers, it’s time to bring out the pruning saw. A good one with a curved blade and sharp, deep teeth will make short work of mature wood, letting you remove big limbs cleanly without tearing the bark.
Sterilisation: The Non-Negotiable Step
This is the one step I see so many gardeners skip, but it’s probably the most critical for your tree's health. It’s incredibly easy to spread diseases from one plant to another on dirty blades. Before you start, and especially when moving between different trees, you have to sterilise your tools.
The easiest and most effective way to do this in New Zealand is with methylated spirits. Just give the blades a good wipe with a rag soaked in the stuff. It’s a quick job that kills off any nasty bacteria or fungal spores, stopping you from accidentally spreading problems like citrus canker.
Essential Safety Gear
Pruning isn’t exactly a high-risk activity, but a few simple precautions are just common sense. Lemon trees have surprisingly sharp thorns that can give you a nasty gash, and it's easy to get a bit of bark in your eye.
Here's your basic safety kit:
- Gardening Gloves: A sturdy, thick pair of gloves is a must. They’ll protect your hands from thorns, blisters, and splinters, making the whole experience much more comfortable.
- Safety Glasses: It only takes one stray twig flying back to cause a serious eye injury. Pop on a pair of safety glasses or goggles to shield your eyes from wood chips and branches that might whip back as you cut them.
By taking a few minutes to get these items ready, you’re setting yourself up for a safe and successful pruning session that will benefit your lemon tree for years to come.
Step-by-Step: How to Make the Right Cuts
Right, let's get down to the business end of things—making the actual cuts. This is where the magic happens. How you snip a branch can be the difference between a tree that heals quickly and one that struggles, so getting it right is key to directing all that lovely energy into a strong frame and a bumper crop of lemons.
First things first, always start with a good clean-up. I call this tackling the three Ds: Dead, Damaged, and Diseased wood. Get in there and remove any branches that fit that description. This is your non-negotiable first step. It instantly makes the tree look better, improves its overall health, and, crucially, gets rid of potential weak spots where pests and diseases might sneak in.
Thinning Cuts vs Heading Cuts
With the obvious problem branches gone, you'll be using two main types of cuts to shape your tree. Knowing when to use which is the secret to good pruning.
-
Thinning Cuts: This is when you take a whole branch off, right back to where it started – either at the main trunk or a bigger limb. Think of it as decluttering. Thinning cuts are perfect for opening up the canopy to let more light and air in. If you've got two branches crossing over and rubbing, for example, a thinning cut is the answer to remove one of them completely.
-
Heading Cuts: This is more of a trim than a removal. You’re just shortening a branch by cutting it back to an outward-facing bud. This encourages the buds just below your cut to sprout, making the tree bushier. It's a great technique for shaping a young tree or keeping a potted lemon tree compact.
For most established lemon trees in a New Zealand garden, you’ll find yourself making far more thinning cuts than heading cuts. The goal is usually to open the tree up and improve airflow, not make it denser.
Finding the Branch Collar
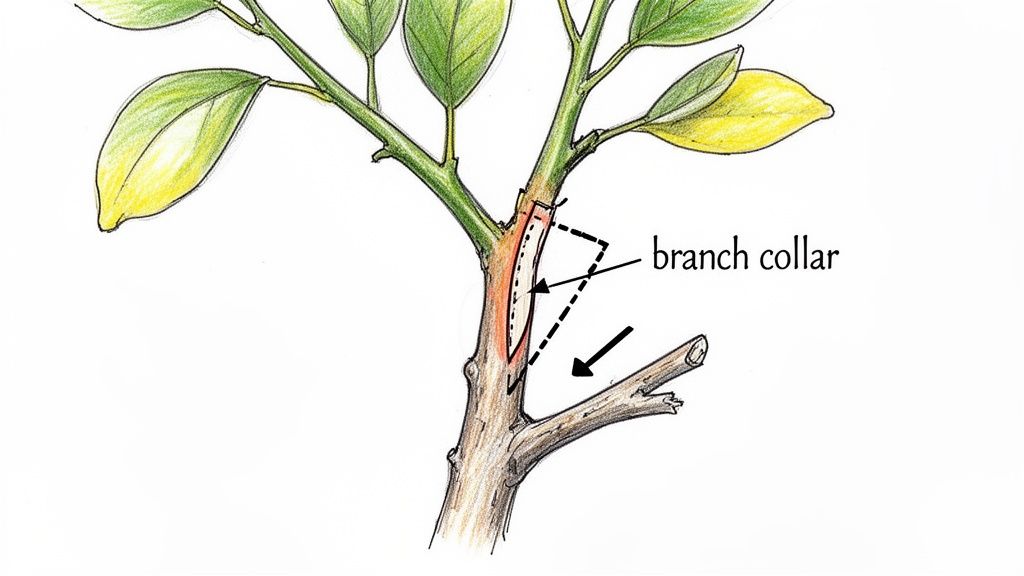
To make a cut that your tree can heal from properly, you need to find the branch collar. Have a look where a branch joins the trunk; you'll see a slightly raised or wrinkly ring of bark. That’s the collar. It’s packed with special cells that act like a natural bandage, sealing over the wound after you prune.
Cutting into this collar is a classic mistake. It creates a much bigger wound that the tree can't heal easily, leaving it wide open to problems like rot or the dreaded lemon tree borer. On the flip side, cutting too far out and leaving a long stub—what we call a "coat hook"—is just as bad. That stub will just die off and start to decay, inviting trouble.
Making the Perfect Pruning Cut
Your goal is to cut just outside the branch collar, leaving it intact. It’s pretty straightforward once you know what to look for.
- Spot the Collar: First, identify that wrinkly ring of bark at the base of the branch you’re removing.
- Get the Angle Right: Position your secateurs or saw so you’re cutting at a slight angle, away from the main trunk. Your cut should be on the branch side of the collar, not slicing into the trunk itself.
- Make a Clean Cut: Go for a single, decisive cut. If you're tackling a bigger branch with a saw, use the three-cut method to stop the bark from ripping. Make an undercut about 15-20cm out from the trunk, then a second cut from the top a bit further out to take the weight off. Finally, make your neat, final cut just outside the branch collar to remove the stub.
Nailing this technique means you’re working with the tree's natural healing process. It will form a protective callus over the cut, sealing it off beautifully. It’s a simple skill, but mastering it is what sets your lemon tree up for a strong recovery and years of zesty fruit.
Shaping Your Tree for Sunlight and Fruit
Pruning isn’t just about tidying things up; how you shape your lemon tree has a massive impact on the size and quality of your harvest. The real goal is to create a structure that lets sunshine and fresh air reach every single part of the plant. Here in New Zealand, professional citrus growers have pretty much perfected a method that home gardeners can easily borrow: the open centre or vase shape.
This approach builds a strong, open framework that can support a heavy crop of lemons, helps the fruit ripen beautifully, and—crucially for our often-humid climate—helps keep fungal issues at bay.
Creating the Vase Shape Framework
Picture your lemon tree as a big, open vase. The main branches reach outwards and upwards from the trunk, leaving the middle completely clear. This isn't just for looks; it’s a highly practical structure ensuring sunlight penetrates deep into the canopy, which means more lemons ripen evenly.
To get this right, that first big structural prune on a young tree is key. You'll need to choose three to five strong, healthy branches that will become the permanent "scaffold" for the rest of its life.
Look for branches that are:
- Well-spaced: You want them evenly distributed around the trunk, not all crammed onto one side.
- Strongly attached: Pick branches with a wide angle where they meet the trunk. These are far less likely to snap under the weight of fruit.
- Growing outwards: They should already be heading away from the centre of the tree.
Once you’ve picked your main limbs, you can cut out any other competing branches crowding the middle. I know it can feel a bit drastic at first, but you're setting the tree up for a lifetime of healthy, productive growth.
The whole idea behind shaping a lemon tree in New Zealand is drawn from decades of commercial growing. A great rule of thumb from old-school orchardists is that when you’re done pruning, you should be able to "loosely see through the tree". It’s a simple test that works every time.
What to Remove for a Healthy Canopy
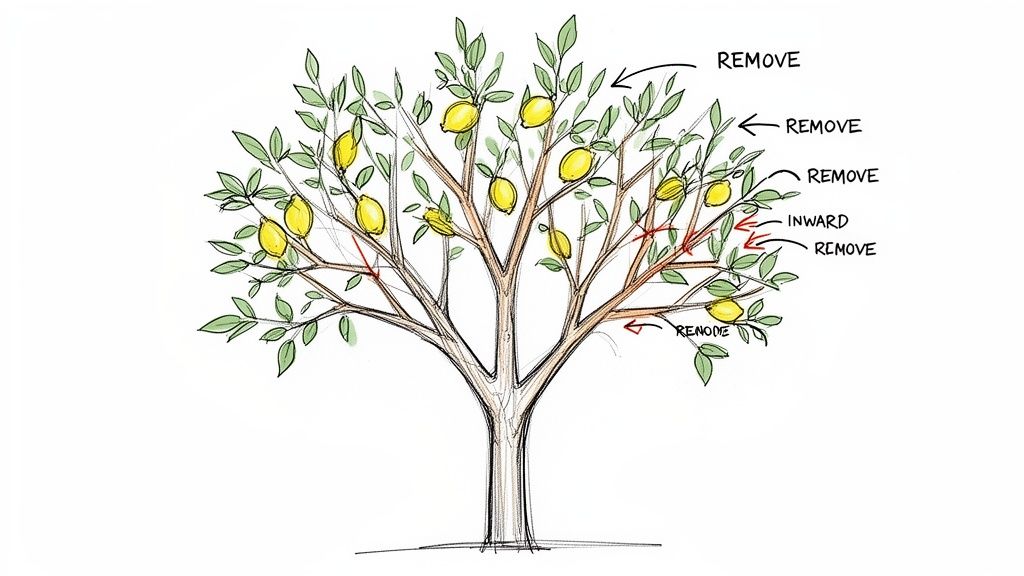
With your main framework sorted, your yearly prune is all about maintaining that open shape. The focus shifts to removing anything that creates congestion and blocks that precious light and air.
Each winter, take a walk around your tree and keep an eye out for these culprits:
- Inward-growing branches: Any branch heading back towards the centre of the tree has to go. It’s only going to cause clutter.
- Crossing branches: When two branches rub against each other, they create wounds that are an open invitation for pests and disease. Remove one of them—usually the weaker or more awkward of the two.
- Crowded twigs: Thin out those dense clusters of small, twiggy growth, especially in the middle of the tree. Taking out about 20-30% of this stuff dramatically improves airflow.
This shaping strategy has been fine-tuned over years, right alongside the expansion of nearly 2,000 hectares of citrus plantings across New Zealand. Commercial growers know that opening up the tree’s centre is vital for cutting down the risk of fungal disease, particularly in humid spots like Northland and the Bay of Plenty. Applying the same logic in your backyard will keep your trees healthier and more productive. You can dig deeper into the principles of Kiwi citrus cultivation and pruning advice on The Plant Company.
Keeping Your Tree at a Manageable Height
Another huge benefit of shaping is simply keeping your tree under control. A lemon tree left to its own devices can shoot up, making it impossible to pick the best fruit at the top without hauling out a ladder. Regular pruning keeps your tree at a sensible backyard height.
To manage the height, use heading cuts on the main upright branches. By trimming the tallest leaders back to an outward-facing side branch, you encourage the tree to grow outwards instead of just upwards.
For a typical backyard lemon tree, aiming for a final height of around 2 to 2.5 metres is a solid goal. It makes harvesting, spotting pests, and all your future pruning so much easier and safer.
After the Prune: Care and Common Mistakes to Sidestep
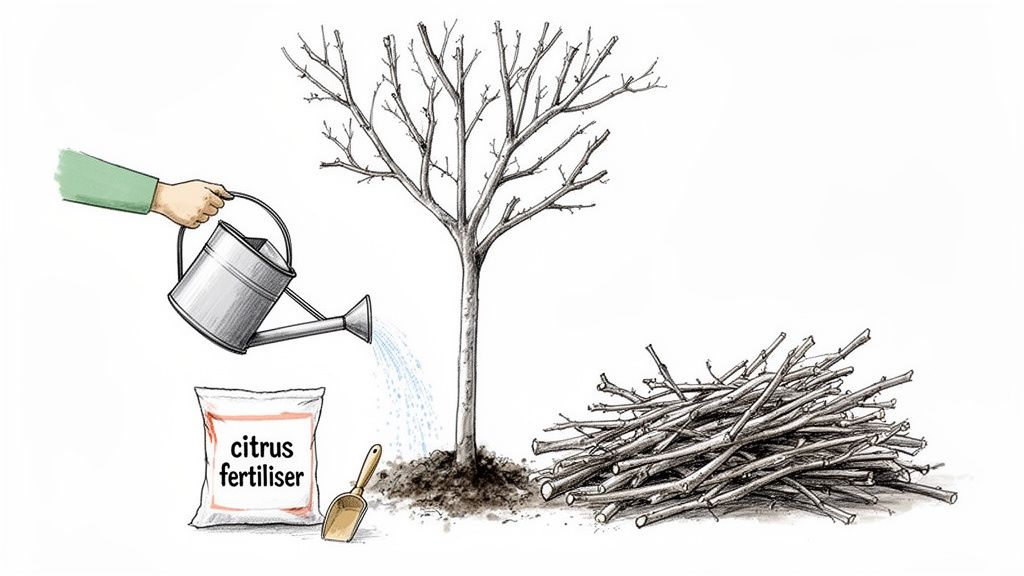
Right, the clippers are down, but your job isn't quite done. What you do after the prune is just as critical as the cuts themselves. This is all about helping your lemon tree recover, heal up, and pour all that saved energy into a brilliant flush of new growth.
First thing's first: give the tree a good, deep watering right after you finish. This helps settle the soil around the roots and eases any stress from the haircut. Then, it's time for a feed. A quality citrus fertiliser provides the exact nutrients it needs to power up new leaves, branches, and eventually, more of those lovely lemons. If you're unsure what to use, check out our guide to the best fertilisers for plants.
Common Pruning Blunders to Avoid in New Zealand
Even the most well-intentioned gardeners can make a few classic slip-ups. Dodging these common pitfalls will make sure your hard work actually helps your tree, rather than setting it back.
- Going overboard: It’s easy to get carried away. But hacking off more than one-third of the tree's canopy in one go is a massive shock to its system. Keep it moderate and stick to the essentials.
- Dodgy timing: We've said it before, but it's worth repeating. Pruning from spring to autumn here in New Zealand is an open invitation for the lemon tree borer. Save any major structural work for the cooler, safer months of winter.
- Messy cuts: Jagged cuts from blunt tools heal poorly and are basically a welcome mat for pests and diseases. Always use sharp, clean secateurs to make neat cuts.
If you look at New Zealand’s citrus industry, you’ll see that consistent, moderate pruning is key to success, especially for popular varieties like Meyer and Yen Ben. Gisborne now produces over 65% of our citrus, with well-managed lemon groves hitting yields of about 27.4 t/ha. That success comes down to disciplined annual pruning that balances leafy growth with fruiting wood, not random heavy-handed cuts. Home gardeners can learn a lot from this—adopting the same habits will help your backyard tree be as productive as its commercial cousins.
Dealing with Suckers and Water Sprouts
After a good prune, your tree will burst into life, but not all new growth is good growth. You need to keep an eye out for two types of shoots that just steal energy without ever giving you fruit.
Suckers are those really vigorous shoots that pop up from the rootstock, right down at the base of the trunk below the graft line. You can usually spot them because their leaves look a bit different from the rest of the tree. Get rid of them as soon as you see them—snip them off flush with the trunk.
Water sprouts (or water shoots) are the other culprits. These are fast-growing, straight-up vertical shoots that emerge from the main branches. They rarely produce fruit and just clog up the canopy, blocking light and air.
Spotting and removing suckers and water sprouts is a key part of pruning a lemon tree all year round. Don't save this job for your big winter prune. Just whip them off whenever you see them to send all that precious energy back where it belongs: into the branches that will actually give you lemons.
Got Questions About Pruning Your Lemon Tree?
Even with the best guide, it’s normal to have a few questions pop into your head when you're standing there, secateurs in hand. Sometimes you just need a quick, clear answer to a specific situation.
Let's run through some of the most common pruning questions we hear from Kiwi gardeners. We've covered the main when, why, and how, but these real-world scenarios will help you prune with total confidence.
How Much Can I Safely Cut Off at Once?
This is a great question because it's so easy to get carried away. As a rule of thumb, never take off more than one-third of the tree's total canopy in a single year. Hacking off more than that can seriously stress the tree, hurting its overall health and, of course, your lemon harvest.
For a typical annual trim on an established tree, just thinning out about 20% of the twiggy interior growth and any deadwood is perfect. It's a gentle tidy-up that keeps the tree in good shape without causing shock.
Should I Prune Branches with Yellow Leaves?
Seeing yellow leaves is a bit of a worry, but reaching for the pruners shouldn't be your first move. More often than not, yellowing leaves point to a nutrient deficiency (like a lack of nitrogen or magnesium) or a watering issue, not something pruning can fix.
Before you snip, play detective. The best first step is to give your tree a good feed with a quality citrus fertiliser and check that the soil is draining well. You can learn more in our guide on why lemon tree leaves might be turning yellow. The only time you should remove the branch is if the wood itself is obviously dead, dry, and brittle.
Can I Prune While the Tree Has Fruit On It?
Yes, you can definitely do a bit of light, careful pruning while your tree is fruiting. Snipping off dead or broken twigs is fine to do any time of year. It's also a good chance to whip out any of those pesky water sprouts that are stealing energy from the good stuff.
However, hold off on any major structural work. Things like removing big, healthy branches to reshape the tree should wait until after you've picked the main crop. This makes sure all the tree's energy is focused on ripening those delicious lemons.
A key takeaway is to match the intensity of your pruning to the season and the tree's cycle. Light touch-ups are fine year-round, but the heavy lifting should wait for the right moment.
What Should I Do If I Find Borer Holes?
Spotting the signs of the lemon tree borer is a classic headache for Kiwi gardeners. If you see little holes leaking a sawdust-like gunk (called frass), you need to act fast.
For smaller branches, the easiest fix is to prune the affected section right off. Make sure you cut well below any visible damage, and get rid of the pruned branch—don't throw it in the compost. If the borer holes are in the main trunk or a big limb you can't remove, the old-school Kiwi method works a treat: carefully poke a piece of flexible wire into the hole to skewer the grub inside.
At Jungle Story, we love helping New Zealand gardeners get the best out of their plants. From healthy lemon trees to all the gear and advice you need, we connect you with trusted local sellers for every step of your journey. Explore our full range and find your next green addition at https://junglestory.co.nz.