It feels like raised wooden garden beds are showing up in backyards all over New Zealand lately, and for good reason. They're a brilliant fix for some of our most common gardening headaches, whether you're battling heavy clay soil or dealing with our famously unpredictable weather. Simply put, they make gardening more productive and a whole lot easier on the back.
Why Raised Garden Beds Work So Well in NZ
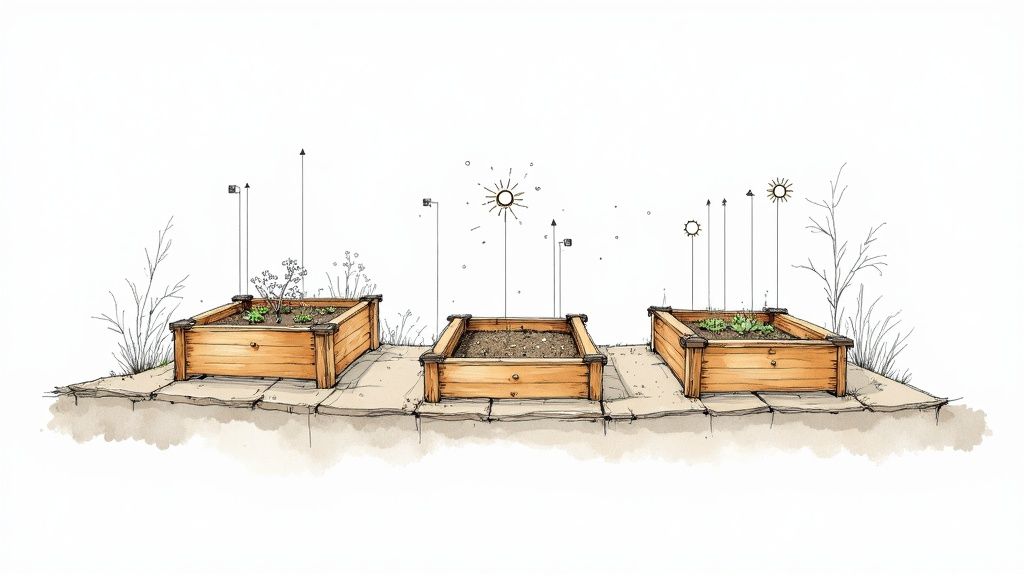
It doesn't matter if you have a tiny urban plot in Wellington or a bit more room to move in Canterbury, a raised wooden garden bed gives you a serious advantage. The biggest win? You get complete control over your soil.
Instead of spending years trying to improve dense clay or sandy ground, you can fill your bed with a perfect, nutrient-rich blend right from day one. This gives your plants the best possible start, which means healthier growth and, eventually, a much better harvest.
Get a Head Start on the Growing Season
One of the cleverest things about a raised bed is how quickly the soil warms up in spring. The sun hits the exposed wooden sides, warming the soil inside much faster than the ground. For us Kiwi gardeners, this means you can get your spring crops like lettuces and spinach in the ground much earlier, often in September or October.
This effectively stretches out your growing season, giving you more time for successive plantings and keeping your garden productive for longer.
Superior Drainage for Wet Winters
New Zealand's weather can be notoriously wet, especially from June to August. In a standard garden, this can mean waterlogged soil and root rot, which is a fast way to kill your plants. Raised garden beds solve this problem beautifully.
Because the bed is elevated, any excess water drains away freely. This stops the soil from becoming a compacted, soggy mess and is an absolute game-changer for growing winter crops like garlic and broad beans that demand well-drained soil to survive.
The boom in raised garden beds across New Zealand is part of a bigger picture. With section sizes shrinking and more of us wanting to grow our own fresh produce, they just make sense. Studies have shown these beds can boost your yield by up to 30% compared to a traditional in-ground patch, all thanks to better drainage and that early spring warmth.
But it’s not just about getting more veggies. The raised height saves your back from all that bending, making gardening a more enjoyable hobby you can stick with for years. For more inspiration, have a look at our other great garden ideas for NZ backyards.
Choosing the Right Timber for Your Garden Bed
Picking the right timber for your raised beds is probably the most crucial decision you'll make at the start. It's what determines how long your garden will last, how safe your soil will be for growing veggies, and how well it'll hold up to our wild New Zealand weather. Get this part right, and you’re setting yourself up for years of happy gardening.
You’re essentially looking at two main paths: go with a naturally tough, untreated timber, or choose a more budget-friendly treated pine. Both have their place, but it's worth weighing up the pros and cons before you pull out your wallet.
The Kiwi Favourite: Untreated Macrocarpa
For heaps of Kiwi gardeners, especially if you're leaning towards organic methods, Macrocarpa is the gold standard. It's a durable softwood packed with natural oils, which means it’s brilliant at resisting rot and insects all on its own—no nasty chemicals needed.
That natural resilience is a massive win when you’re growing food. You get total peace of mind that nothing from the timber is leaching into the soil where your kai is growing.
In New Zealand, our damp climate and love for sustainable gardening make timber choice a big deal. Macrocarpa is hands-down the most popular timber for raised beds because it naturally fights off rot, perfect for organic setups. A well-built Macrocarpa bed can last upwards of 15 years, which is a world away from untreated pine that might rot out in just two or three seasons. You can find more tips on choosing the best timber for NZ conditions here.
Yes, Macrocarpa costs a bit more upfront than treated pine, but its incredible lifespan often makes it the smarter choice financially in the long run. You simply won't have the hassle of rebuilding your beds every few years.
A Quick Look at Treated Pine
Treated pine is the other common option you'll see, mainly because it's so much cheaper. The timber is pressure-treated with chemicals to stop it from rotting and getting eaten by bugs, which is why it can survive in our damp environment.
This is where you need to be a bit careful, though. Older treated pine (often called CCA) had arsenic in it, which understandably made people worry about it getting into their garden soil. Modern treatments are considered much safer, but a lot of gardeners still prefer to play it safe.
If you do go with treated pine to keep costs down, I'd strongly recommend lining the inside of the bed.
- Use a food-safe plastic liner: Look for a thick, non-leaching plastic like a pond liner. You can staple it directly to the inside walls of your bed.
- Install it correctly: Make sure the liner covers all the timber on the inside, but leave the bottom open to the ground. You need that drainage!
This one simple step creates a solid barrier between the treated wood and your precious soil. It’s a great compromise that gives you an affordable garden structure without compromising the health of your homegrown produce.
Timber Comparison for NZ Raised Garden Beds
To make things a bit clearer, here’s a quick rundown of the most common timber options you’ll find here in New Zealand. Thinking about how long you want your beds to last versus your initial budget is key.
| Timber Type | Average Lifespan (Untreated) | Best For | Safety Note |
|---|---|---|---|
| Macrocarpa | 10-15+ years | Organic veggie gardens, long-term garden structures. | Naturally rot-resistant, no chemicals needed. Completely food-safe. |
| H4 Treated Pine | 15-20+ years | General landscaping, ornamental gardens, or veggie gardens if lined. | Contains chemical preservatives. Lining with food-grade plastic is essential for growing edibles. |
| Untreated Pine | 2-4 years | Temporary or very short-term garden projects. | Breaks down very quickly in NZ's damp soil. Not recommended for a lasting garden. |
| Recycled Hardwoods | 20-30+ years | A premium, long-lasting and sustainable option. | Ensure it's untreated if from an unknown source. Can be very expensive and hard to find. |
Ultimately, choosing between something like durable Macrocarpa and budget-friendly (but lined) treated pine depends on your gardening philosophy and how long you plan to be in one spot. Either way, you can build something fantastic.
Getting Your Raised Bed Planned and Assembled
Right, this is where the fun starts and your garden vision begins to take shape. With your timber sorted, it’s time to literally lay the groundwork for a thriving, beautiful veggie patch. A bit of careful thought now will save you a world of headaches later on and give your plants the best possible start.
The first job, and easily the most critical, is picking the perfect spot. Most of our favourite veggies – especially sun-lovers like tomatoes, courgettes, and capsicums – need a solid six to eight hours of direct sun each day. I'd recommend spending a day just watching your backyard to see which areas get the most sun, especially during our main growing seasons from September through to March.
Don't forget about convenience, either. Placing your raised beds close to the kitchen door or a tap makes daily watering and nipping out for a handful of herbs so much easier.
Nailing the Dimensions
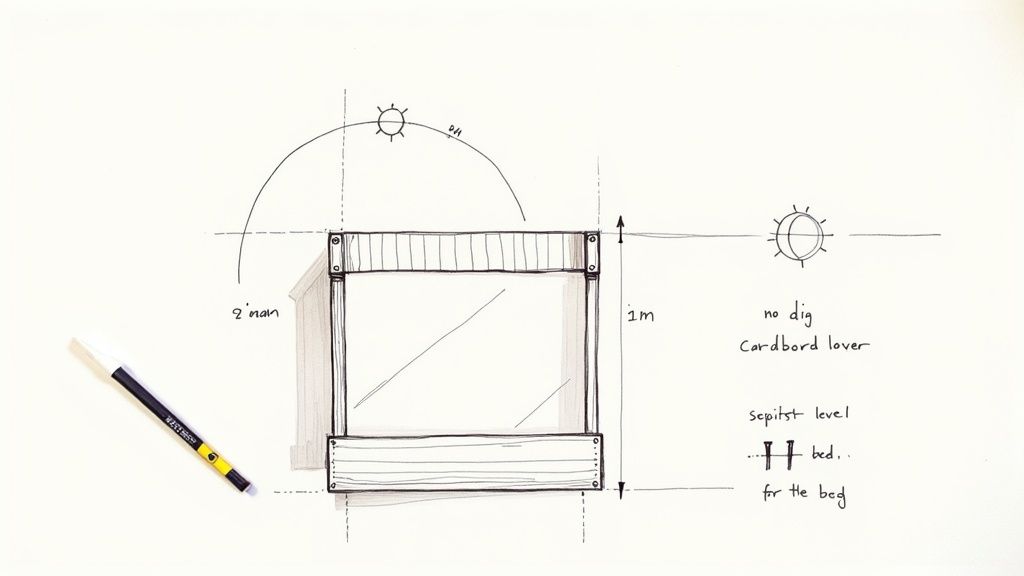
The size of your bed has a huge impact on how easy it is to work with. While you can make it as long as your space allows, the width is the one measurement you really want to get right.
I always suggest aiming for a maximum width of 1.2 metres. This is the sweet spot that lets you comfortably reach the centre from either side without ever having to step on your precious soil. If you're building it up against a fence or a wall, stick to about 75cm wide – that’s about as far as most of us can comfortably reach across.
It's so important to keep the soil in your raised bed loose and uncompacted. This is what allows roots to grow freely, helps with drainage, and gives beneficial critters like earthworms room to do their thing. Stepping into the bed squashes that delicate structure, pretty much undoing all the benefits of having a raised bed in the first place.
This practical, efficient approach to gardening is a big reason why growing your own is having such a moment. The global market for raised garden beds is booming as more people look for simple ways to grow food at home. You can read more about the trends driving this gardening movement if you're curious.
Prepping the Ground
Once you’ve marked out your spot, you need to get the ground ready. And don't worry, this doesn't mean you have to spend hours digging up stubborn lawn. The 'no-dig' method is your best friend here.
- Clear the site: First up, get rid of any big rocks, sticks, or persistent weeds from the area.
- Lay down cardboard: Grab a good layer of plain, unwaxed cardboard and lay it directly over the grass or weeds. Make sure you overlap the edges generously to block out all the light. This will smother whatever is underneath, which will eventually break down and feed your soil.
- Give it a soak: Wet the cardboard down with the hose. This helps it mould to the ground and kicks off the decomposition process.
Putting it All Together
Whether you're working with a kitset or building from scratch, the end goal is a sturdy, level structure. Get a spirit level out to make sure your frame is sitting even on all sides. If your bed is on a lean, water will just pool in one corner, which can lead to soggy soil and unhappy plant roots.
Make sure you secure the corners firmly with galvanised screws; they’ll stand up to our damp climate without rusting. Once it's all assembled and sitting in its final spot, you're ready for the most important part: filling it with the perfect soil mix.
How to Create the Perfect Soil Mix
The secret to an incredible harvest from your raised wooden garden beds has very little to do with the timber frame. It's all about what you put inside. Creating a rich, living soil is the single most important thing you can do to grow healthy, productive plants.
Forget spending a fortune on countless bags of potting mix. A far better and more sustainable approach is to build your soil from the ground up using layers of organic material, a technique many gardeners call 'lasagne gardening'. This method mimics a natural forest floor, creating a thriving ecosystem right in your backyard.
This layering process not only builds incredible fertility but also saves you a bit of money by using organic waste from your own garden and kitchen. It’s about creating a soil structure that holds moisture, drains well, and provides a slow release of nutrients all season long.
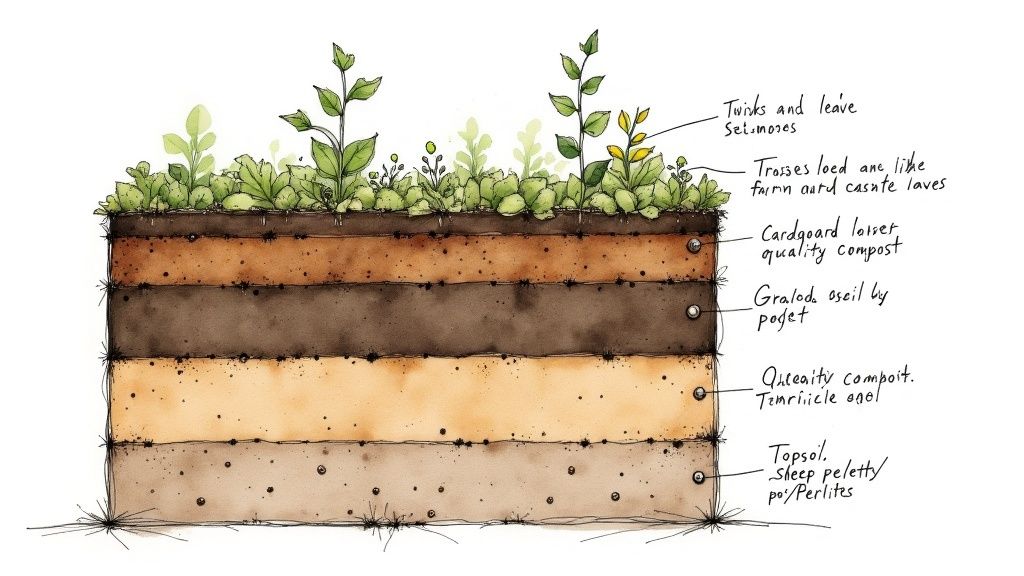
Building Your Bed from the Bottom Up
The first layer in your new bed is all about drainage and long-term nutrients. You'll want to use bulky, carbon-rich materials that break down slowly over time.
Start by laying down twigs, small branches, and woody prunings at the very bottom. On top of this, add a thick layer of autumn leaves, untreated grass clippings, or straw. This bulky base creates essential air pockets, which stop the soil from becoming waterlogged and help roots breathe. It also becomes a long-term food source for beneficial soil life.
A common mistake is to simply fill a raised bed with standard topsoil or dirt from another part of the garden. This soil often lacks the structure and nutrients needed for intensive vegetable growing and can become heavily compacted, starving plant roots of oxygen.
Building these layers ensures your bed will be full of life from day one, setting the stage for a fantastic growing season.
The Perfect Recipe for Your Growing Medium
Once your base layers are in, it's time to add the main growing medium. This is the top 30 cm or so where your plants’ roots will do most of their work. The ideal mix is a balanced blend that provides structure, nutrients, and moisture retention.
A simple, effective recipe many Kiwi gardeners swear by is the "thirds" method:
- One-third quality compost: This is the powerhouse of your mix, providing essential nutrients and beneficial microbes. If you have your own, that's perfect. If not, look for a locally sourced, well-rotted compost.
- One-third topsoil or garden loam: This adds substance and minerals to your mix, helping to anchor plant roots.
- One-third aeration material: Perlite, pumice, or even coarse sand improves drainage and keeps the soil light and fluffy.
To give your plants an extra boost, mix in some classic NZ garden amendments like sheep pellets or blood and bone. These provide a slow-release source of nitrogen and other key nutrients.
If you’re interested in making your own garden gold, you can learn more about how to start composting at home and create an endless supply of nutrients for your garden.
With this rich, layered soil, your raised wooden garden beds will become a powerhouse of productivity.
Planting and Care Through the NZ Seasons
Alright, your raised bed is built and filled with that beautiful, rich soil. This is where the real fun begins—planting! One of the absolute best things about raised wooden garden beds is how much kai you can grow all year round, simply by working with New Zealand's distinct seasons.
A little bit of planning at this stage goes a very long way. If you start thinking a season ahead, you can have seedlings ready to pop in the moment a space opens up. It’s the secret to keeping your garden constantly productive.
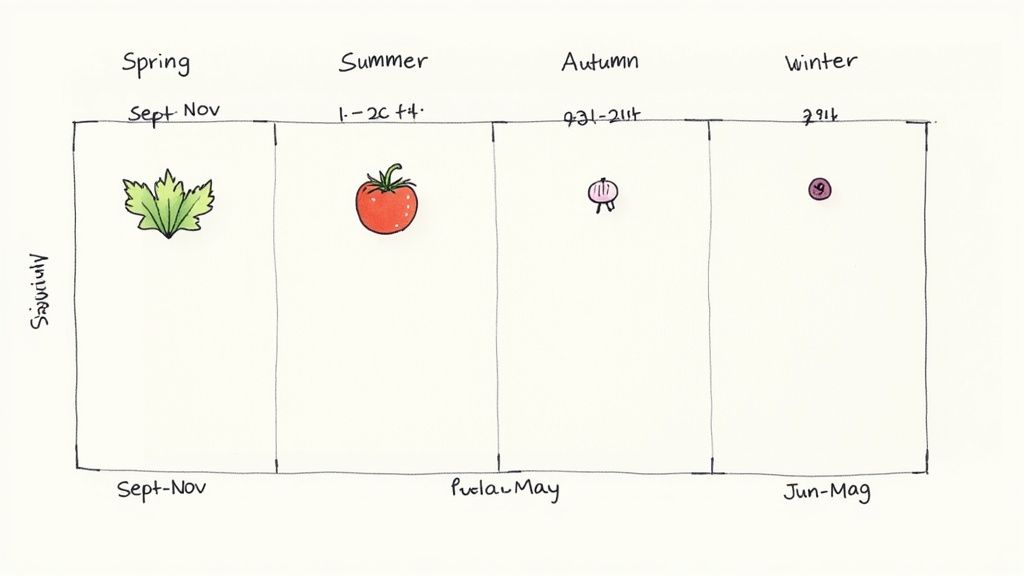
Your NZ Seasonal Planting Calendar
Here’s a simple guide to keep your garden pumping, no matter what the weather is doing. This calendar is tailored to our unique climate, whether you're enjoying a balmy Northland summer or a crisp southern winter.
-
Spring (September - November): The soil is finally warming up, which means it’s go-time for leafy greens and fast-growing roots. Get your lettuces, spinach, rocket, radishes, and spring onions in for some early harvests. This is also the perfect moment to sow seeds for all those summer favourites.
-
Summer (December - February): This is peak season for anything that loves the sun. Think tomatoes, courgettes, capsicums, beans, and cucumbers. Just remember to keep the water up to them as the summer heat really kicks in. For a detailed look at getting the timing just right, have a read of our guide on when to plant tomatoes in New Zealand.
-
Autumn (March - May): As things start to cool down, the conditions become ideal for brassicas. It’s time to plant your broccoli, cauliflower, cabbage, and kale. You can also sneak in another round of leafy greens and root veggies like carrots and beetroot.
-
Winter (June - August): Don't hang up your trowel just yet! Winter is prime time for planting garlic, broad beans, and onions. If you're in a milder part of the country, you can keep harvesting hardy greens like kale and silverbeet right through the cold months.
Essential Care for a Thriving Garden
Planting is just the start. A few simple care routines will keep your raised beds healthy and bursting with produce. These little jobs don't take much time but they make a massive difference to your plants' health and how much you get to harvest.
One of the best watering tricks for raised beds is to water deeply but less often. Giving the soil a good, long soak every few days encourages plant roots to grow deeper, making them stronger and far more resilient during dry spells.
This deep-watering approach is much better than a quick, daily sprinkle, which only wets the top layer and leads to shallow, weak root systems.
Another game-changer is mulching. A thick layer of pea straw, bark, or even raked-up autumn leaves spread over the soil works wonders. Mulch is brilliant for retaining soil moisture, keeping weeds down, and it slowly breaks down to add precious organic matter back into your bed.
Finally, don't forget to feed your soil. At the beginning of each new season, I make a point of topping up the bed with a generous 5-10 cm layer of fresh compost. This simple step replaces the nutrients your last crop used, ensuring the soil stays fertile and ready for whatever you're planting next. It's really all you need to do to keep your garden ecosystem in top shape.
Got Questions? We've Got Answers
Getting started with raised wooden garden beds usually sparks a few questions. We've pulled together some of the most common ones we hear from fellow Kiwi gardeners to give you clear, straightforward advice.
Thinking through these details now will help you sidestep common mistakes and build a garden that's not just productive, but a real joy to look after.
How Deep Should a Raised Wooden Garden Bed Be?
The honest answer? It really hinges on what you’re hoping to grow. For most veggies, especially root crops like carrots and potatoes that need a bit of room to stretch out, a depth of at least 30cm is perfect.
If you're building on top of poor, compacted clay or even a concrete patio, giving your plants a deeper bed of 40-60cm will make a world of difference to their happiness. On the other hand, for shallow-rooted things like lettuce, spinach, and most herbs, you can easily get away with a depth of just 20cm.
Should I Line the Bottom of the Bed?
It’s a fantastic idea, and one we highly recommend. The easiest trick in the book is to lay down a layer of plain, unwaxed cardboard directly on the ground before you add any soil. This simple step smothers any grass or weeds by blocking out the sunlight, and it will eventually break down, adding some nice organic matter to your soil.
If you have ongoing battles with pests like rabbits trying to tunnel into your garden, laying down wire mesh or hardware cloth at the base is a brilliant defensive move. It creates a physical barrier they can't get through while still allowing for excellent drainage.
Taking this one small step now will save you countless hours of weeding down the track.
How Often Do I Need to Replace the Soil?
This is one of the absolute best things about gardening in a raised bed—you almost never have to replace the soil. You'll notice the soil level will naturally drop by a few centimetres each season as your plants use up nutrients and the organic matter decomposes.
Instead of a full replacement, all you need to do is amend it. At the beginning of each growing season (usually spring and again in autumn), just top it up with a generous 5-10cm layer of high-quality compost. Gently work this into the top few inches of the existing soil, and you'll replenish all the vital nutrients, keeping your soil structure healthy and ready for the next round of planting.
Ready to create your own thriving garden? At Jungle Story, we offer a huge selection of plants, seeds, and garden supplies to get you started. Explore our range and get everything you need delivered right to your door at https://junglestory.co.nz.