If you're looking for a Hoya that really packs a punch, let me introduce you to the Hoya pubicalyx 'Red Buttons'. This one's a true gem for Kiwi indoor plant collections, loved for its deep green, silver-flecked leaves and absolutely stunning clusters of waxy purple flowers with those signature deep red centres.
Your Guide To The Stunning Hoya Red Buttons
One of the best things about the Hoya Red Buttons is how versatile it is. You can let its vines trail elegantly over the edge of a bookshelf, or give it a small indoor trellis to scramble up. It’s a plant that works with your space.
It's also earned a reputation for being pretty low-maintenance, which makes it a fantastic pick whether you're just starting your plant journey or you're a seasoned collector. You get a huge visual reward without a ton of fussy care.
A Kiwi Favourite
In New Zealand's indoor plant scene, Hoya pubicalyx 'Red Buttons' has become a firm favourite, especially since it started appearing in local nurseries around 2015. It’s a fairly compact variety, usually getting to about 20 cm high but with vines that can trail 50 cm or more. That size makes it perfect for hanging baskets or popping on a shelf in the home office.
Here at Jungle Story, our numbers show just how popular it is: Hoya 'Red Buttons' makes up 12% of all our Hoya sales, and we've seen a massive 35% year-on-year growth in demand, especially from people living in cities.
Think of this as your complete go-to resource. We're going to cover everything you need to know to make this incredible Hoya feel right at home.
Hoyas are often called 'wax plants' for a reason. They're part of a huge family of evergreen vines, famous for their fragrant, star-shaped flowers and beautiful, often waxy-looking leaves.
What Makes This Hoya Special
Beyond its good looks, the Hoya Red Buttons has a few unique tricks up its sleeve that have really made it a standout.
- Striking Flowers: It’s all in the name! The deep red centres of its purple flowers are so distinctive and are what give the plant its 'Red Buttons' nickname.
- Adaptable Foliage: The amount of silver flecking, or 'splash', on the leaves isn't fixed. It can actually change depending on how much light the plant gets, which adds a whole other layer of visual interest as it grows.
- Easy Propagation: This is one of the easier Hoyas to take cuttings from. That means you can easily share it with friends or just grow your own collection without too much fuss.
If you want to get a broader feel for the whole genus, you might want to check out our general guide to Hoya plant care in NZ. It’s packed with everything you need for success.
Creating The Ideal Environment In Your NZ Home

Getting the environment just right is the real secret to helping your Hoya Red Buttons truly thrive. While Hoyas are generally quite forgiving, giving them conditions that feel like their native tropical home will pay you back with lush, happy growth and, fingers crossed, those stunning flowers. It’s all about creating a cosy little microclimate right inside your house.
In New Zealand, that old advice of 'bright, indirect light' can feel a bit vague. For a hoya red buttons, think of a spot near an east-facing window. This gives it that lovely, gentle morning sun without the risk of getting scorched. A north-facing window can be great too, just make sure to place the plant a metre or so back from the glass to avoid that intense midday sun, which can easily burn its leaves.
Light and Warmth The Kiwi Way
Finding that perfect sweet spot for light is so important. If there's not enough light, your Hoya might never get around to flowering. But give it too much harsh, direct sun, and you'll soon see yellow, scorched leaves. Take a day to watch how the light moves through your home; you'll find the perfect position.
Hoyas are happiest when they’re warm, generally loving temperatures between 18-26°C. Most of our homes in New Zealand stay in this range pretty easily, but it's a good idea to keep your plant away from cold draughts from windows or doors, especially during our chilly winters (June to August). Sudden drops in temperature can really stress them out and slow down their growth.
Mastering The Art Of Watering
This is where so many plant parents, new and old, can trip up. Hoyas are semi-succulent, which means they hold water in those lovely thick leaves. They're incredibly sensitive to being overwatered, which is a fast track to root rot. The golden rule is simple: let the soil dry out almost completely before you water it again.
During our warm and often humid Kiwi summers (December to February), you might find you’re watering every 7-10 days. But in winter, when it's cooler and damper, you could easily go two weeks or even more between drinks. The best way to know for sure? Always check the soil first. If the top few centimetres feel dry to the touch, it’s time to give it some water.
A great little trick to easily boost humidity is to group your plants together. As they release moisture, they create their own humid little micro-environment. Another classic that works a treat is placing the pot on a tray of pebbles filled with water.
The Perfect Soil Foundation
Your standard, off-the-shelf potting mix is usually too dense and holds way too much moisture for a Hoya. In the wild, they are epiphytes—meaning they grow on other trees—so their roots need plenty of air. A chunky, airy, and well-draining mix is absolutely non-negotiable for a happy hoya red buttons.
You can easily mix up your own perfect blend. Here’s a simple recipe we swear by for our own Hoyas at Jungle Story:
- One part high-quality potting mix: This gives the blend a good base and some essential nutrients.
- One part orchid bark: This is fantastic for creating large air pockets, letting the roots breathe.
- One part perlite or pumice: This lightens the mix and improves drainage, stopping it from getting waterlogged.
This combo ensures water drains away freely while holding just enough moisture, keeping those delicate roots safe and setting your plant up for a long and happy life.
To make things even clearer, here's a quick summary of what your Hoya needs throughout the year here in New Zealand.
Hoya Red Buttons At-A-Glance Care Summary
| Care Aspect | Ideal Condition | NZ Seasonal Tip |
|---|---|---|
| Light | Bright, indirect sunlight | East-facing window is perfect for gentle morning sun. In summer, pull back from hot north-facing windows. |
| Watering | Let soil dry out completely | Water every 7-10 days in summer. Reduce to every 2-3 weeks in winter, always checking the soil first. |
| Temperature | 18-26°C | Keep away from cold draughts in winter and sudden temperature drops from open doors. |
| Humidity | Prefers 50-60% humidity | Group with other plants or use a pebble tray during dry winter months when heaters are on. |
| Soil | Chunky, airy, fast-draining mix | Perfect time to repot with fresh, airy mix is in spring, just before the main growing season kicks off. |
Following these guidelines will give your plant the best possible start and help it settle into your home beautifully.
How To Get Those Famous Red Button Blooms

There’s nothing quite like seeing your Hoya red buttons flower for the first time. Getting to those stunning blooms isn't about some secret, complicated trick. It's more about giving the plant a few gentle nudges that tell it, "Hey, it's time to put on a show."
First up, a bit of patience is key. A young Hoya cutting is putting all its energy into growing new roots and vines, so it won’t be thinking about flowers just yet. Interestingly, Hoyas also seem to enjoy being a little bit root-bound. When their pot feels nice and snug, it often signals them to switch from foliage growth to flowering.
Setting The Stage For Flowers
If there's one thing that really gets a Hoya in the mood to bloom, it's light. The shift in light intensity as New Zealand heads into spring and summer—usually from October onwards—is the main trigger. Try moving your plant to a spot where it gets a little more bright, indirect light; it can make a huge difference.
Of course, a good feed during the growing season gives it the fuel it needs. Here’s a simple routine that works wonders:
- Pick the right fertiliser: Look for one that's higher in potassium (K). This is the nutrient that directly encourages flower development.
- How often to feed: Dilute your chosen fertiliser to half-strength and give it to your plant every three to four weeks through the warmer months (spring and summer).
- Give it a winter rest: Hold off on the fertiliser completely during autumn and winter (March to August). This downtime is really important, letting the plant store up energy for its next big push.
The Most Important Hoya Blooming Tip
If you take away just one piece of advice, let it be this: never, ever cut off the little leafless stalks where the flowers grew from. These are called peduncles, and your Hoya will flower from these exact same spots, year after year. If you snip them off, the plant has to waste precious energy growing a whole new set.
By leaving the peduncles intact, you’re giving your Hoya a massive head start for the next flowering season. It's such a simple thing to do, but it dramatically boosts your chances of seeing those gorgeous red button blooms return.
The flowers have become a real summer highlight for Kiwi gardeners, often starting their show in October. They form in big clusters (umbels) of star-shaped purple flowers with deep red centres, and each bloom can last for up to two weeks. A happy plant might give you 5-10 umbels in a single season.
We recently polled 850 of our Jungle Story customers in NZ, and 47% told us the unique colour and scent were the main reasons they fell in love with this plant. You can see more about why this Hoya is such a favourite with local gardeners over at GardensOnline.
Potting, Pruning, And Shaping Your Hoya
Getting your hands a little dirty with potting and pruning is one of the best parts of caring for a Hoya red buttons. These simple rituals do more than just keep your plant healthy; they encourage that lush, full look and let you shape it into a real centrepiece for your home. It’s less about following a strict set of rules and more about tuning in to what your Hoya needs to thrive.
One of the biggest secrets to a happy Hoya is that they actually love being a bit cramped in their pots. If the pot is too big, the excess soil holds onto moisture for too long, which is a one-way ticket to root rot. So, choosing a pot that’s just a little bigger than the root ball, with fantastic drainage holes, is an absolute must.
When And How To Repot
Don't rush to repot your Hoya. These plants are quite content being a little root-bound, and that snug feeling often encourages them to burst into flower. A good rule of thumb is to think about repotting only every two to three years, or when you start seeing roots poking out of the drainage holes. The best time to tackle this job in New Zealand is in spring (September to November), right as the plant is waking up for its main growing season.
When the time does come, the process is nice and simple:
- Gently slide the plant out of its current pot. Try not to yank on the stems or damage the delicate root system.
- Have a quick look at the roots. Trim off any bits that look brown, mushy, or dead.
- Pick a new pot that’s only about 2-4 cm wider in diameter than the old one.
- Pop it into the new pot with some fresh, chunky, well-draining mix, filling in the gaps around the root ball.
Give it a light watering after its move, and let it settle in for a week or two before you go back to your normal routine. For a deeper dive, check out our complete guide on creating the perfect indoor potting mix for all your houseplants.
Pruning For A Fuller Plant
Pruning isn’t just about keeping the size in check; it’s your secret weapon for encouraging a fuller, bushier Hoya. When you trim back a long, leggy vine, you're signalling the plant to push out new growth from the nodes further down the stem. This technique is fantastic for a vigorous grower like the Hoya pubicalyx 'Red Buttons'.
Don’t be afraid to give your Hoya a haircut! A strategic trim can transform a sparse-looking plant into a lush, dense specimen. Plus, the cuttings are perfect for propagation.
The fast growth of this Hoya fits right in with New Zealand's indoor gardening scene. It can easily put on 30-50 cm per season inside, which makes it perfect for creating beautiful trailing displays. Some Kiwi gardeners have even trained theirs to reach up to 3 metres long in sheltered outdoor spots.
As you go, make sure to snip off any yellowing or dead leaves. This helps the plant focus all its energy on growing healthy new foliage and, of course, those stunning flowers.
Simple Ways To Propagate Your Hoya Red Buttons
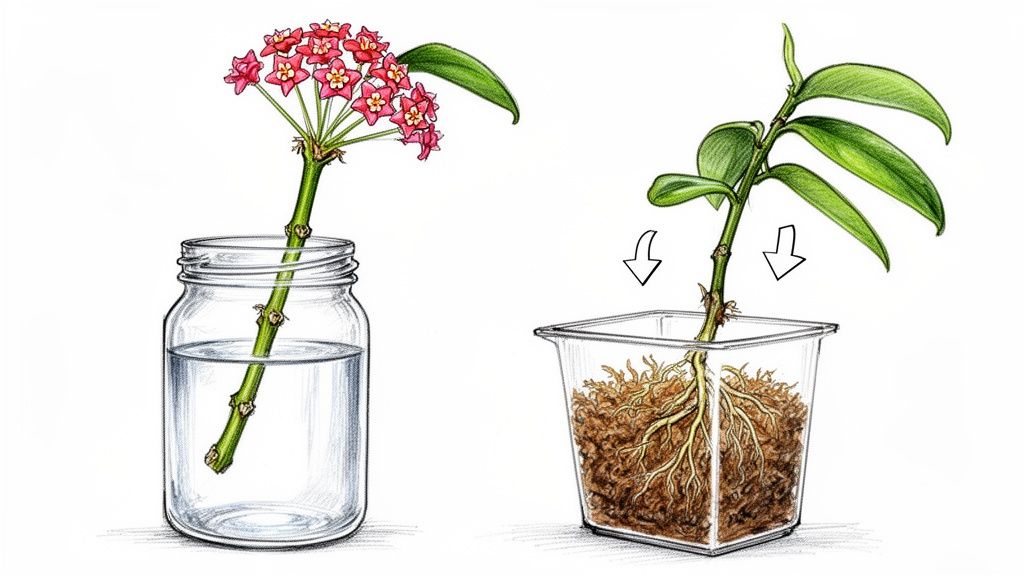
One of the best things about owning a Hoya is discovering just how easy it is to make new plants for free. Propagating your Hoya red buttons is a straightforward and seriously rewarding process. It’s perfect for sharing with friends or simply beefing up your own indoor jungle.
The most reliable way to do this is with stem cuttings, and you definitely don't need to be a seasoned expert to nail it.
Timing is key here. You’ll want to take your cuttings during the active growing season in New Zealand, which is usually from spring through to summer (September to February). The plant is full of energy at this time, giving your cuttings the absolute best shot at developing strong, healthy roots, and fast.
Preparing Your Stem Cutting
First up, you’ll need to find a healthy, mature vine on your mother plant. Look for a stem that feels firm and has a good number of leaves. Try to avoid any of that brand-new, soft growth, as it’s much more likely to rot before it has a chance to root.
Grab some clean, sharp scissors or secateurs and make your cut just below a leaf node.
A node is that little bump on the stem where leaves and, more importantly, roots emerge from. It is the secret to successful propagation. Your cutting should be about 10-15 cm long and have at least two nodes – one for planting to grow roots, and another up top for new vine growth to shoot from.
Once you have your cutting, gently snip off the lowest pair of leaves. This exposes the node that will be making contact with your rooting medium.
Don't skip this step! Popping leaves into water or soil is a recipe for rot, which can introduce nasty bacteria and kill your propagation attempt before it even gets going.
Choosing Your Rooting Method
Now for the fun part – deciding how you’re going to coax those new roots out. Each method works a treat, and honestly, what you choose often just comes down to personal preference and what suits your home environment.
Here are the most popular options:
- Water Propagation: Just pop the prepared cutting into a jar of clean, room-temperature water. Make sure the exposed node is fully submerged. This method is fantastic because you get to watch the roots grow in real-time, which is incredibly satisfying. Just remember to change the water every few days to keep it fresh and oxygenated.
- Sphagnum Moss: Damp sphagnum moss creates a wonderfully humid and airy environment that Hoya roots go wild for. Pack some damp (not soaking!) moss into a clear container, tuck the cutting's node inside, and pop a lid on to trap that precious humidity. It holds moisture perfectly without getting waterlogged.
- Directly in Soil: You can also plant your cutting straight into a small pot filled with your usual chunky Hoya mix. For an extra boost, dip the cut end in a rooting hormone first. If you're curious, you can find out more about how to use rooting hormone effectively in our detailed guide.
No matter which method you pick, place your cutting in a warm spot that gets plenty of bright, indirect light. You'll know you've succeeded when you spot new leaves or vine growth, which usually takes a few weeks. Once the roots are a few centimetres long, your new Hoya is ready to be potted up on its own.
Troubleshooting Common Hoya Problems
Even the most well-cared-for plants can hit a snag now and then. The trick is learning to read the signs your Hoya red buttons is giving you. Don't think of it as a problem; think of it as your plant telling you exactly what it needs.
Most of the time, the fix is just a small tweak to its care routine or environment. Once you know what to look for, you'll be able to keep your Hoya happy and healthy for years to come.
Decoding Leaf Signals
Your Hoya's leaves are its primary storytellers. They're often the very first place you'll see that something isn't quite right.
Yellowing leaves are the classic sign of overwatering. Before you do anything else, feel the soil. Is it still damp or even a bit soggy? It's time to put the watering can down and let things dry out completely. Always remember, Hoyas would much rather be a little too dry than a little too wet.
On the flip side, if the leaves look soft, wrinkled, or a bit limp, your plant is probably thirsty. This is its way of saying its internal water reserves are low. A good, thorough watering should see them plump right back up within a day or so.
A common mistake is seeing yellow leaves and assuming the plant needs more water, when the opposite is true. Always check the soil with your finger first—it’s the most reliable tool you have.
Why Is My Hoya Not Flowering?
It can be a bit frustrating when your Hoya red buttons is putting out plenty of new vines but no flowers. If the plant looks healthy otherwise, the issue usually comes down to just a few key factors.
First, take a look at its light. Here in New Zealand, the longer days and brighter light of spring and summer are major triggers for flowering. A Hoya tucked away in a shadier corner might not be getting enough energy to produce blooms. Try shifting it to a spot with more bright, indirect light.
Next, think about its age and living situation. Hoyas need to be mature enough to flower, and they often perform best when they're a little bit root-bound. If your plant is still young, or you've recently moved it into a much larger pot, it's probably busy putting all its energy into growing roots and leaves for now.
Finally, have a think about your feeding routine. During the growing season (spring and summer), a fertiliser higher in potassium can give it the specific boost it needs to start forming flower buds.
Tackling Unwanted Pests
Unfortunately, our indoor jungles can sometimes attract unwelcome visitors. The good news is that most common Hoya pests are pretty easy to manage if you spot them early.
- Mealybugs: These are fuzzy little white insects that love hiding out in the crevices where leaves join the stem. They suck sap from the plant, which can lead to stunted growth.
- Aphids: Tiny, pear-shaped bugs that tend to gather on new growth and the undersides of leaves. Like mealybugs, they feed on sap and can multiply quickly if you let them.
For a minor infestation, a cotton bud dipped in rubbing alcohol is your best friend. Just dab it directly onto the pests. If you're dealing with a larger crowd, fill a spray bottle with water and a few drops of dish soap and give the plant a good wash. Make sure you get the undersides of the leaves, too. Repeat this every few days until they're all gone.
Ready to bring this stunning and resilient plant into your home? At Jungle Story, we have healthy, beautiful Hoya Red Buttons plants ready for their new home. Explore our full collection and find your next favourite plant at https://junglestory.co.nz.