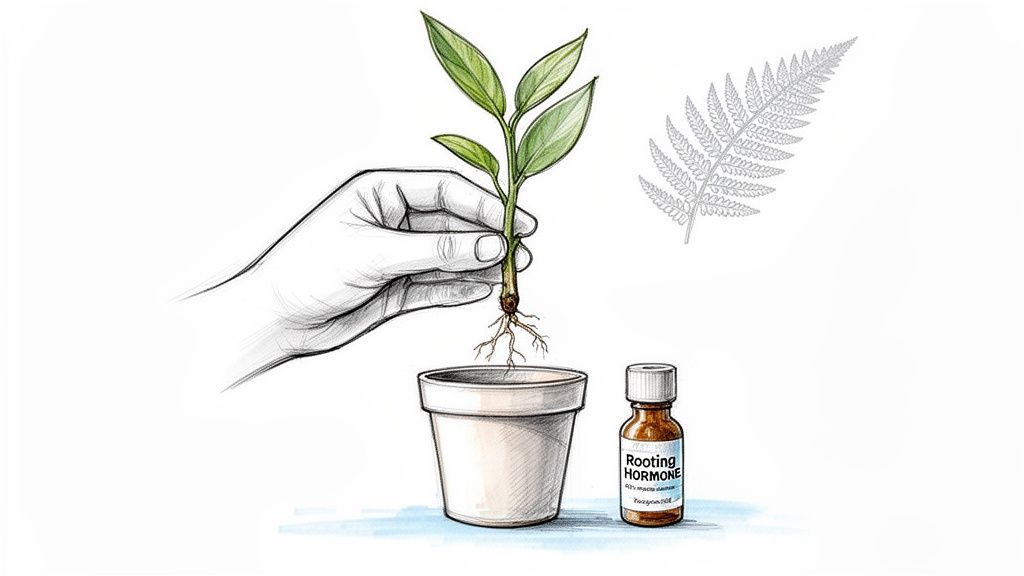
Ever wonder how some gardeners seem to have a magical ability to multiply their favourite plants? The secret isn't magic, but it's close: rooting hormone. It’s a powerful tool that gives plant cuttings a serious head start on life.
Think of it as a personal trainer for your cuttings, pushing them to focus all their energy on growing a strong, healthy root system instead of just clinging to survival.
Giving Your Plant Cuttings a Head Start
There’s nothing quite like propagating plants from cuttings. It’s a fantastic way to create new plants for free, share your favourites with mates, and fill your home and garden with more of what you love. But as any keen gardener knows, not all cuttings are created equal. Some will happily sprout roots with little fuss, while others need a bit of a nudge.
This is where finding the right rooting hormone in NZ can make all the difference. We’ve put this guide together specifically for Kiwi gardeners, keeping our unique seasons and the incredible variety of plants we grow in mind—from lush indoor ferns to hardy native shrubs.
Why Bother with a Rooting Hormone?
When you snip a cutting from its parent plant, you’re essentially cutting it off from its life support. Its one and only job is to grow new roots, and fast. A rooting hormone gives it a concentrated dose of auxins—the natural plant hormones responsible for signalling root growth—right where it’s needed most.
This targeted boost has a few key benefits:
- Higher Success Rate: It dramatically increases the chances of a cutting taking root, especially for trickier plants like roses or hydrangeas.
- Faster Root Growth: Cuttings treated with rooting hormone almost always develop roots much faster than untreated ones.
- Stronger Root Systems: It encourages a more robust and sprawling root network, which means you end up with a healthier, more resilient new plant.
What This Guide Covers for Kiwi Gardeners
This guide is your complete walkthrough. We'll dive into the different types of rooting hormones available here in New Zealand, from classic powders to modern gels, and help you pick the best one for your plants. We’ll also give you clear, step-by-step instructions on how to use them for the best results.
For a new cutting to thrive, the growing medium is just as crucial as the rooting process itself. Once your cutting has developed roots, planting it in the right potting mix provides the essential nutrients and aeration for continued growth.
And if you're keen on sustainable gardening, we'll even share some clever DIY alternatives you can whip up from things you already have in the pantry or garden. For more on getting your new plant babies settled, check out our guide to finding the perfect indoor potting mix.
Right, let’s get ready to turn one plant into many.
How Rooting Hormone Works Its Magic
Right, so how does this magic dust actually work?
To get our heads around rooting hormones, we first need to appreciate just how clever plants are. These products aren't inventing something new; they're just giving a natural process a massive boost. Think of them as a concentrated shot of auxins – the master hormones that tell a plant when and where to grow roots.
When you snip a cutting from a mother plant, you’re essentially asking a piece of stem to do something pretty radical: grow a whole new root system from scratch. This is a big ask and puts the cutting under a lot of stress. Dabbing on a bit of rooting hormone is like giving it a clear, firm instruction: "Stop worrying about leaves for a minute, and put all your energy into making roots, now!"
This hormonal nudge kicks off a beehive of activity right at the cut. It tells the cells to start dividing and changing, forming a lumpy little mass called a callus. It’s from this callus that the first tiny, delicate roots will emerge, ready to find water and nutrients to fuel their new life.
The Science of a Nudge
A plant's own, naturally-occurring auxin is like a gentle whisper, guiding growth along. But the rooting hormones we buy, which usually contain a tough, stable synthetic version called Indole-3-butyric acid (IBA), are more like a confident command. It cuts through any confusion the cutting might have and focuses all its resources on one single, critical job: growing roots.
This focused approach gives you a few key advantages:
- Speed: It dramatically cuts down the waiting time for roots to show up.
- Success Rate: You'll get more of your cuttings to take, especially with notoriously fussy plants like camellias or daphne.
- Strength: It often results in a bigger, more vigorous root system, giving you a healthier, tougher young plant right from the get-go.
It's no surprise that gardeners are catching on. The global market for rooting hormone powder was valued at a whopping USD 799.2 million in 2024 and is expected to climb to USD 1.23 billion by 2032. This boom is all thanks to a growing interest in gardening and organic methods. For us Kiwi gardeners, this trend is great news – it means more advanced formulas and a wider range of products are becoming available. You can read more about the growing rooting hormone market and its trends.
You could say rooting hormone doesn’t give a plant a superpower it doesn’t already have. It just unlocks its innate potential to regenerate, turning a vulnerable cutting into a viable, independent plant with a much better shot at survival.
Why This Really Matters for Your Cuttings
Left to its own devices, a cutting has to rely on its limited stored energy and whatever natural auxins are floating around to even begin thinking about roots. For a lot of plants, this is simply too slow. The cutting often gives up the ghost – drying out, rotting, or succumbing to disease before it can grow the roots it needs to drink and feed itself.
By applying rooting hormone directly to the cut, you're creating the perfect conditions for success. You’re bridging that critical gap between being snipped off and becoming self-sufficient, giving your precious cuttings the absolute best start in life.
Choosing the Right Rooting Hormone for Your Plants
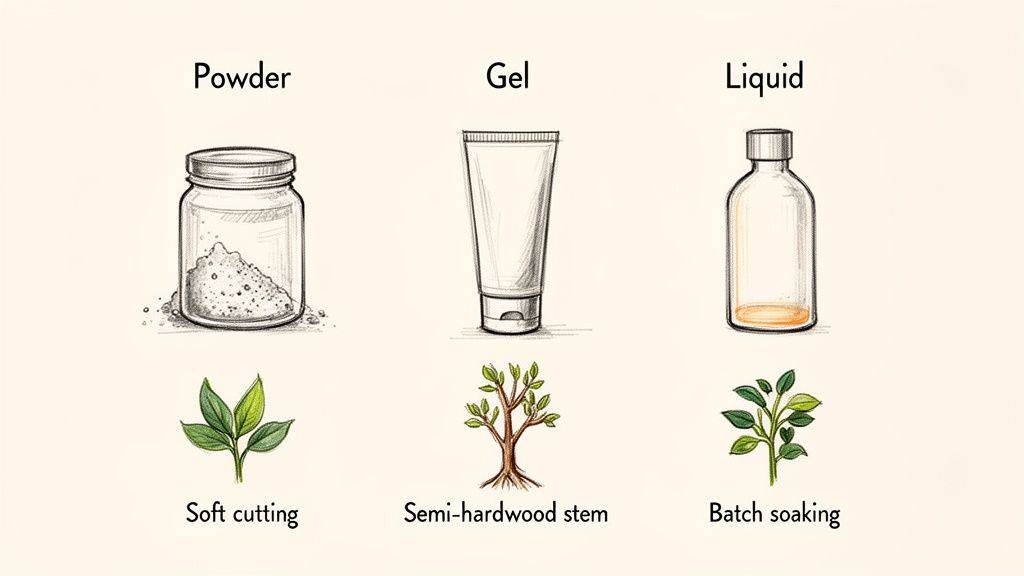
Pop into any local garden centre in NZ, and you'll quickly realise that rooting hormone isn't a one-size-fits-all product. You'll typically find three main forms on the shelf: powders, gels, and liquids.
Each has its own set of advantages, and the right one for you really boils down to what you're trying to grow and, honestly, a bit of personal preference. It's like having different tools in the shed – you pick the one that best suits the job. Getting a handle on the differences will make your choice easier and give your cuttings a much better shot at success.
Powder: The Classic Choice
Rooting powder is the old-school, tried-and-true option for countless Kiwi gardeners, and for good reason. It's usually the most budget-friendly of the lot and has an impressive shelf life when you keep it tucked away in a cool, dark spot.
Using it couldn't be simpler: just moisten the cut end of your stem, dip it in the powder, give it a gentle tap to shake off the excess, and then pop it into your potting mix. Powders are fantastic for handling individual cuttings. The main thing to watch for is cross-contamination; always tip a little powder out onto a separate dish for each batch instead of dipping cuttings directly into the main container.
Gel: A Modern Approach to Sealing and Protecting
Gels are a more recent innovation and have quickly become a favourite for many. Their biggest win is their thick, sticky consistency. When you dip a cutting, the gel clings to the stem, creating a perfect seal over the fresh wound.
This seal is brilliant for two reasons:
- It keeps the hormone in constant contact with the plant tissue, right where it’s needed to trigger root growth.
- It protects the cutting by forming a barrier against fungal nasties and diseases that can cause rot.
Gels are especially good for semi-hardwood cuttings—think lavender, rosemary, or hydrangeas—because the thick coating grips the woodier surface without fuss. They might cost a little more than powders, but many gardeners find the boost in success rates is well worth the extra coin.
Liquid: Maximum Versatility and Efficiency
If you're after flexibility, liquid rooting hormones are the way to go. They usually come as a concentrate that you dilute with water, which opens up a whole range of uses.
This makes them incredibly efficient for propagating in bulk. You can mix up a solution and soak a whole bunch of cuttings at once, saving heaps of time. This batch-soaking method also ensures every single cutting gets an even coating of hormone. Liquids are also the go-to for anyone using hydroponic or aeroponic setups, as the solution mixes seamlessly into the system's water supply.
To help you decide, here's a quick rundown of how the three types stack up.
Comparing Rooting Hormone Types: Powder vs Gel vs Liquid
| Hormone Type | Best For | Pros | Cons |
|---|---|---|---|
| Powder | Beginners, individual cuttings, and general-purpose use. | Cost-effective, very long shelf life, easy to use. | Can be messy, potential for inconsistent coating, risk of cross-contamination. |
| Gel | Semi-hardwood and hardwood cuttings, or high-value individual cuttings. | Excellent adhesion, seals and protects the wound, ensures constant contact. | More expensive than powder, can be a bit sticky to handle. |
| Liquid | Large batches of cuttings (soaking method) and hydroponic/aeroponic systems. | Highly versatile, ensures even coating, efficient for bulk propagation. | Shorter shelf life once diluted, requires careful measuring and mixing. |
Ultimately, there's no single "best" rooting hormone. It's all about matching the product to your plant and your process.
The key is to match its properties to your plant and process. For a few precious cuttings, a gel offers excellent protection. For bulk propagation, a liquid solution is highly efficient. And for general, all-purpose use, a powder is a reliable and economical starting point.
Whether you're taking soft new shoots from fuchsias in late spring or tougher cuttings from shrubs in autumn, picking the right form—powder, gel, or liquid—is the first step in giving your future plants the best possible start in life.
Your Step-by-Step Guide to Propagating Cuttings
Alright, this is where all the prep work pays off. There's something truly special about turning a simple piece of a plant into a whole new one – it's one of the most satisfying jobs in the garden. This guide will walk you through everything, from making that first snip to tucking your new plant baby in for its aftercare.
Let's get our hands dirty. We'll use some common Kiwi garden and indoor favourites like hydrangeas, roses, and fiddle-leaf figs to make these steps easy to picture and follow.
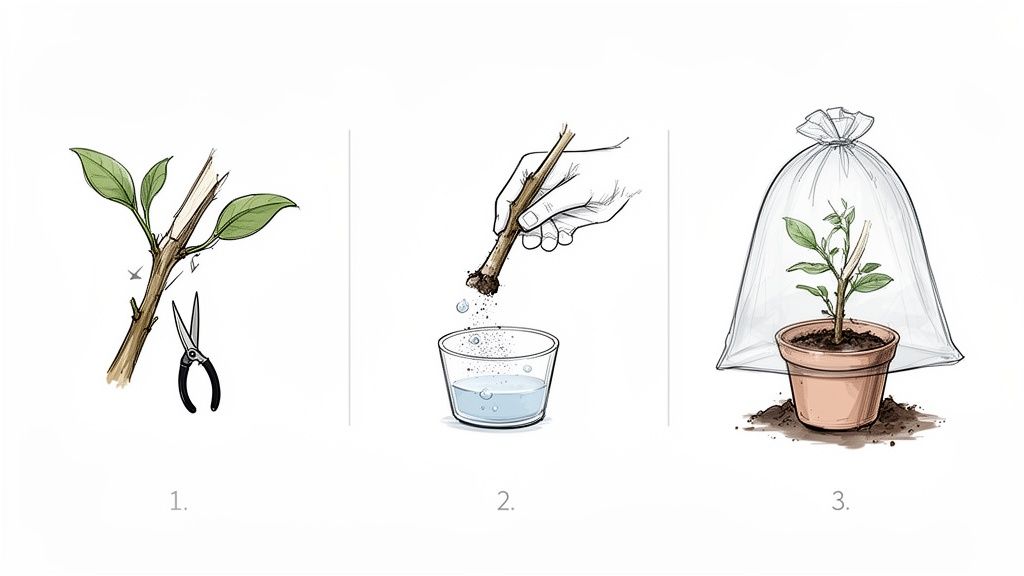
Step 1: Select and Prepare Your Cutting
Success starts with a healthy parent plant. You'll want to pick a strong, vibrant stem that's completely free of any pests or disease. Look for new growth that’s firm but hasn’t turned woody yet. This is often called semi-hardwood and it’s perfect for heaps of popular shrubs.
Using clean, sharp secateurs or a knife is an absolute must. A clean cut does less damage and helps stop diseases from getting into the fresh wound.
- Make the Cut: Snip off a piece of stem about 10-15 cm long. You’ll want to make your cut on a 45-degree angle, just below a leaf node (that little bump on the stem where a leaf grows from). Making an angled cut gives more surface area for roots to sprout.
- Tidy Up: Gently pull off the leaves from the bottom half of the cutting. You want at least two nodes to be under the soil, and taking the leaves off stops them from rotting. Just leave two or three leaves at the very top to help the plant photosynthesise and create energy for its new roots.
Step 2: Apply the Rooting Hormone
Now for the magic touch. The method changes slightly depending on if you're using a powder, gel, or liquid, but the goal is always the same: coat the cut end and lower nodes evenly.
To keep your rooting hormone from getting contaminated, never dip cuttings directly into the main container. Always tip a small amount into a separate, clean dish for each batch of cuttings.
Application by Hormone Type:
- Powder: Dip the bottom few centimetres of the cutting in water, then dip it into the powder you’ve poured out. Give the stem a gentle tap on the side of the dish to knock off any excess. You're after a light, even dusting, not a thick cakey layer.
- Gel: Simply dip the end of the cutting straight into the gel. The gel is thick enough to form a complete seal around the stem, clinging on without needing any water first. Make sure the cut end and the lower nodes are well and truly covered.
- Liquid: Follow the dilution instructions on the bottle to the letter. You can then either dip the end of each cutting into the mix for a few seconds or, if you're doing a big batch, bundle them up and let them soak for the recommended time.
Step 3: Plant Your Cutting Correctly
With the hormone on, it's time to plant. Your growing medium is just as important as the hormone. It needs to give the cutting support while also having fantastic drainage and airflow to stop any rot from setting in.
A commercial seed-raising mix is a great choice as it’s sterile and has a fine texture. You can also whip up your own mix with equal parts perlite and peat moss or coco coir.
- Potting Up: Grab a small pot with good drainage holes. Use a pencil or a dibber to poke a hole in the moist potting mix, then gently place the cutting inside. This stops the rooting hormone from getting scraped off. Firm the mix gently around the stem to make sure it’s held securely in place.
Step 4: Provide Crucial Aftercare
Your cutting is in its new home, but we’re not quite done. Creating the right environment is the key to encouraging those roots to grow. The most important thing here is high humidity, because the cutting has no roots yet to drink up water.
A simple trick for us Kiwi gardeners is to make a mini-greenhouse. Just pop a clear plastic bag over the pot and secure it with a rubber band. You can use a small stick to prop the bag up so it doesn’t touch the leaves. This traps moisture and creates a humid little microclimate.
Put the pot in a warm spot with bright, indirect light – a windowsill that doesn’t get blasted by harsh sun is ideal. Remember to open the bag for a few minutes each day to let some fresh air in and prevent mould. Keep the soil moist, but never soggy.
Once you’ve got these general steps down, you can apply them to all sorts of plants. It’s a handy skill for tasks like growing fresh herbs indoors all winter for a constant supply. For plants with tougher leaves, like Sansevieria, you might use different techniques; you can find out more in our guide on how to propagate snake plants.
DIY Rooting Aids from Your Own Garden
For the hands-on Kiwi gardener, buying a commercial product isn't always the first thought. Sometimes, the best solutions are waiting right in our own backyards and pantries. Tapping into these natural ingredients is a fantastic way to give your cuttings a head start, all while embracing a more sustainable approach to gardening.
This shift towards natural alternatives is happening all over the country. You only have to look at the Australia & New Zealand herbal supplements market, which is expected to jump from US$1.4 billion in 2025 to a whopping US$2.2 billion by 2032. It's a clear sign that more of us are looking for organic ways to cultivate our own plants and herbs. You can dive deeper into this trend in this detailed market report.
So, let's look at a few of the most effective DIY rooting aids you can whip up yourself.
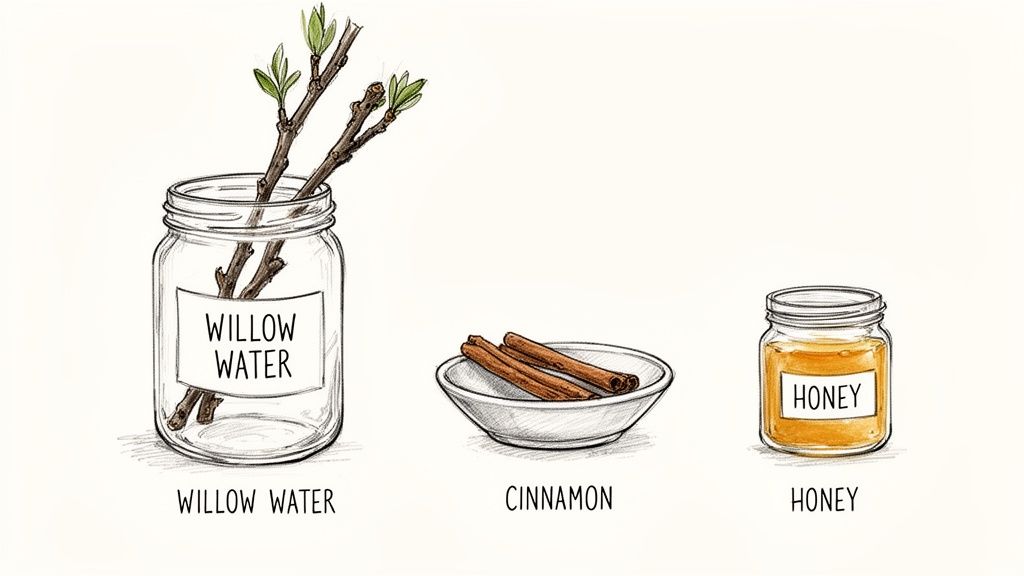
The Power of Willow Water
It turns out nature’s original rooting hormone can be brewed right in your garden shed. Willow trees (Salix species) are loaded with two key compounds: indolebutyric acid (IBA), which is the exact same active ingredient found in many commercial rooting powders, and salicylic acid, which helps fend off nasty bacteria and fungi.
Making your own willow water couldn't be simpler:
- Gather: Head out to a willow tree and snip off a handful of the new, flexible twigs. The young growth works best.
- Chop: Cut the twigs into small, 2–3 cm pieces to expose as much surface area as possible.
- Soak: Pop the chopped twigs in a jar and cover them with boiling water, just as if you were making a cup of tea.
- Steep: Let it all sit for 24–48 hours. This gives the good stuff plenty of time to leach out into the water.
- Use: Strain the liquid and it's ready to go. You can soak your cuttings in it for a few hours before planting, or even use it to water them as they get established.
This simple brew gives your cuttings a gentle, all-natural hormonal boost to get those roots growing.
Cinnamon Powder: A Fungal Foe
That unassuming jar of cinnamon in your spice rack is a secret weapon for propagation. Cinnamon is a seriously powerful natural anti-fungal, which is crucial because one of the biggest dangers to a fresh cutting is rot. Fungal diseases love to attack the vulnerable cut stem before it even has a chance to root.
By dipping your freshly cut, moist stem into cinnamon powder, you’re creating a protective shield. This simple step helps prevent damping-off and other fungal infections, giving the cutting a clean slate so it can focus all its energy on growing roots, not fighting off disease.
While it doesn't directly stimulate root growth like a hormone, its protective qualities can dramatically increase your success rate, making it a must-have in your propagating kit.
Honey: A Sweet and Antiseptic Helper
For centuries, people have used honey for its natural antiseptic and anti-fungal properties. Although it doesn't contain any rooting hormones, a light dab of raw, unpasteurised honey can help keep the cut end of a stem free from infection.
To use it, just dip the base of the cutting into a small amount of honey before you pop it into your rooting medium. Some gardeners even mix it with a bit of cinnamon to get the best of both worlds—honey's antiseptic qualities and cinnamon's anti-fungal power.
While commercial products certainly offer a concentrated, reliable dose of synthetic hormones, these homemade alternatives are proof that nature often gives us exactly what we need. Experimenting with them is not only easy on the wallet but also a great way to connect more deeply with the processes happening in your own garden.
Troubleshooting Common Propagation Problems
Even when you do everything right, propagation can sometimes be a bit of a heartbreaker. Seeing a promising cutting fail is disheartening, but every flop is a chance to learn something new.
Once you know how to spot the early signs of trouble, you can quickly figure out what’s wrong and tweak your approach. Think of this section as your propagation first-aid kit – we'll go through the most common dramas Kiwi gardeners run into and give you practical ways to get your cuttings back on track.
Identifying and Fixing Rot
Stem rot is probably the most frequent party crasher in propagation. You’ll know it when you see it: the base of the cutting turns brown or black, goes soft and mushy, and might even start to smell a bit funky.
Nine times out of ten, this is caused by too much moisture and not enough air getting to the base of the cutting. When the potting mix is waterlogged, it suffocates the delicate new cells and creates the perfect breeding ground for fungus and bacteria.
Here’s how to sidestep it:
- Improve Drainage: Always start with a light, airy mix. A good seed-raising mix or a blend of perlite and coco coir is perfect.
- Water Sparingly: You want the mix to be moist, but never soggy. A good rule of thumb is to let the top centimetre or so dry out before you water again.
- Ensure Airflow: If you're using a mini-greenhouse or a plastic bag for humidity, make sure you open it up for a few minutes each day to let fresh air circulate.
Fungal issues can also hitch a ride in your soil. Pesky fungus gnats, for example, love damp conditions, and their larvae can nibble on fragile new roots. Learning how to get rid of fungus gnats is a handy skill for anyone propagating plants indoors.
Dealing with Wilting Leaves
It’s totally normal for a fresh cutting to look a little droopy for the first day or two as it settles in. But if the leaves start to wilt dramatically and don't perk up, it's a major red flag for stress – usually from water loss.
Because a cutting has no roots yet, it has no way to drink up water to replace what it’s losing through its leaves (a process called transpiration). If it’s wilting badly, it’s losing moisture far faster than it can handle.
The biggest culprit for severe wilting is almost always not enough humidity. Your cutting is in a desperate race against time to grow roots before it completely dries out. Creating a humid little microclimate gives it the breathing room it needs to win that race.
The fix is simple: boost the humidity. Popping a clear plastic bag or a cut-off plastic bottle over the pot works wonders. This simple trick traps moisture in the air, slowing down water loss from the leaves and letting the stem focus all its energy on growing those vital roots.
Got a Question? We’ve Got Answers
Even with the best guide, there are always a few little questions that pop up. Here are some quick, clear answers to the most common things Kiwi gardeners ask when they’re starting out with rooting hormone.
Can You Use Rooting Hormone on Cuttings in Water?
Absolutely. Adding a rooting hormone can give cuttings in water a massive head start, encouraging roots to form much faster and stronger than they might on their own.
- For liquid types, just add the recommended drops straight into your propagation jar. Easy.
- For gels and powders, lightly coat the end of the cutting’s stem before you pop it in the water.
This simple step gives the cutting a clear signal to get on with the business of growing roots.
Does Rooting Hormone Go Off?
Yep, it sure does. Like most things in the garden shed, rooting hormone loses its oomph over time. Powders tend to last the longest, but how you store it makes all the difference.
To get the most out of your rooting hormone, keep it somewhere cool, dark, and dry—a cupboard or a shelf in the shed is perfect. Always screw the lid back on tight and have a quick glance at the expiry date before you start.
Is Rooting Hormone a Must-Have for All Plants?
Definitely not. Plenty of plants are so keen to grow they’ll happily throw out roots in soil or water without any help. Think of easy-going plants like succulents, mint, spider plants, and pothos—they rarely need a push.
Rooting hormone really shines when you’re trying to propagate something a bit more stubborn. It's your secret weapon for cuttings from woody shrubs like roses and camellias, fruit trees, or some of those beautiful but finicky houseplants. For these tougher projects, it can be the difference between success and disappointment, giving a reluctant cutting the nudge it needs to get growing.
Ready to give your cuttings the best start in life? Explore the wide range of plants and gardening essentials at Jungle Story and turn your propagation dreams into reality. Find your next favourite plant at https://junglestory.co.nz.