Embarking on a raised garden bed project is one of the most rewarding things a Kiwi gardener can do. At its heart, it’s simple: you build a frame, pop it in a sunny spot, and fill it with beautiful, rich soil. This simple setup gives you a huge head start with superior drainage, better soil control, and easier access to your plants.
Why Raised Beds Are Perfect for New Zealand Gardens
Raised garden beds are a true game-changer, especially for gardens here in New Zealand. Our climate is nothing if not varied, from the humid north to the frosty south, and raised beds offer a controlled environment where you can help your plants truly thrive. They're a brilliant solution for common gardening headaches like poor soil and relentless pests.
This isn't just a local trend, either. The move towards raised beds is happening worldwide, which is great news for us. It means there’s a fantastic range of local options available, especially those made from beautiful, sustainable macrocarpa.
Overcoming Common Garden Challenges
Let's be honest, one of the biggest battles for any gardener is the soil we start with. Whether you're wrestling with heavy clay that turns into a bog or sandy soil that just won't hold water, a raised bed lets you sidestep the problem completely. You get to create the perfect soil mix from scratch, tailored specifically for what you want to grow.
Here’s why that’s such a win:
- Superior Soil Quality: You’re in the driver's seat. You can mix up a rich, crumbly, and nutrient-dense growing medium right from day one.
- Excellent Drainage: Say goodbye to waterlogged roots. Excess water drains away freely, which is a lifesaver during our wet winters.
- Faster Soil Warming: The soil in a raised bed warms up much quicker in spring, giving you a valuable head start on the growing season.
- Reduced Soil Compaction: Because you never have to walk on the garden soil itself, it stays light and airy, giving plant roots plenty of room to stretch out.
A raised bed is your chance to build the perfect foundation for your garden. By controlling the soil, drainage, and even its temperature, you eliminate so many of the variables that make traditional gardening a challenge.
Ergonomics and Pest Control
Beyond the soil, raised beds just make gardening more comfortable. The elevated height means a lot less bending and kneeling, which your back and knees will thank you for. If you want to dive deeper, you can explore the many benefits of raised garden beds and how they fit into different garden designs.
This height advantage also helps deter some of our common garden pests. Slugs and snails, for instance, have a much harder time scaling the sides. Whether you go for a classic timber frame or a sleek galvanised steel one, there’s a raised bed solution for every Kiwi backyard.
Planning Your Ideal Garden Layout and Design
Every great garden starts with a smart plan. Before you even think about cutting timber, taking a moment to map out your design will save you a world of headaches later on. This is where your vision for a thriving, productive garden really starts to come to life.
The very first job is picking the perfect spot. I always tell people to just spend a day watching their backyard, really noticing how the sun travels across it. It’s a simple observation, but it's absolutely crucial for the success of your garden.
Finding the Perfect Spot
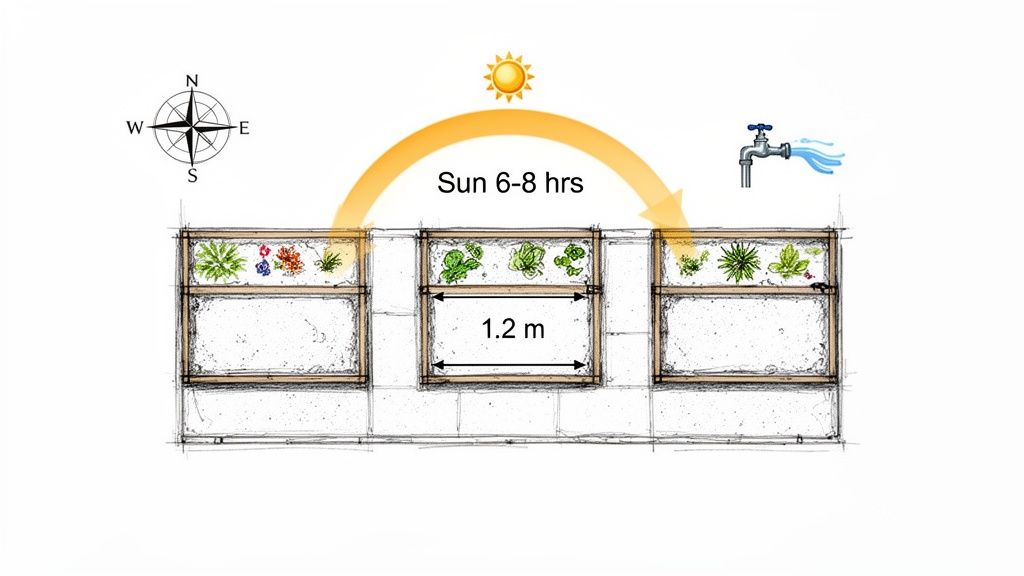
Most of the veggies and fruits we love to grow are total sun-worshippers. They need a huge amount of direct sunlight to pump out a good harvest. Your mission is to find a spot that gets at least six to eight hours of direct sun every day, especially during our peak growing season here in New Zealand.
Think about the daily grind, too. Having a water source nearby will make your life so much easier than lugging a massive hose across the lawn. Also, try to find a patch of ground that’s relatively level. You can definitely build on a slope, but starting on flat ground makes the whole construction process a lot simpler.
Before you commit, take a look at the bigger picture of your backyard. Try to avoid placing your beds right under big trees — they’ll just compete for sunlight and water. Also, steer clear of low-lying spots where water might pool after a heavy rain.
Determining the Right Size and Height
When it comes to the dimensions of your raised beds, bigger isn't always better. The golden rule is accessibility. You have to be able to reach every single part of your garden without stepping on the soil, which compacts it and crushes plant roots.
For that reason, a width of no more than 1.2 metres is pretty much perfect. This lets most people comfortably reach into the centre of the bed from either side. As for the length, that's entirely up to you and your space — go for a neat little square or a long, generous rectangle.
The height of your bed is another key decision, affecting what you can grow and how comfortable you are while gardening.
- Low Profile (30-40cm): This height works brilliantly for most vegetables, like leafy greens, herbs, and even root veggies like carrots and beetroot, provided the ground beneath is decent. It’s a great budget-friendly option since it uses less timber and soil.
- Back-Saver Height (60-80cm): If you want to cut down on all the bending and kneeling, a taller bed is a fantastic, ergonomic choice. This extra depth is also brilliant for deep-rooted crops like parsnips or spuds, giving their roots heaps of room to grow.
Mapping Out Your Garden Space
Alright, with your location and dimensions sorted, it's time to actually visualise the layout. If you’re planning on building more than one bed, think about the paths between them. A minimum pathway of about 60-80cm is practical, giving you enough room to comfortably get a wheelbarrow through.
Grab some garden stakes and string, or even just lay out your hosepipe on the ground to mark out the footprint of where you want your beds to go. Live with this layout for a few days. Walk around it, pretend you're planting and harvesting, and see how it feels. This simple trick can show you any problems with the flow or spacing before you’ve hammered in a single nail. For some creative ideas, check out how you can integrate raised beds into your garden landscape design. A bit of proper planning right now will set you up for years of gardening joy.
Choosing the Best Materials for Your Raised Bed
The material you choose for your raised bed is a big deal. It dictates the garden's final look, how long it'll last, and what it’s going to cost you. This is one of those decisions that really pays to get right from the start, influencing everything from durability to the overall vibe of your backyard.
For us Kiwi gardeners, the options are brilliant, running the gamut from classic timber to sleek metals and rustic stone.
Let's dig into the most popular choices so you can find the perfect match for your vision and budget. Each has its pros and cons, and weighing them up now will save you a world of headaches later on.
The Classic Choice: Timber
Timber is, without a doubt, the go-to for raised garden beds here in New Zealand. It’s natural, easy to work with, and just looks right in almost any garden. But not all woods are created equal, especially when they're going to spend years in contact with damp soil.
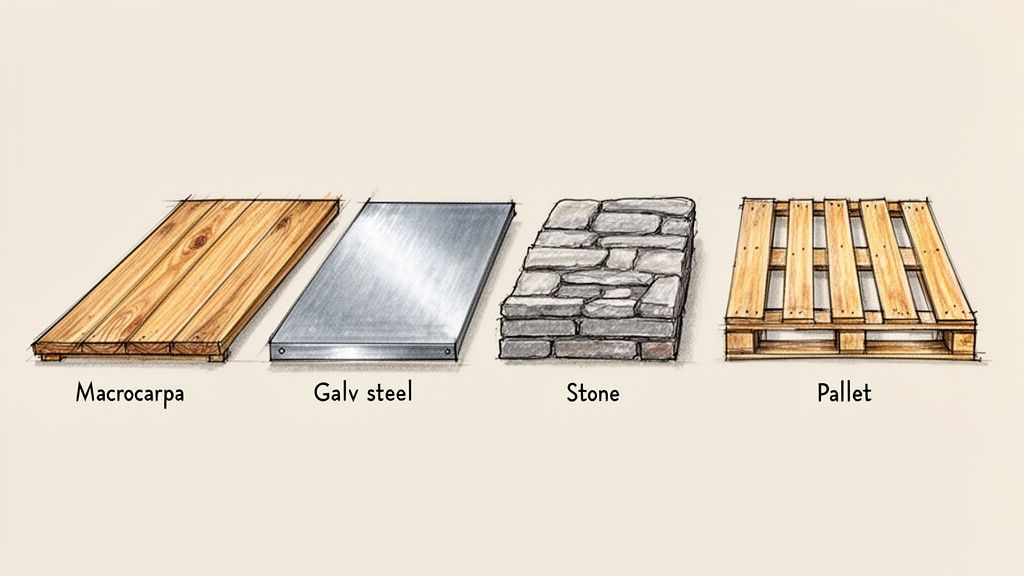
The undisputed favourite is untreated macrocarpa. Kiwi gardeners love it for a reason—it’s naturally durable and a great sustainable choice. Being locally sourced, it has inherent rot-resistant oils that mean it doesn’t need any chemical treatment, making it completely safe for growing your veggies.
Most standard kits in NZ come in heights of 400mm, 600mm, or 800mm. A pro tip: try to keep the width of any bed under 1,200mm. This stops you from having to step into the bed and compact the soil just to reach the middle. You can dive deeper into timber choices for raised beds in NZ to see what else might work.
Treated pine is another option if you're on a tighter budget. While modern treatments are considered much safer for garden use than the old arsenic-based ones, many people still choose to line their beds with a bit of builder's plastic for extra peace of mind, especially when growing food.
My best advice when choosing timber? Always go for the thickest boards you can afford—at least 40-50mm (2 inches). Thicker timber provides better insulation for the soil and is far less likely to bow and warp under the pressure of all that soil and water over the years.
Modern and Durable: Galvanised Steel
For a more contemporary or even rustic-industrial look, galvanised steel or corrugated iron beds are a fantastic choice. Their popularity has shot up because they're incredibly long-lasting and require pretty much zero maintenance.
One of their best features is how quickly they warm the soil in spring, giving you a valuable head start on the growing season. And while you might worry about them getting too hot in the peak of summer, the huge volume of soil inside the bed does a great job of insulating and protecting the plant roots from any extreme heat.
- Longevity: They simply won't rot, warp, or get eaten by bugs.
- Easy Assembly: Most steel beds arrive as pre-drilled kits that are a breeze to bolt together.
- Aesthetic: They create a crisp, defined edge that looks sharp in any garden design.
Stone, Brick, and Upcycled Options
If you're after a permanent, structural feature for your garden, materials like stone, brick, or concrete blocks are hard to beat. They bring a timeless, rustic charm and will literally last a lifetime. Building with them is definitely more labour-intensive and takes a bit more skill, but the sturdy, beautiful results speak for themselves.
Then there's the other end of the spectrum: upcycled and no-cost materials. This is where your creativity can really shine! Think about using things like:
- Old concrete blocks (you can even plant in the holes!)
- Reclaimed bricks from a local demolition
- Untreated timber pallets (just be sure they are stamped ‘HT’ for heat-treated, not ‘MB’ for methyl bromide)
Going the upcycled route is a wonderfully sustainable and budget-friendly way to get your raised bed garden started. It's the perfect approach if you want to create a productive garden without a big financial investment.
To help you decide, here's a quick comparison of the most common materials we've talked about.
Raised Garden Bed Material Comparison
| Material | Estimated Lifespan | Relative Cost | Pros | Cons |
|---|---|---|---|---|
| Untreated Macrocarpa | 10-15 years | Medium | Natural look, rot-resistant, safe for edibles, sustainable NZ choice. | Can be more expensive than treated pine, will eventually break down. |
| Treated Pine | 15-20 years | Low | Affordable, widely available, long-lasting. | Contains chemicals (lining recommended for edibles), not as natural-looking. |
| Galvanised Steel | 20+ years | Medium-High | Extremely durable, no maintenance, modern aesthetic, warms soil early. | Higher initial cost, can get hot to the touch (though soil insulates roots). |
| Stone/Brick | 50+ years | High | Permanent, beautiful, excellent durability, classic look. | Labour-intensive to build, requires more skill, very high initial cost and effort. |
| Upcycled (e.g., Pallets) | 2-5 years | Free - Low | Extremely budget-friendly, sustainable, can be creative. | Shorter lifespan, need to source safe materials (e.g., heat-treated pallets), variable quality. |
Ultimately, the "best" material is the one that fits your budget, your garden style, and the amount of effort you want to put in. Whether you choose the rustic charm of macrocarpa or the sharp lines of steel, you're on your way to building a fantastic garden.
Right, this is where the fun really begins and your garden vision starts taking shape. Building a classic timber raised bed is one of those deeply satisfying projects, and honestly, it's a lot easier than you might think. With a little bit of prep and a few basic tools, you'll have a sturdy, beautiful frame ready for soil in no time. This guide will give even a complete beginner the confidence to build a garden bed that’ll last for years.
Before you dive in, get everything you need laid out and close at hand. There's nothing more frustrating than getting halfway through a job only to realise you're missing a crucial screw. A bit of organisation now makes the whole process smoother and much more enjoyable.
Gathering Your Essential Tools and Materials
For a standard rectangular timber bed, the toolkit is refreshingly simple. You don't need a pro workshop—just a few reliable basics that are probably already hiding in your garage.
Your must-have tool list:
- Drill with Drill Bits: A good cordless drill is your best mate for this project. You'll need it for pre-drilling holes and driving in the screws.
- Tape Measure: Absolutely essential for making sure your cuts and placements are spot on. Remember the old saying: measure twice, cut once!
- Pencil: For marking up your timber before you cut or drill.
- Spirit Level: Crucial for getting your bed perfectly level on the ground before you fill it. This prevents water from pooling on one side.
- Clamps: While not strictly essential, a couple of clamps make holding timber pieces together while you drill so much easier, especially if you're working solo.
- Safety Gear: Don't skip the basics. Pop on some gloves to protect your hands from splinters and some eye protection, particularly when you're drilling.
For the materials, you’ll need your chosen timber boards (we recommend macrocarpa that’s at least 40-50mm thick), some sturdy corner posts (50x50mm or 100x100mm timber works well), and exterior-grade wood screws that are long enough to securely join your boards to the posts.
Constructing the Frame Step-By-Step
With all your gear ready, it's time to get building. We're going to construct the frame by attaching the long and short side panels to strong corner posts. This method is far more robust than just screwing the board ends together and will stop your bed from bowing out under the weight of the soil.
First up, lay two of your long boards on a flat surface, parallel to each other. Pop a corner post at each end, making sure it sits flush with the ends of the boards. Use your clamps to hold everything tight.
Now, pre-drill your holes through the boards and into the corner posts. Drilling these pilot holes is key to preventing the timber from splitting when you drive the screws in. Use at least two screws per board at each corner to get a really secure connection. Repeat this whole process to create your second long side.
A great pro tip for perfectly square corners is to measure the diagonals. Once the frame is assembled, lay it flat and measure from one corner to the one diagonally opposite. Then, measure the other diagonal. If the two measurements are identical, your bed is perfectly square.
Assembling and Positioning Your Bed
You should now have two long side panels with their corner posts attached. The next step is to join them together with your shorter end boards. Stand the two side panels up and position a short board at one end, fitting it snugly against the inside of the corner posts.
Clamp it securely, then drill and screw it into place. Move over to the other end and attach the final short board to complete the rectangle. It’s often much easier to have a helper at this stage to hold the panels steady while you work.
Once the frame is fully screwed together, move it to its final spot in the garden. This is a crucial step: before you go any further, you need to check that the ground is level. Lay your spirit level across the top edges of the frame. If one side is sitting higher, just dig out a little bit of soil from underneath until the frame sits perfectly flat. An unlevel bed not only looks a bit wonky but can cause drainage issues later on. Taking ten minutes to get this right will pay off for years to come.
Creating the Perfect Soil Mix for a Bountiful Harvest
Let's be honest, the real secret to a ridiculously productive raised garden bed isn't the timber frame or the fancy steel corners—it's what you fill it with. Getting the soil right is like baking a cake; the right ingredients in the right proportions make all the difference. This is your chance to build the foundation for a season of lush, healthy plants.
Before you even think about buying topsoil, let’s talk about what goes in the very bottom. There’s a clever technique gardeners call 'lasagne gardening' or a sort of Hügelkultur-lite. It’s a brilliant way to fill that empty space, supercharge your soil structure, and create a slow-release powerhouse of nutrients right where your plants need it.
The Lasagne Method: Your Foundation for Success
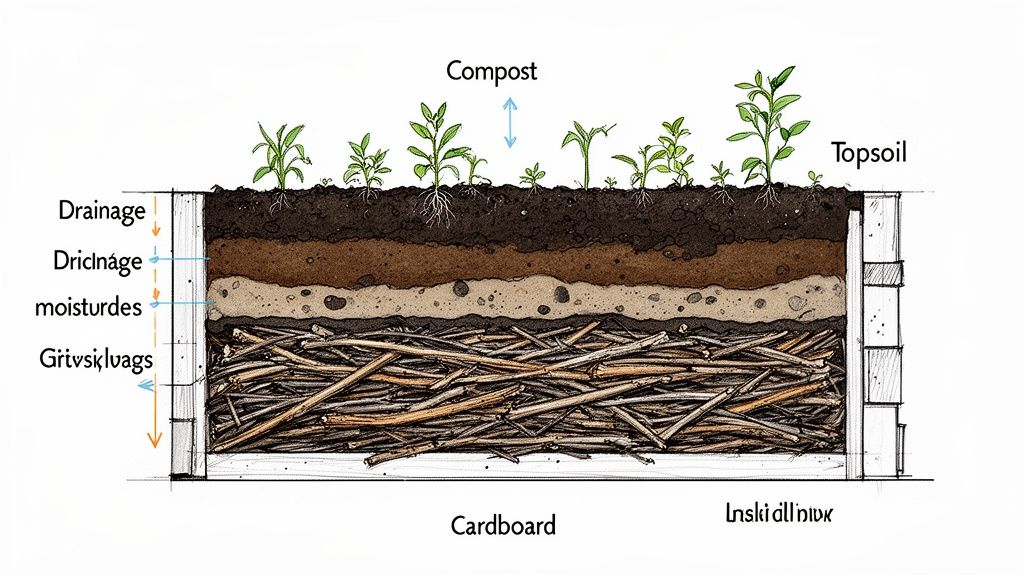
Think of the bottom third of your raised bed as a built-in compost system. By layering different organic bits and pieces, you create a thriving ecosystem for microbes, improve drainage, and hold onto moisture.
First things first, lay down some plain cardboard or newspaper directly on the ground inside your frame. This is a fantastic weed barrier, smothering whatever grass or weeds are lurking underneath. It’ll slowly break down over the season, adding valuable carbon to your soil.
Next up, it’s time to add your 'brown' and 'green' layers:
- Brown Layers (Carbon-Rich): Chuck in a generous layer of small twigs, branches, fallen leaves, and even wood chips. This stuff creates air pockets for drainage and breaks down incredibly slowly, giving your soil long-term structure.
- Green Layers (Nitrogen-Rich): On top of the browns, add layers of fresh grass clippings, kitchen veggie scraps, and used coffee grounds. These materials get to work much faster, generating a little warmth and releasing that all-important nitrogen.
Keep alternating your brown and green layers until the bottom third of the bed is full. You'll not only save a bit of money on soil but also build an incredibly fertile, living foundation for your garden.
Our Go-To Soil Recipe for the Top Layer
With your base layer sorted, it's time to mix up the perfect growing medium for the top two-thirds of the bed. This is where your plants' roots will spend most of their time, so you want a blend that's light, airy, and packed with goodies. A word of warning: avoid using soil straight from your garden. It’s usually far too heavy and can bring a whole lot of weed seeds and pests along for the ride.
I swear by a simple three-part recipe. It’s tried and true. You can easily mix it up in a wheelbarrow or on a tarp before tipping it into your bed.
The Perfect Blend Ratios
- 60% High-Quality Topsoil: This is the backbone of your mix, providing substance and minerals. Look for a screened topsoil from a garden supplier to make sure it’s free of rocks and weeds.
- 30% Mature Compost: This is the 'black gold' every gardener raves about. Compost improves soil structure, helps it hold water, and provides a slow, steady release of essential nutrients. If you don't have a home compost system yet, bagged compost is a great substitute. You can learn how to start composting to get your own supply going.
- 10% Aeration and Nutrient Boost: This final touch keeps the soil from compacting and adds an extra kick of fertility. A handful of pumice, vermiculite, sheep pellets, or some rich worm castings will do the trick nicely.
Mix these ingredients together thoroughly, give it a light watering, and then fill your raised bed almost to the top. The soil will settle over the first few weeks, so it’s not a bad idea to start with it mounded up slightly. No matter where you're gardening from, understanding how to improve soil is the key to getting great results. This balanced approach ensures your plants have absolutely everything they need to thrive.
Right, your raised bed is built, filled with that beautiful, nutrient-rich soil you mixed up, and now for the best bit – planting! This is where all that hard work really pays off and you start to see your very own productive garden come to life. A well-looked-after raised bed can pump out an incredible amount of fresh veggies and gorgeous flowers, all at a comfortable height.
The beauty of a raised bed is the controlled environment you've created. That deep, loose soil is a dream come true for root vegetables that often give up in heavy clay soil, like carrots and parsnips. Leafy greens are also big fans; things like spinach, silverbeet, and lettuce absolutely thrive with the excellent drainage and warmer soil.
What to Plant and Where
Companion planting is a brilliant, old-school strategy that works wonders in the close quarters of a raised bed. It's not just folklore; planting certain things together can genuinely boost growth and help keep pests away, creating a tiny, self-sufficient ecosystem.
Here are a few classic Kiwi garden pairings that I always come back to:
- Tomatoes and Basil: It's a classic for a reason. Basil is said to deter tomato hornworms and whiteflies, and many old-timers will swear it actually makes the tomatoes taste better.
- Carrots and Rosemary: The powerful scent of rosemary can help throw the carrot rust fly off the scent, giving your carrots a fighting chance.
- Lettuce and Chives: Popping chives or spring onions in amongst your lettuce can help keep aphids at bay.
Think of your new raised bed as a blank canvas. Don't be shy about using the vertical space. You can easily add a small trellis at one end for climbing beans or cucumbers, which leaves plenty of room for bushier plants like capsicums and courgettes in the main area.
Keeping Your Garden Healthy
A little ongoing care is all it takes to keep the harvests coming. Raised beds do have slightly different needs compared to an in-ground garden, especially when it comes to watering and feeding.
Because the soil is above ground and exposed on all sides, it can dry out much quicker, particularly during a scorching New Zealand summer. Get into the habit of checking the soil moisture daily by just pushing your finger a few centimetres deep. A great little trick is to lay a soaker hose through the bed. It delivers water straight to the roots where it's needed, cutting down on evaporation and waste.
Regular feeding will also keep your plants happy and productive. I find a liquid feed every couple of weeks during the main growing season gives them a quick, easily absorbed boost of nutrients. If you want to dive deeper into choosing the right plant food, have a look at our detailed guide on the best fertiliser for vegetables and how to use it.
Finally, don't forget to mulch! A thick layer of something like pea straw or lucerne is fantastic for holding onto that precious soil moisture, keeping weeds down, and slowly breaking down to feed the soil over time.
Got Questions About Raised Garden Beds?
As you get ready to dive in and build your own raised garden bed, a few questions always seem to surface. Here are some quick, practical answers to the things we get asked most by fellow Kiwi gardeners.
What's the Best Depth for a Raised Garden Bed in NZ?
For most of what you’ll likely want to grow, a depth of 30-40cm is absolutely fantastic. This is perfect for all your leafy greens like spinach and silverbeet, and pretty much any herb you can think of.
However, if you’ve got your heart set on deep-rooted crops like carrots, parsnips, or potatoes, it’s a great idea to aim for a taller bed of around 40-60cm. That extra depth gives their roots all the room they need to stretch out and develop properly. Plus, the taller height is a real back-saver when it comes to weeding and harvesting!
Should I Put Anything on the Bottom of My Raised Bed?
Yes, definitely. Before you add any soil, lay down a layer of plain, uncoated cardboard or newspaper at the very bottom. It’s an excellent and super simple way to suppress any grass and weeds trying to push through from underneath. This layer will smother them out and then just slowly decompose over time, adding a bit of organic matter back into your soil.
A quick tip: avoid using plastic sheeting as a liner. It might seem like a good weed barrier, but it just traps water, completely messes with drainage, and can really harm the long-term health of your soil.
How Do I Stop My Bed from Drying Out in Summer?
It’s true, raised beds can dry out faster than your average in-ground garden, especially under that strong Kiwi sun. The trick is to make sure your soil mix is loaded with good-quality compost, as it does a brilliant job of holding onto moisture.
Applying a thick 5-10cm layer of mulch like pea straw or bark chips over the soil surface is also an absolute game-changer. This one simple step dramatically cuts down on water evaporation and keeps the soil cool, protecting your plants' roots during those real scorchers.
At Jungle Story, we've got everything you need to get your gardening project off the ground, from top-notch seeds to all the essential tools. Explore our collection and start bringing your dream garden to life.