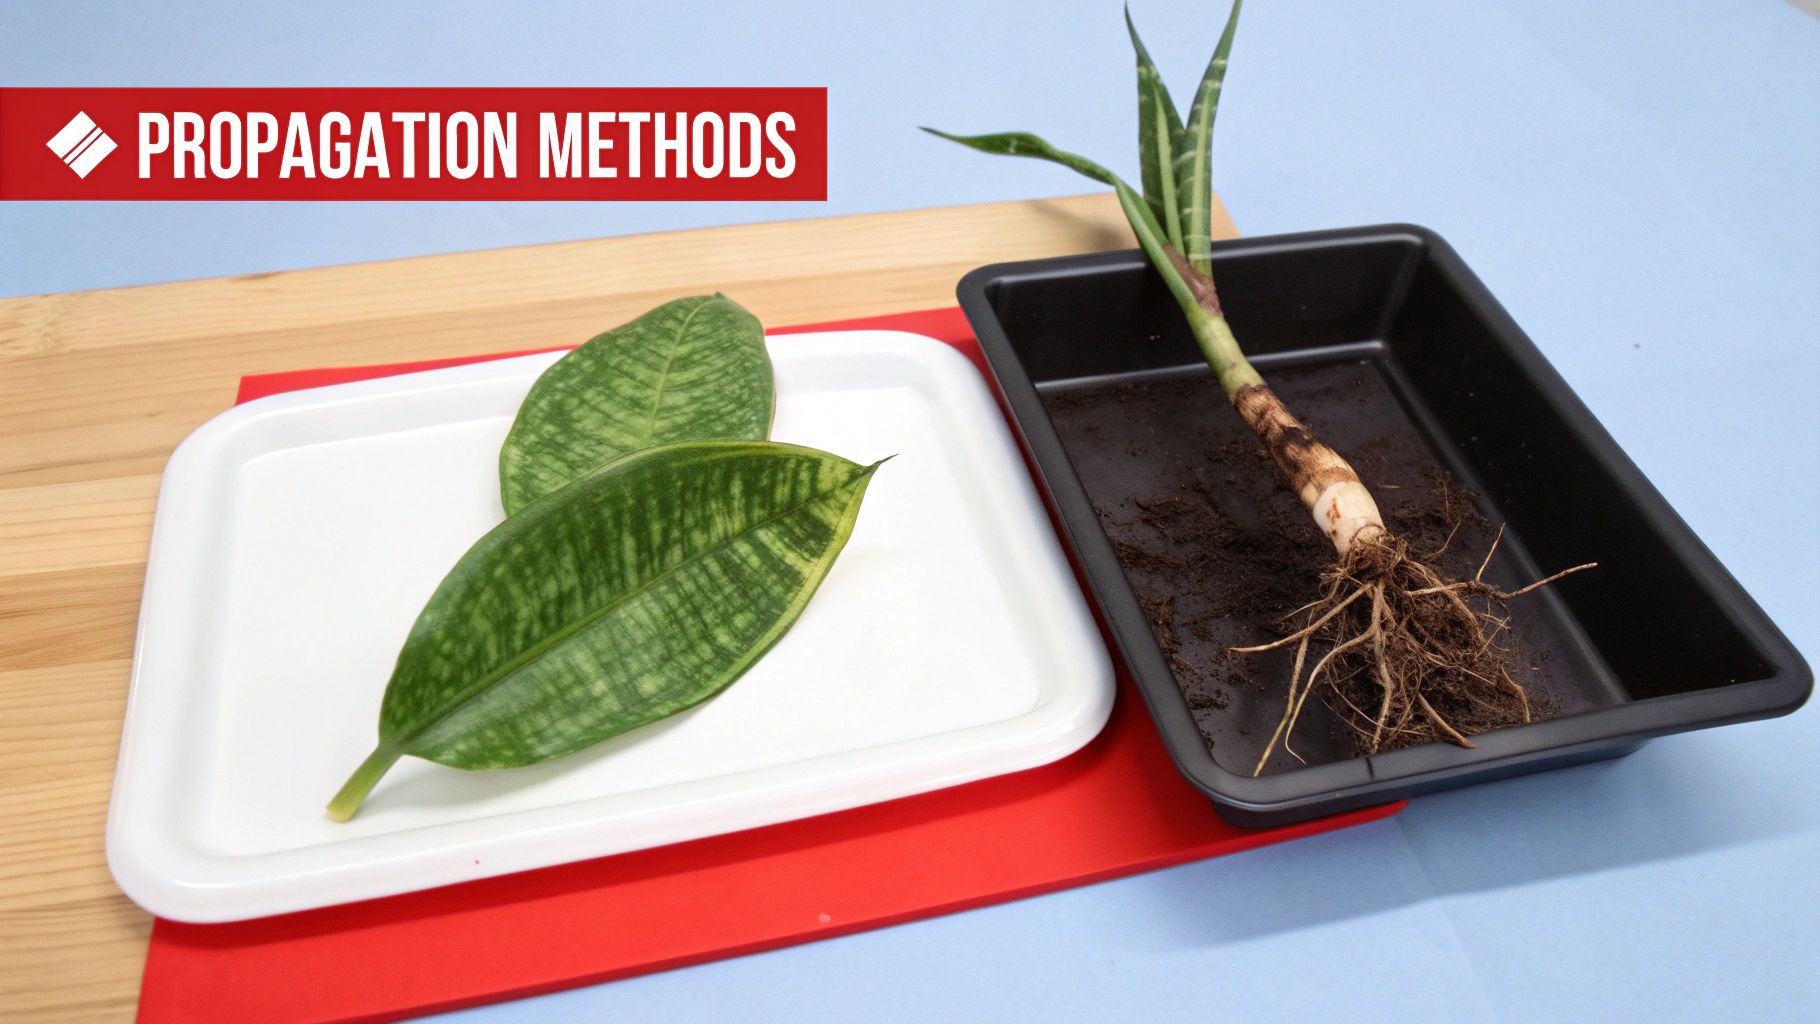
Thinking about multiplying your snake plants? You've come to the right place. It's surprisingly straightforward – you can create brand new plants by either dividing a larger one, rooting leaf cuttings directly in soil, or even popping cuttings in water. Each way is a simple path to growing your collection from just one parent plant.
Why Propagate Snake Plants in New Zealand?

The snake plant, or Sansevieria trifasciata, is practically a staple in Kiwi homes, and it’s easy to see why. Its sharp, architectural shape brings a modern vibe to any space, but its real charm lies in its toughness. This plant is the definition of low-maintenance, known for its resilience and air-purifying abilities.
Propagating is simply the art of making new plants from one you already have. It’s a fantastic, wallet-friendly way to fill your home with more greenery or to share the plant love with your friends and whānau. Given how easy they are to look after, it’s no wonder snake plants are a go-to for propagation projects all over the country.
A Kiwi Favourite for Good Reason
Here in New Zealand, the love for propagating snake plants has really taken off. In fact, local gardening figures from 2023 show it's one of the top five most propagated houseplants, with roughly 60% of Kiwi households that own indoor plants having tried it.
This guide is designed to help you get great results in a typical New Zealand home. We’ll walk through the three most reliable methods:
- Division: Perfect for established plants that are already producing little offshoots, giving you an instant new plant.
- Leaf Cuttings in Soil: A brilliant method if you want to create several new plants from just a single leaf.
- Water Propagation: A fun, visual way to propagate where you get a front-row seat to watch the new roots form.
If you're just getting started with indoor gardening or want to try something new, propagating a snake plant is the perfect project. They are so forgiving, which makes the whole process fun and almost always successful, giving your green thumb a real confidence boost.
Before we get into the nitty-gritty, let's look at which method might be best for you. And if you're after more general tips for keeping your indoor jungle happy, feel free to browse our other plant care guides.
Which Snake Plant Propagation Method Is Right for You?
Choosing a method can feel like the hardest part, but it really comes down to what you're starting with and how patient you are. This little table breaks it down to give you a clear snapshot of each approach.
| Method | Best For | Difficulty | Time to Roots (Approx.) |
|---|---|---|---|
| Division | Large, mature plants with pups (offshoots). | Easy | Instant (already has roots) |
| Leaf Cuttings in Soil | Creating multiple plants from one leaf; any healthy plant. | Easy | 4-8 weeks |
| Water Propagation | Watching root growth; beginners who want a visual process. | Easy | 4-8 weeks |
As you can see, division is your quickest win if your plant is ready. But for the magic of watching a new plant grow from almost nothing, you can't beat cuttings. Now, let’s get into the step-by-step for each one.
Choosing the Right Time and Tools for Success
Like any good project, timing and preparation are everything. If you want to give your new snake plant babies the absolute best shot at life, you’ll want to propagate them during their main growing season. Here in New Zealand, that’s spring and summer – think September through to February. This is when the plant is actively pushing out new growth, meaning your cuttings will have all the warmth and energy they need to strike roots.
Before you get scissor-happy, let's talk tools. You don't need a whole lot, but getting a few key things ready beforehand makes the whole process much cleaner and, frankly, more successful.
Your Propagation Essentials
The biggest secret to successful propagation? Cleanliness. This is non-negotiable. The last thing you want is to introduce nasty bacteria or fungi to a fresh plant wound, so making sure your gear is sterile is priority number one.
Here’s what I always have on hand:
- A sharp, clean cutting tool: A sterile craft knife, a good pair of scissors, or some sharp secateurs will do the trick. I’m a big fan of wiping the blades down with rubbing alcohol before I start and between plants. It's a simple step that can save you a lot of heartache.
- The right kind of pots: Good drainage is crucial. Look for pots with plenty of holes at the bottom. Terracotta is a fantastic choice because it's porous, which helps the soil breathe and dry out more evenly – a massive plus for snake plants.
- A quality potting mix: Snake plants absolutely hate having “wet feet,” so a chunky, free-draining mix is essential to prevent rot. Don't just grab any old bag of soil.
My go-to recipe for the perfect snake plant soil is a simple one. I just mix a standard, high-quality potting mix with a generous handful of pumice or orchid bark. This creates a really airy, gritty medium that stops water from hanging around too long – a common problem in our sometimes-humid indoor environments.
Getting these basics sorted first sets you up for a really rewarding experience and gives your new plants the best possible start.
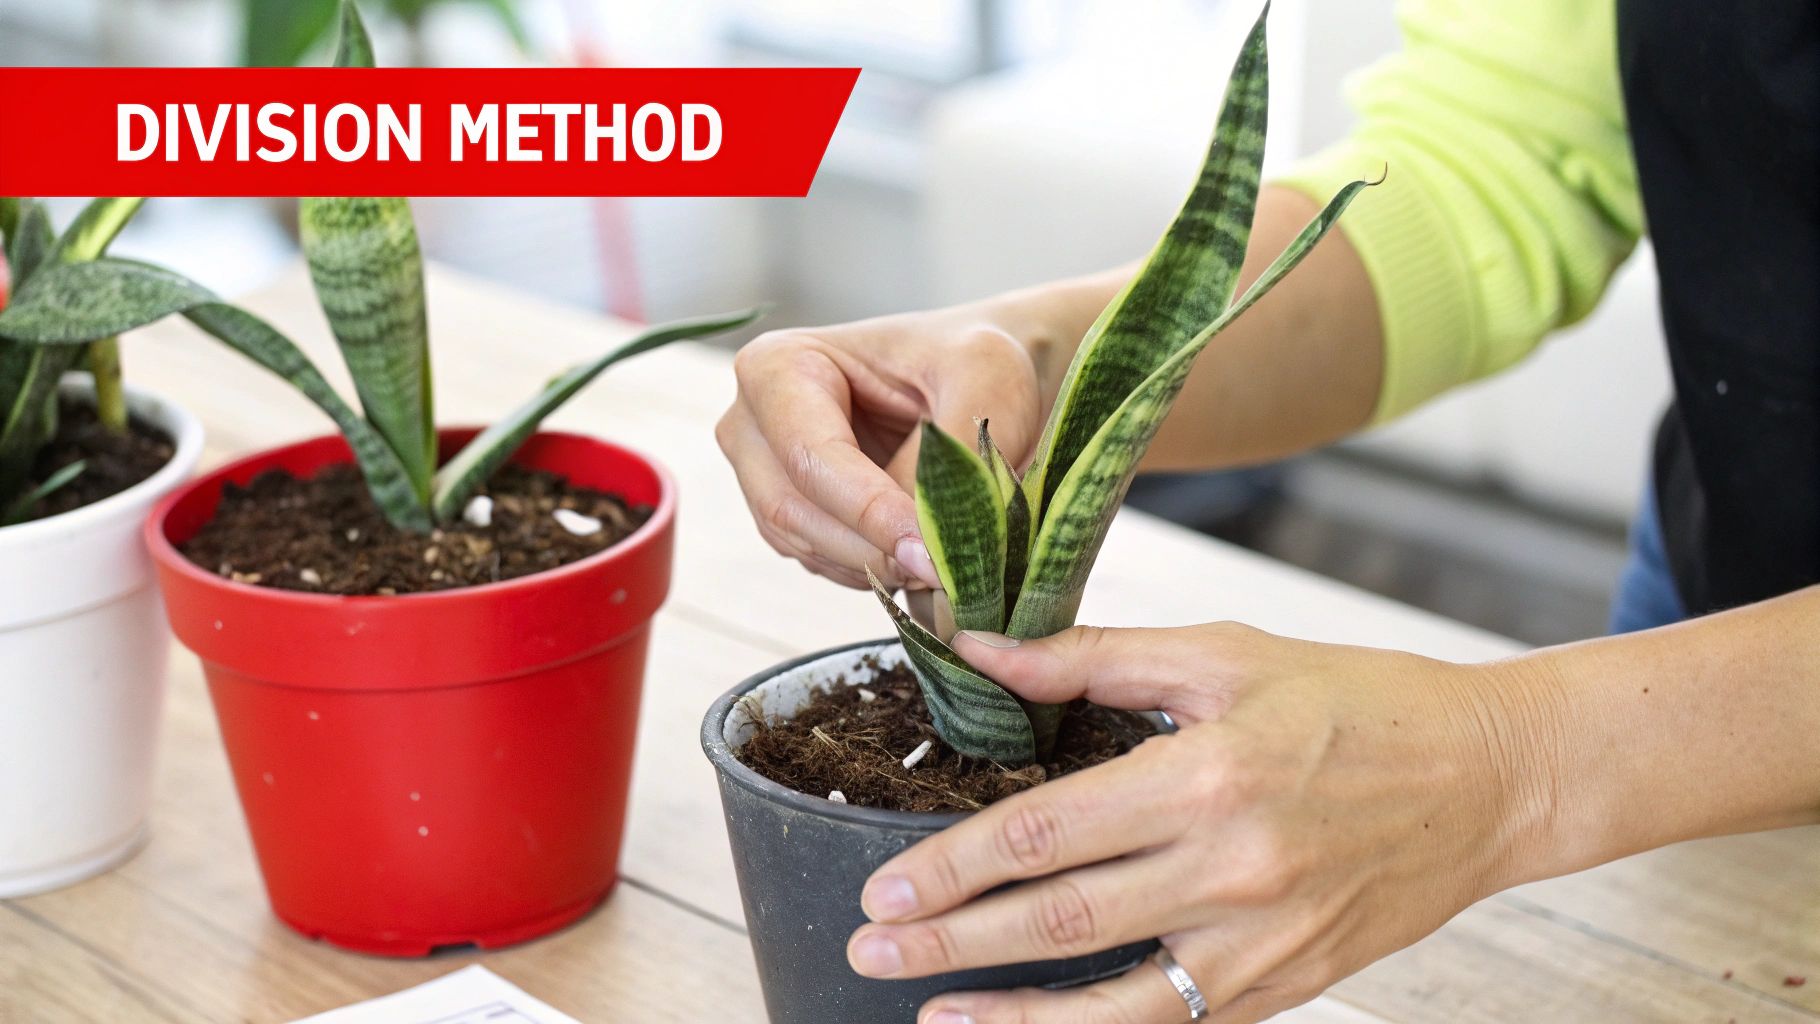
The Division Method for Instant New Plants
If you’re a bit impatient and want the quickest, most reliable way to get more snake plants, division is the way to go. This approach works perfectly for mature, healthy plants that have started pushing out little offshoots—often called 'pups'—around the main plant's base.
Unlike propagation methods that can take weeks or even months to show results, division gives you a whole new, fully formed plant right away. It's also a great fix for a plant that's getting a bit crowded in its current pot. I always think of it less as a big propagation project and more like a simple repotting session that leaves you with a bonus plant or two.
How to Get Started
Your first move is to carefully ease the whole plant out of its pot. The best way is to lay the pot on its side and gently slide the root ball out. You can give the pot a few taps to help loosen things up, but whatever you do, don't yank on the leaves.
With the plant out, start brushing off the excess soil so you can get a good look at the root system. You'll see that the plant grows from thick, underground stems known as rhizomes. The pups you see will be growing directly from these rhizomes, each with its own little cluster of roots. This is where you'll make your split.
Making the Cut
The goal here is to separate the pups from the parent plant, making sure each new piece has a healthy amount of roots attached to it. Look for the natural connection points between the main plant and a pup. Sometimes, you'll find they are loose enough to be gently teased apart with just your hands.
If the rhizomes are holding on tight, don't be afraid to use a clean, sharp knife to make a clean, decisive cut. Just make sure every new section has at least one strong leaf and a decent clump of roots to sustain it. This really sets your new plant up for success.
For anyone growing a variegated snake plant (those stunning ones with yellow or cream stripes), this is the only way to propagate it and guarantee the patterns carry over. If you try to propagate a variegated variety from a leaf cutting, it will almost always revert to a plain green colour.
Once you’ve made your divisions, all that's left is to pot each new plant into its own container with a well-draining potting mix. Give them a light watering to settle them in, and you're done! It's the most straightforward and rewarding way to multiply your snake plant collection.
Propagating From Leaf Cuttings in Soil
Creating new snake plants from leaf cuttings is probably the most popular way to multiply your collection, and it’s easy to see why. It’s the perfect method if your plant is still a bit young and hasn't started producing its own pups, or if you simply fancy turning one healthy leaf into several brand-new plants.
First up, you’ll want to choose a strong, mature leaf from your plant—avoid any that look old, yellowed, or a bit beat up. With a clean, sterile knife or pair of scissors, slice the leaf horizontally into sections about 5-7 cm long. Here's a little trick I've picked up: cut a small, inverted 'V' at the bottom of each cutting. This clever notch actually increases the surface area, giving roots more space to emerge.
The Most Important Step: Callusing
Now for what I honestly believe is the most crucial part of the process, and one that experience has taught me makes all the difference: letting the cuttings callus over. All you need to do is lay your fresh cuttings on something like a paper towel and leave them in a dry, shady spot for 2-3 days.
This simple step allows the raw, wet ends to dry out and form a protective seal. I can't tell you how many times I've seen cuttings fail because this was skipped. Planting them while they're still fresh is an open invitation for bacteria, which almost always leads to rot. It’s a small test of patience that pays off big time.
Once your cuttings have callused, they're ready for the soil. From here, it's a waiting game. Roots and new pups can take several weeks or even a few months to show up, but trust me, spotting that tiny new leaf poking through the soil next to your cutting is an incredibly rewarding moment.
Planting Your Cuttings
With your cuttings properly callused, it's potting time. Grab a pot and fill it with a well-draining potting mix, just like we talked about for the mother plant. A gritty blend with something like pumice is perfect for preventing soggy soil.
Gently push the bottom end of each cutting about 2 cm deep into the soil. The most important thing here is to make sure you plant them the right way up! The end that was originally closer to the plant's base is the end that goes into the soil.
Give the soil a light watering and find a spot for your new pot that gets plenty of bright, indirect light. From now on, you only need to water when the soil has completely dried out. The same rules apply here as for a mature plant—overwatering is the number one enemy. If you’re looking for more tips on caring for tropicals that hate having wet feet, our guide on looking after Anthuriums has some great insights that apply here too.
Growing New Snake Plants in Water
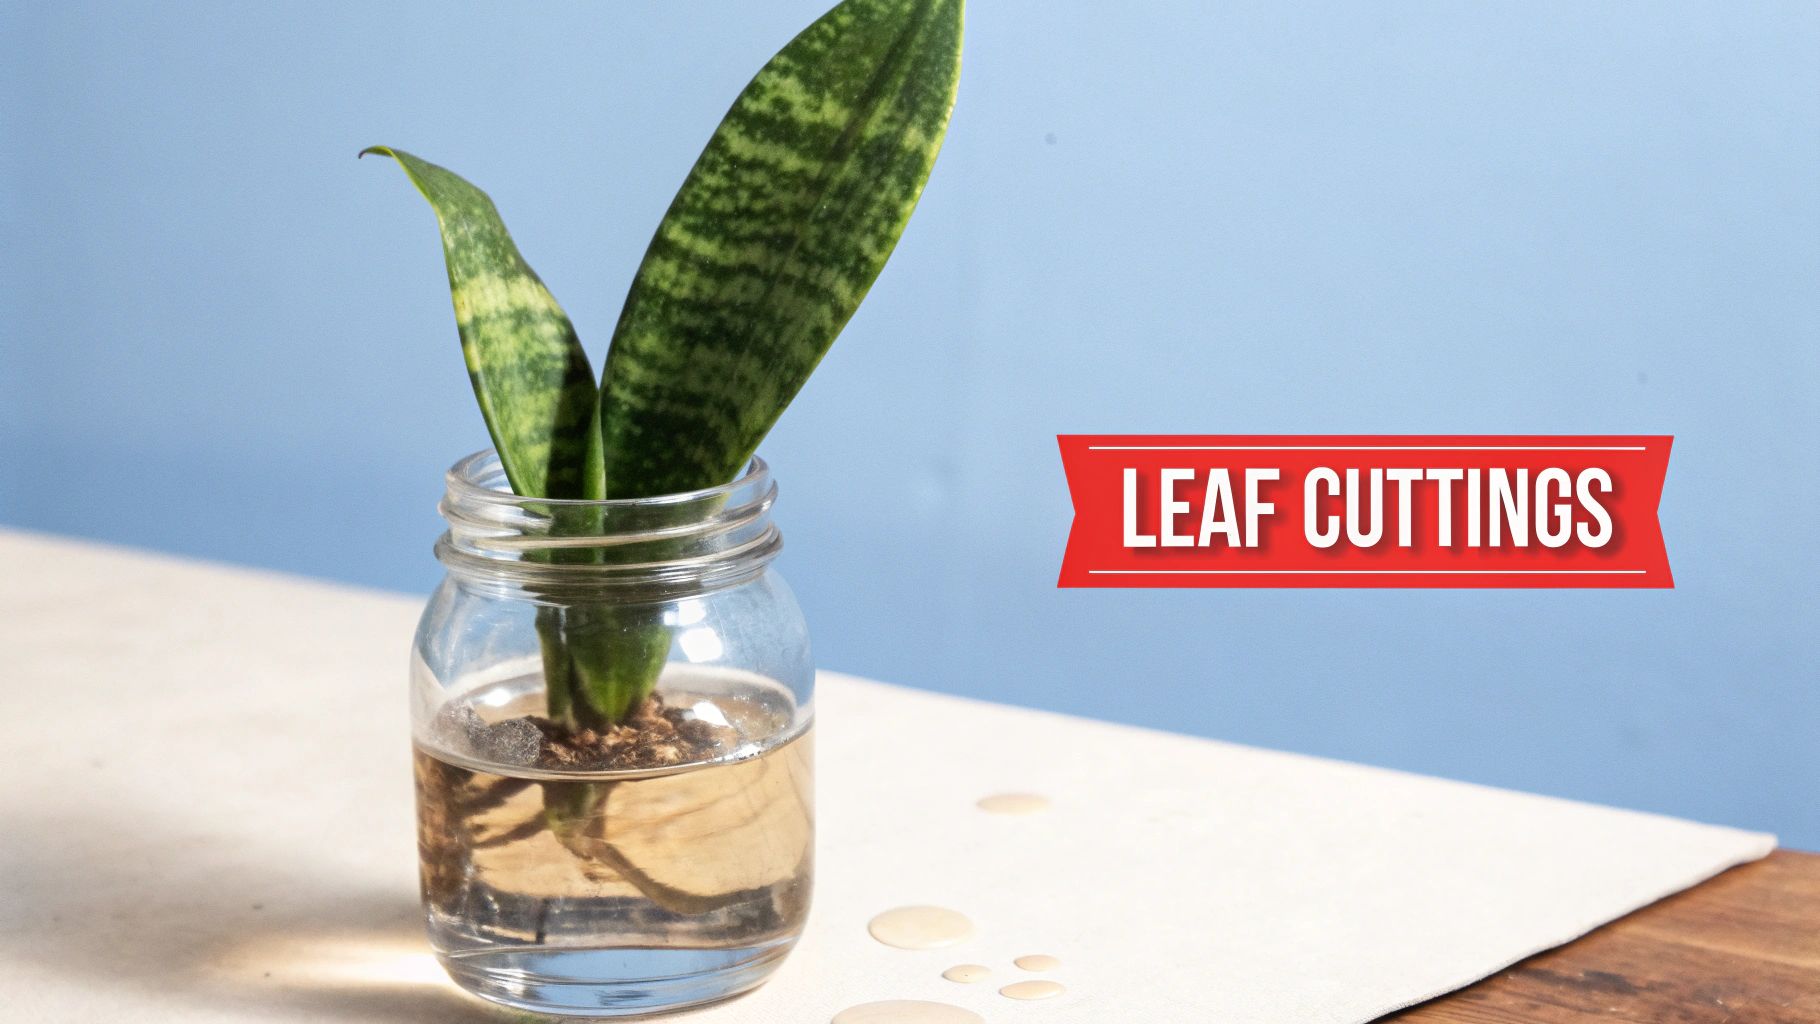
There's something uniquely satisfying about watching roots sprout from a leaf cutting in a simple jar of water. It feels a bit like a science experiment on your windowsill and is a fantastic way to get a real-time look at propagation in action. For this reason, it’s a brilliant project for first-timers or even for getting the kids involved.
The setup couldn't be easier. Once you've prepared your leaf cuttings as we've already covered (and given them time to callus over!), all you need is a glass or jar of water. Pop the cutting in, but make sure only the bottom 2-3 cm is actually sitting in the water. Submerging too much of the leaf is a common mistake and can unfortunately lead to rot.
Water Propagation Tips for Kiwi Homes
While this method is popular everywhere, our homes here in New Zealand have their own quirks that can affect how well it works. A 2022 study by some local plant enthusiasts actually found that about 40% of Kiwi indoor gardeners saw rooting take much longer than expected, sometimes between 6 to 12 weeks. They pinned this on our water temperatures and how often the water was changed. You can read more about what they discovered by checking out the research on water propagation challenges here.
This really hammers home one crucial piece of advice: keep that water fresh. Changing it out at least once a week is the goal. This simple step stops bacteria from building up and gives your cutting the fresh oxygen it needs to develop roots. It’s especially important during our cooler months when water can get stagnant much faster. A quick rinse of the jar and some fresh tap water is all it takes.
A heads-up if you're working with a variegated plant: when you propagate a snake plant with yellow or cream stripes from a leaf cutting in water, the new babies that grow will almost always revert to being solid green. It's just a quirk of this propagation method.
Knowing When to Make the Move
So, how do you know when your new plant is ready to graduate from its water home to a proper pot? The secret is patience. You're waiting for a decent root system to form. I always look for the main roots to be at least 3-5 cm long before I even think about potting it up.
Waiting for those established roots gives the plant the best chance of surviving the move to soil. When you do pot it, choose a well-draining potting mix. For the first few weeks, I'd suggest keeping the soil a little more moist than you would for a fully grown snake plant. This helps those delicate "water roots" get used to their new, drier life in the soil.
Common Questions About Propagating Snake Plants
Even with the best of intentions, you're bound to hit a few snags when you first start propagating snake plants. It happens to everyone! Let's walk through some of the most common questions I hear from fellow Kiwi gardeners so you can tackle your project with confidence.
How Long Does Snake Plant Propagation Actually Take?
This is definitely a project where patience pays off. If you’re propagating with leaf cuttings directly in soil, you can expect roots to begin forming in about 4 to 8 weeks. But seeing that first little pup poke through the soil? That can take anywhere from 2 to 6 months, really depending on how much warmth and light your home gets.
Water propagation might give you the satisfaction of seeing roots a bit faster, but don't forget you still have the extra step of moving the cutting into soil, which adds to the overall timeline.
Why Are My Cuttings Turning Yellow and Mushy?
Ah, the dreaded mush. This is easily the most common issue, and nine times out of ten, it’s a sign of rot from too much moisture. The best way to deal with it is to prevent it from happening in the first place. Always, always let your leaf cuttings dry and form a callus for a few days before you even think about planting them.
The golden rule to avoid rot is simple: use a gritty, well-draining potting mix (pumice is your best friend here!) and only water when the soil is completely dry to the touch. For water propagation, you absolutely must change the water every week to keep nasty bacteria from setting up shop.
Will My Variegated Snake Plant Keep Its Stripes?
If you're using leaf cuttings, the answer is almost certainly no. When pups sprout from leaf cuttings of a variegated variety—like those with stunning yellow or cream edges—they nearly always revert to the classic, all-green form.
To keep that beautiful variegation intact, you must use the division method. This technique is the only way to create a true clone of the parent plant, guaranteeing those gorgeous patterns are passed down.
When Do I Move Water Cuttings to Soil?
The trick here is to wait until the new roots are strong enough to handle the transition. A good rule of thumb is to hold off until the main roots are at least 3-5 cm long.
When you do pot them up, make sure you're using that all-important well-draining mix. For the first few weeks, you'll want to keep the soil slightly more moist than you would for a mature plant. This helps those delicate 'water roots' adjust to their new life in soil. If you're keen to expand your indoor garden, our guides on growing herbs indoors are a great place to start your next project.