Welcome to the world of aloes! These surprisingly tough succulents are perfectly suited to New Zealand's varied climate. Known for their striking architectural shapes and easy-going nature, aloes have become a firm favourite in Kiwi homes and gardens across Aotearoa.
Let's dive into why these plants are so beloved, from their ancient roots to their place as a modern-day staple.
Why Aloe Plants Thrive in New Zealand Gardens
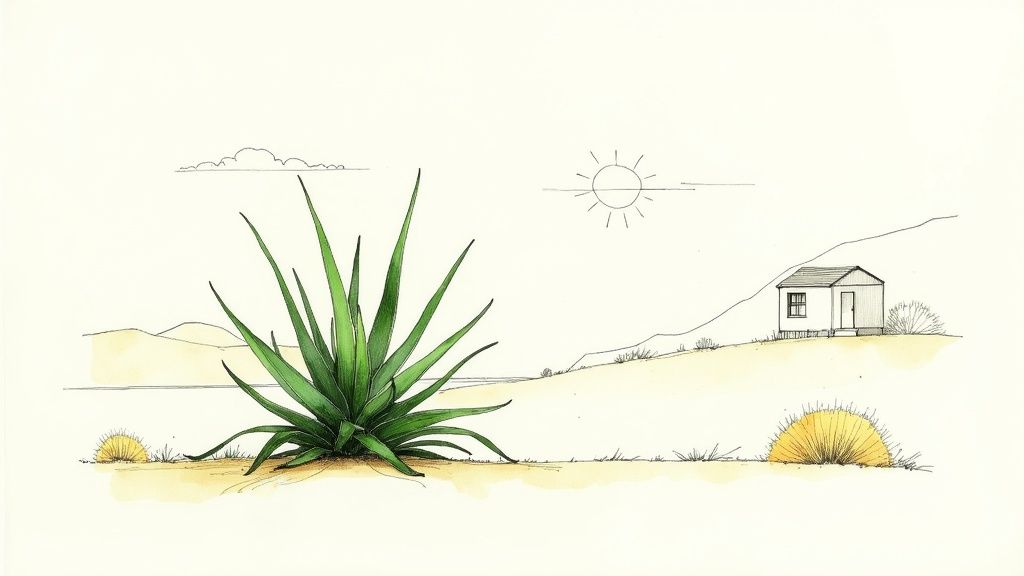
Aloes are more than just beautiful succulents; they're remarkable survivors. Hailing from arid spots in Africa, the Arabian Peninsula, and Madagascar, they’ve well and truly found a second home here in New Zealand. Their secret? The ability to store water in their fleshy leaves, making them incredibly drought-tolerant.
This handy feature makes them a fantastic match for many parts of the country. Whether you're in sunny, dry Hawke's Bay or dealing with Wellington's windswept coast, an aloe can usually handle whatever the weather throws at it. They ask for so little but give back so much.
A Long History in Aotearoa
While they feel like a modern garden staple, aloes actually have a long and storied history in New Zealand, with their journey to our shores dating back over a century. Some species have settled in so well that they're now considered part of our naturalised flora.
Records show that certain aloes have been grown here since the late 19th century. One species, Aloe maculata, was officially recorded as naturalised in New Zealand as early as 1883, not long after it was introduced from South Africa. It's become such a familiar sight that its ecological impact has even been reviewed, which just goes to show how long these plants have been part of our landscape. You can explore more about this species' long history in NZ gardens if you're curious!
Think of an aloe as the ultimate low-maintenance garden guest. It doesn't demand constant attention, tolerates a bit of neglect, and thrives in conditions that would challenge fussier plants—all while adding a touch of exotic elegance.
The Perfect Plant for Kiwi Lifestyles
The appeal of aloes in NZ goes way beyond just being tough. Their clean, structural forms fit beautifully into all sorts of garden designs, from minimalist modern courtyards to lush, subtropical backyards. And if you’re short on space, many smaller varieties will happily live in pots on a sunny deck or windowsill.
Here’s why they’re such a great fit for New Zealanders:
- Water-Wise Gardening: As we all become more conscious of water use, aloes are a brilliant choice, needing very little water once they're established.
- Versatile Placement: They’re happy outdoors in frost-free areas and make fantastic, easy-care indoor plants anywhere in the country.
- Year-Round Interest: Their evergreen foliage provides constant structure and colour, even through our milder winters.
This guide is here to give you all the confidence you need to choose, grow, and enjoy these incredible plants, all tailored to our unique Southern Hemisphere seasons.
Choosing the Right Aloe for Your NZ Home
So, you’re ready to bring an aloe plant into your life. Great choice! But where to begin? With over 500 species out there, the options can feel a bit overwhelming. Thankfully, in New Zealand, a few clear favourites have emerged—varieties that are perfectly suited to our unique climate.
The real secret to success is matching the right plant to your home. Think about where it will live. Is it a sun-drenched Auckland deck, a bright Wellington windowsill, or a sheltered spot in a frosty South Island garden? Getting this right from the start means your new aloe won't just survive; it'll absolutely thrive.
Let's dive into some of the most popular and easy-to-find aloes across Aotearoa.
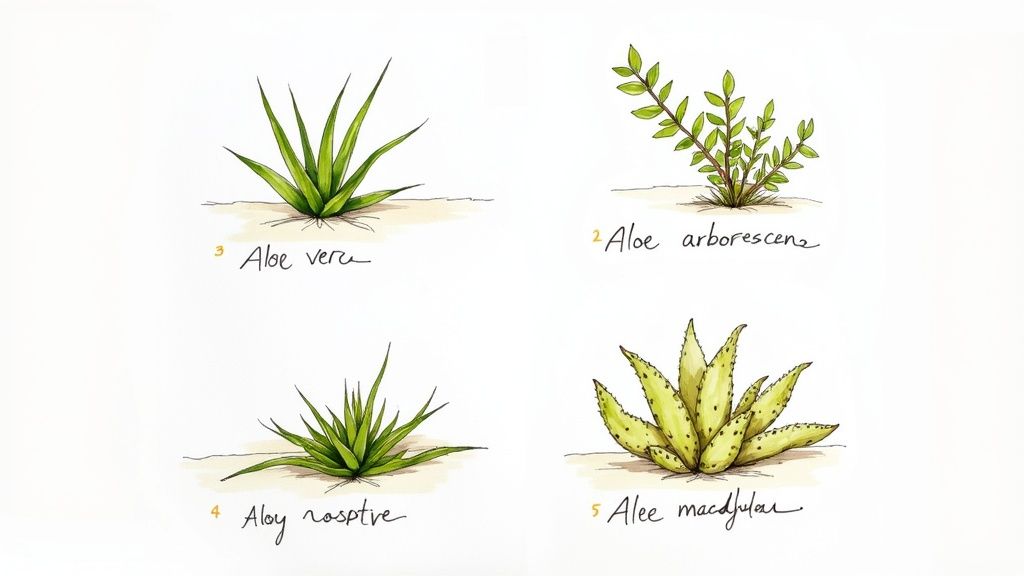
Meet the Most Popular Aloe Varieties
Aloe vera (True Aloe) This is the one everyone knows, famous for the soothing gel packed inside its fleshy leaves. It makes a brilliant indoor plant anywhere in New Zealand, happy to live in a pot where you can keep a close eye on its watering. While you might get away with it outdoors in the toastiest, frost-free parts of the north, it’s generally happiest inside or on a well-protected patio.
Aloe arborescens (Krantz Aloe) A true superstar for Kiwi coastal gardens, Aloe arborescens is a big, tough, multi-headed shrub that puts on a spectacular show. It sends up fiery orange flower spikes right in the middle of our winter (usually June to August), bringing a welcome blast of colour when you need it most. This one is incredibly hardy and couldn't care less about salt spray or wind, making it a go-to for exposed locations.
Aloe maculata (Soap Aloe) Also known as the Soap Aloe, this hardy character is one of the most common sights in New Zealand gardens, and for good reason. It forms beautiful rosettes of spotted leaves and is impressively tolerant of a wide range of conditions, even handling a moderate frost. Its resilience and striking look make it a super reliable choice for adding a bit of architectural flair to your garden beds.
Architectural Beauties and Collector's Items
Beyond the everyday favourites, New Zealand is also home to some seriously stunning architectural aloes. The magnificent tree aloes (Aloidendron barberae), for instance, have a long and storied history here. Enthusiast journals have recorded massive specimens in towns like Nelson, some of which are decades old and stand several metres tall!
Another highly sought-after variety is the sculptural Aloe plicatilis, or Fan Aloe. With its unique, fan-like clusters of leaves, it’s basically a living piece of art. It’s perfect as a standout feature plant in a pot or a well-drained garden bed. For a truly distinctive addition to your collection, check out our stunning Aloe plicatilis (Fan Aloe).
Popular Aloe Varieties in New Zealand
Choosing an aloe isn't just about what catches your eye; it’s about finding the right fit for your space and climate. To make things a bit easier, here’s a quick comparison of our top picks.
| Aloe Species | Common Name | Best For | Size | Frost Tolerance |
|---|---|---|---|---|
| Aloe vera | True Aloe | Indoor pots, medicinal gel | Up to 60 cm tall | Low (protect from frost) |
| Aloe arborescens | Krantz Aloe | Coastal gardens, hedging | Up to 3 m tall and wide | Moderate |
| Aloe maculata | Soap Aloe | Garden beds, rockeries | Up to 50 cm tall | Good (tolerates light frost) |
| Aloe polyphylla | Spiral Aloe | Feature pots, alpine gardens | Up to 30 cm tall, 60 cm wide | High (needs good drainage) |
This table should give you a solid starting point for figuring out which aloe will feel most at home with you. Whether you have a tiny balcony or a sprawling backyard, there’s an aloe out there with your name on it.
A Seasonal Care Calendar for Kiwi Gardeners
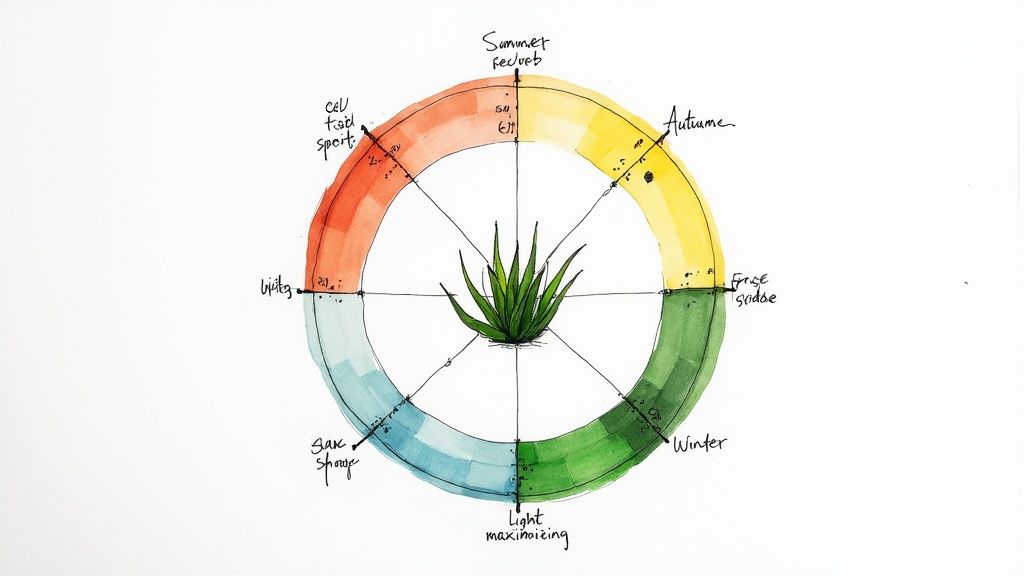
Growing a happy aloe in New Zealand is really all about tuning into our unique Southern Hemisphere seasons. It’s not a set-and-forget plant. Adapting your routine to the changes in light, temperature, and rainfall throughout the year is what keeps an aloe thriving.
Think of it as a partnership. Your plant will give you signals about what it needs, and this calendar will help you read those cues. By anticipating its needs, from the energetic growth of a Hawke's Bay spring to the crisp chill of a Canterbury winter, you can give your aloe the right care at the right time.
Spring Awakening (September – November)
As the days get longer and the soil starts to warm up, your aloe begins to wake from its winter slumber. This is the season of renewal and growth, making it the perfect time to give your plant a bit of a boost.
Now’s the time to encourage fresh, healthy growth after the quiet of winter. It’s the ideal window for repotting an aloe that’s become root-bound in its current home. You can also start to gradually increase watering, but always—always—let the soil dry out between drinks.
Spring is your aloe's main "growing season." This is when it has the most energy to push out new leaves, send out pups (baby aloes), and bounce back from any stress.
To support this burst of activity, spring is the best time to offer a feed. A single dose of a balanced liquid fertiliser, diluted to half-strength, is usually all it needs for the entire year. Go easy on it, though; aloes are light feeders.
Summer Vigilance (December – February)
The New Zealand summer sun can be incredibly intense. And while aloes love light, they can definitely get too much of a good thing. The key to summer care is all about protection and smart watering, keeping your plant hydrated without waterlogging the roots.
If your aloe is outside, watch for signs of sun stress like leaves turning reddish-brown or yellow. That’s your plant telling you it needs a break. Move it to a spot with bright, indirect light or some afternoon shade to prevent scorching. For indoor aloes, a sunny windowsill is great, but try to avoid the leaves pressing right up against hot glass.
During heatwaves, you might need to water more often, but the golden rule still applies: check the soil first. Poke your finger about 5 cm deep; if it feels dry, it's time for a good soak. This is crucial for preventing root rot, which is a major risk when the soil stays soggy in humid weather.
Autumn Transition (March – May)
As the days shorten and the nights get cooler, your aloe's growth will naturally start to slow. Autumn is all about preparing your plant for the leaner winter months ahead, letting it ease into a state of rest.
Your main job now is to cut back on watering. As temperatures drop and the sun becomes less intense, the soil will take much longer to dry out. Watering with the same frequency as summer is a recipe for disaster. Start spacing out your waterings, allowing the soil to stay completely dry for longer.
This is also a good time for a general tidy-up.
- Remove Dead Leaves: Gently pull away any dried, shrivelled leaves from the base of the plant.
- Check for Pests: Have a good look where the leaves meet the stem for any mealybugs or other pests trying to bunk down for winter.
- Plan Your Winter Spot: If your aloe is outdoors in a frost-prone area, now is the time to figure out where you’ll move it for protection.
Winter Protection (June – August)
Winter care for an aloe in NZ is about survival, not growth. The combination of cold, low light, and dampness requires a very hands-off approach. For many of us, especially in the South Island or inland regions, this means frost protection is non-negotiable.
The most critical step is to drastically reduce watering. An indoor aloe might only need a tiny drink once a month, if that. Overwatering is the number one killer of aloes in winter.
For outdoor plants, frost is the biggest enemy. If you live in an area that gets frosts:
- Bring It Inside: The easiest solution is to bring potted aloes indoors to a bright, cool spot.
- Provide Shelter: Move plants under the eaves of the house, onto a covered deck, or into a greenhouse.
- Cover Up: For plants in the ground, throw some frost cloth over them on cold, clear nights.
Following this seasonal rhythm will help your aloe not just survive, but truly thrive in our beautiful Aotearoa conditions.
How to Propagate Aloe Pups Successfully
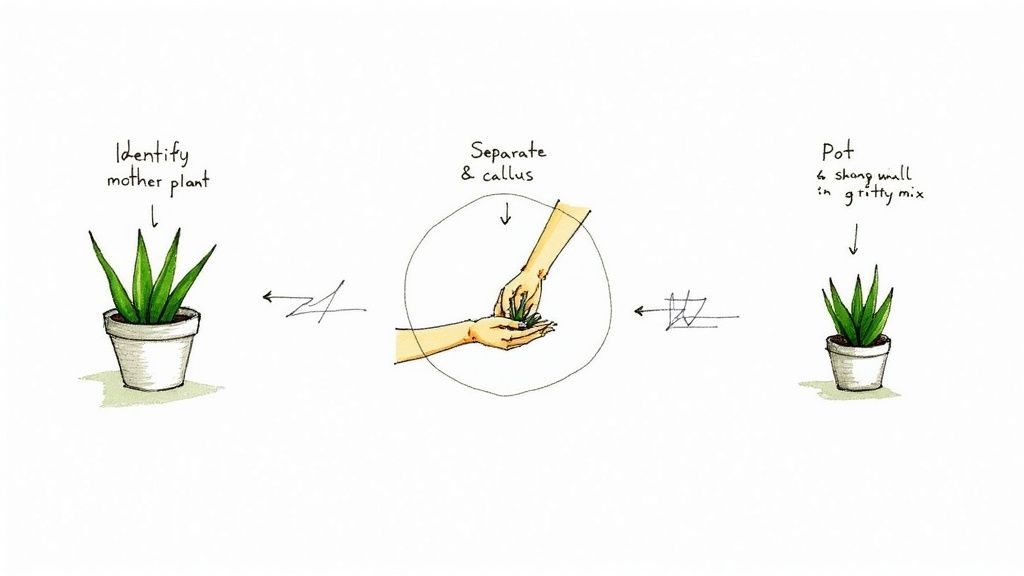
One of the best moments for any aloe owner is finding out your plant has had babies! These little offshoots, known as 'pups', are perfect clones of the parent plant. It's your ticket to an endless, free supply of new aloes for your own collection or to give away to friends. And honestly, propagation is surprisingly simple, even if you’re a total newbie.
Think of it like helping a grown-up kid move out. You wait until they’re mature enough, carefully help them on their way, give them a moment to recover, and then set them up in their own place. A bit of patience and a few basic tools are all you need to multiply your aloe family.
Here in New Zealand, the best time to tackle this is during the active growing season. Aim for late spring or early summer, around October to January, when both the mother plant and the pups have all the energy they need to heal up and grow new roots.
Step 1: Identifying a Ready Pup
Before you get started, you have to be sure the pup is actually ready to go it alone. If you separate it too early, it’ll really struggle to survive. It needs to be big enough to have started its own little root system.
Check around the base of the mother plant. A good rule of thumb is that the pup should be at least one-fifth the size of the parent. You also want to see several of its own proper leaves, not just tiny new sprouts. The more developed the pup looks, the better its chances of thriving.
Step 2: The Separation Process
Spotted a mature-looking pup? It's time to make the split. The key here is to be gentle – you want to minimise any damage to the mother plant and the little offset.
Here's how to go about it:
- Remove the Plant: Gently ease the entire mother plant out of its pot. This gives you a much better view of what’s going on and makes for a cleaner separation.
- Locate the Connection: Brush away the soil to find the thick, stem-like root connecting the pup to its mum. Often, you'll see the pup already has its own set of roots starting.
- Make the Cut: Grab a clean, sharp knife or pair of secateurs and make a clean cut to sever the connection. Try to keep as many of the pup’s own roots attached as you can.
Don’t panic if the pup comes away with just a tiny root nub or even nothing at all. Aloes are incredibly tough and can often sprout new roots right from the base of the cutting.
Crucial Tip: Let the pup's wound dry out and 'callus' over. Just pop it in a dry, shady spot for 2-4 days. This step is non-negotiable; it stops the fresh cut from rotting as soon as it hits the soil.
Step 3: Potting and Aftercare
Once the cut end is dry and calloused, your new aloe pup is ready for its new home. Potting it correctly is what sets it up for success and encourages strong, healthy roots.
Pick a small pot with great drainage holes—just a bit bigger than the base of the pup is perfect. Fill it with a free-draining cactus and succulent mix. Poke a small hole in the centre and settle the base of the pup in, just deep enough so it stands up on its own. Gently firm the soil around it.
Now for the hardest part: do not water it right away. I know it's tempting, but wait a full week before giving it a light drink. This forces the new roots to grow out searching for moisture. Keep your new pup in a spot with bright, indirect light until you see new growth. That’s the sign it has successfully rooted!
The basic idea of separating offsets works for lots of succulent-type plants. If you've enjoyed giving this a go, you can find more tips in our guide on how to propagate snake plants—another houseplant favourite that’s a breeze to multiply.
Solving Common Aloe Problems in New Zealand
Even the toughest plants hit a rough patch sometimes, and your aloe is no different. The good news is that most common aloe problems are simple to spot and even simpler to fix, especially once you know what to look for in our unique New Zealand climate.
From our notoriously damp winters to the surprisingly fierce summer sun, local conditions can throw up a few curveballs. So if your plant is looking a bit yellow, feeling soft, or stretching for the light, don't stress. Let's walk through the most frequent issues Kiwi aloe owners run into and get your plant looking its best again.
Diagnosing Yellow or Mushy Leaves
One of the most common SOS signals from an aloe is its leaves turning yellow and feeling soft, particularly down near the base. This is almost always a tell-tale sign of overwatering. In New Zealand’s more humid or cooler regions, soil can take way longer to dry out than you’d think, making it incredibly easy to give your plant more of a drink than it can handle.
If the leaves feel properly mushy or you spot brown, water-soaked patches, you might be looking at the early stages of root rot. This is what happens when the roots are left sitting in soggy soil for too long and start to decay.
The Solution:
- Stop Watering. Immediately. Let the soil dry out completely. Seriously. This could take a few weeks, especially during a chilly, damp winter.
- Check the Roots. If the plant looks really unhappy, it's time for a gentle inspection. Ease it out of its pot. Healthy roots are firm and white or a pale yellow; rotten ones will be brown, black, and mushy. Trim off any rotten bits with a clean, sharp knife.
- Boost Drainage. Before you pop it back in its pot, make sure there are plenty of drainage holes. And a gritty, free-draining succulent mix is non-negotiable for a happy aloe plant nz.
Here's the key takeaway: when in doubt, don't water. Aloes are built for drought. They will always forgive you for being a bit forgetful with the watering can, but they can quickly give up the ghost if they get too much moisture.
Understanding Leggy or Stretched Growth
Is your aloe looking a bit tall, pale, and gangly, with big gaps between the leaves? This is a classic case of etiolation, and it's a dead giveaway that your plant is desperately searching for more light. We see this a lot with indoor aloes during New Zealand’s darker winter months (June to August), when daylight hours are short and often grey.
The plant is literally stretching itself thin to reach a better light source. While you can't really undo the stretched growth that's already happened, you can stop it from getting worse and encourage new, more compact growth.
The Solution: Find the brightest spot in your house and move your aloe there. For indoor plants, a north-facing window (which gets the most sun here in the Southern Hemisphere) is perfect. If you just don't have a spot with enough natural sun, think about supplementing with a grow light to keep it happy through the winter.
Dealing with Common Pests
While they're generally pretty pest-resistant, aloes can sometimes attract a couple of unwanted guests, most often mealybugs and scale insects.
- Mealybugs: These little critters look like tiny bits of white cotton fluff. They love to hide deep in the nooks and crannies where the leaves join the stem, sucking the sap and weakening the plant over time.
- Scale: These show up as small, hard brown bumps on the leaves and stems. Just like mealybugs, they're there to feed on the plant's sap.
If you've only spotted a few, the fix is easy. Just dip a cotton bud in a bit of rubbing alcohol (isopropyl alcohol) and dab it directly onto each pest. It dissolves their protective coating straight away. For a bigger invasion, a spray with neem oil or a commercial insecticidal soap from any NZ garden centre will sort it out. Just be sure to follow the instructions on the bottle.
Where to Buy Your Aloe Plant in New Zealand
So, you’re ready to bring an aloe home. Fantastic! Finding the perfect plant is the first exciting step, and in New Zealand, you’ve got quite a few options. From the big-name garden centres to little local nurseries, each place offers a different vibe and selection.
Most of us will start our search at a major garden centre or a specialised local nursery. The big-box stores are great for convenience and you'll almost always find common varieties like Aloe vera and the striking Aloe arborescens. But if you're after something a bit different, your local nursery is often a treasure trove of unique finds and, best of all, expert advice for your specific corner of NZ.
Don't forget to look online, either. Online sellers often have a much wider range of species, and they'll deliver right to your door. And a little pro-tip: check out local gardening groups on Facebook. You can often snag a well-acclimatised 'pup' from a fellow Kiwi gardener who has one to spare.
What a Healthy Aloe Looks Like
No matter where you end up buying your aloe, give it a quick once-over before you head to the checkout. A healthy plant is a strong plant, ready to settle into its new home without a fuss. It doesn’t take long to train your eye to spot a winner.
Here’s what to look for:
- Firm, Upright Leaves: The leaves should look full and sturdy, standing up proudly. If they’re soft, floppy, or feel mushy, that’s a big red flag for overwatering and maybe even root rot.
- Good, Even Colour: You want to see a consistent, healthy green. While some aloes get a slight reddish or orange tint when they're a bit stressed (which is normal!), you should steer clear of plants with yellowing leaves or dry, brown tips.
- Pest-Free: Get in close and have a good look, especially down where the leaves meet the central stem. You’re checking for any unwanted guests, like the little white, fluffy clusters that signal mealybugs.
- A Solid Footing: Gently give the plant a little wiggle in its pot. It should feel firmly anchored. If it’s loose and wobbly, it might have a weak or underdeveloped root system.
Ornamental vs. Commercial Aloe Vera in NZ
Here’s something important to know: there’s a difference between the aloes sold for our gardens and the ones grown commercially for their gel. The vast majority of aloes you'll find in New Zealand garden centres are ornamental varieties. They’ve been chosen because they look great and are tough enough for home environments.
While many are technically types of Aloe vera, they aren't necessarily the specific cultivar, Aloe barbadensis miller, that's farmed for its potent medicinal gel.
In New Zealand, we don't really have a large-scale commercial industry for Aloe vera processing like you'd see overseas. Our supply usually comes from smaller, specialist growers or is imported. This just means the beautiful aloe plant nz you pick up is best enjoyed as a stunning addition to your home or garden. If you're looking to build out your indoor jungle, you can find more inspiration in our guide to great indoor houseplants.
Your Aloe Plant Questions Answered
Even the most seasoned plant parent has questions, and when it comes to growing aloes in New Zealand, a few common ones pop up time and again. Growing these succulents is incredibly rewarding, but sometimes you just need a quick, clear answer to get you back on track.
Think of this as your go-to troubleshooting guide. Let's tackle some of the most frequent queries from Kiwi gardeners so you can grow your aloes with total confidence.
Can I Grow My Aloe Plant Outside All Year?
This is a classic question, and the answer is a definite "it depends on where you live." New Zealand’s climate varies hugely from the subtropical north to the frosty south, and that makes all the difference for an aloe.
- Frost-Free Zones: If you're lucky enough to live in warmer, frost-free regions like Northland, coastal Auckland, or the Bay of Plenty, many aloe varieties will happily live outdoors year-round. They'll soak up the sun and thrive.
- Frost-Prone Areas: For gardeners in places like Canterbury, Otago, or the inland North Island, winter protection is a must. During our coldest months (roughly June to August), aloes need to be brought inside or moved to a sheltered spot like a covered porch to avoid frost damage.
Always double-check the specific frost tolerance of the aloe species you’re growing. Some are much hardier than others.
The golden rule for any aloe plant in NZ is protection from harsh frosts. A single cold snap can turn their water-filled leaves to mush, causing irreversible damage.
What Is the Best Soil Mix?
If you remember one thing about aloe soil, make it this: excellent drainage. Aloes absolutely hate having "wet feet," and waterlogged soil is the fastest way to invite root rot, especially during our wetter seasons.
You've got two simple options:
- Buy Pre-Made: The easiest route is to grab a bag of specialised cactus and succulent mix from your local garden centre. It's perfectly formulated for the job.
- Make Your Own: Fancy a bit of DIY? Just mix regular potting mix with a generous amount of an aerating material. A good ratio is about half potting mix and half perlite, pumice, or coarse sand.
This gritty, free-draining blend is the secret to happy, healthy roots. It ensures any excess water drains away quickly, preventing the plant from sitting in soggy soil.
How Often Should I Water My Aloe?
Put the watering can down and step away from the schedule! Never water your aloe on a fixed routine. Instead, let the plant and the soil tell you when it’s thirsty using the "soak and dry" method.
Wait until the top 5-7 cm of the soil is completely dry to the touch—poke your finger in there to check. Once it’s dry, water the plant thoroughly until you see water running out of the drainage holes at the bottom.
In a hot, dry Kiwi summer, this might mean a good drink every couple of weeks. But during a cool, damp winter, an indoor aloe might only need water once a month or even less. When in doubt, it’s always safer to underwater than to overwater.
Ready to find the perfect aloe for your home? From hardy outdoor specimens to elegant indoor varieties, Jungle Story connects you with New Zealand's best growers. Explore our huge collection and have a healthy, beautiful aloe delivered right to your door. Start your succulent journey today at https://junglestory.co.nz