Picture this: a citrus fruit that doesn't just squirt juice, but instead spills out a cascade of tiny, flavourful pearls. That’s the magic of the finger lime, the so-called 'citrus caviar' that’s been making waves in New Zealand gardens. This fascinating Australian native delivers a texture and a zesty burst of flavour that's truly unlike anything else you can grow at home.
Meet the Citrus Caviar Thriving in New Zealand
The finger lime is more than just a quirky fruit; it's a whole sensory experience. Think of it as nature's answer to popping candy, but with a refined, tangy lime kick. When you slice one open, you won't find the usual segments of pulp. Instead, dozens of tiny, individual juice-filled sacs, known as vesicles, tumble out. These little pearls hold their shape perfectly until they pop in your mouth, releasing a clean, intense hit of citrus.
This incredible fruit, scientifically called Citrus australasica, comes from the subtropical rainforests of Australia's east coast. It's made the journey across the Tasman with great success, thanks to New Zealand’s rather accommodating climate. The plant has settled in beautifully in our warmer regions, especially in the sunny, humid microclimates you find in places like Northland and the Bay of Plenty.
A Perfect Match for Kiwi Gardens
While it's not a native, the finger lime's sheer adaptability makes it a brilliant choice for Kiwi gardeners. Its resilience and unique appeal have sparked a small but passionate cultivation scene right here. We're still talking small scale, with estimates putting the number of trees at under 1,000 nationwide as of 2023. The focus is on self-fertile varieties, which makes growing them at home a breeze.
This niche interest is a great addition to New Zealand's specialty fruit sector, with those incredible pearls commanding top dollar at local farm stands and farmers' markets. If you're keen to dig deeper, you can explore the history of Citrus australasica and its journey to global cultivation.
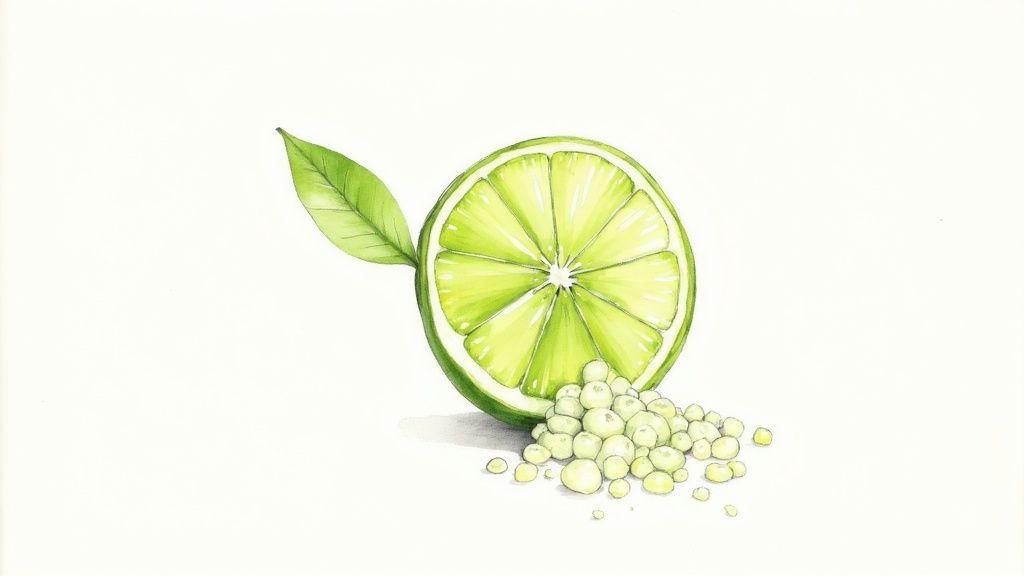
This image captures the unique interior of the finger lime perfectly, showing off those individual 'caviar' pearls. It really highlights the distinct separation of the vesicles, which is exactly what gives the fruit its signature texture and makes it such a prize for chefs.
Your Journey Starts Here
Consider this guide your starting point for growing one of the most exciting fruits out there. We’ll walk you through everything, from choosing the right variety for your garden to harvesting and, of course, using these amazing citrus pearls in your own kitchen.
Whether you've got a big backyard or just a sunny spot on the balcony, growing your own finger lime NZ tree is a totally achievable—and incredibly rewarding—project. Let's get started.
Picking the right finger lime tree for your garden is easily the most important first step you'll take. It's not just about getting a plant in the ground; it's about setting yourself up for a fantastic harvest down the track.
Finger limes come in a wild array of colours, flavours, and sizes. The variety you choose will literally shape everything from the look of your garden to the taste of your gin and tonic, so it pays to get it right.
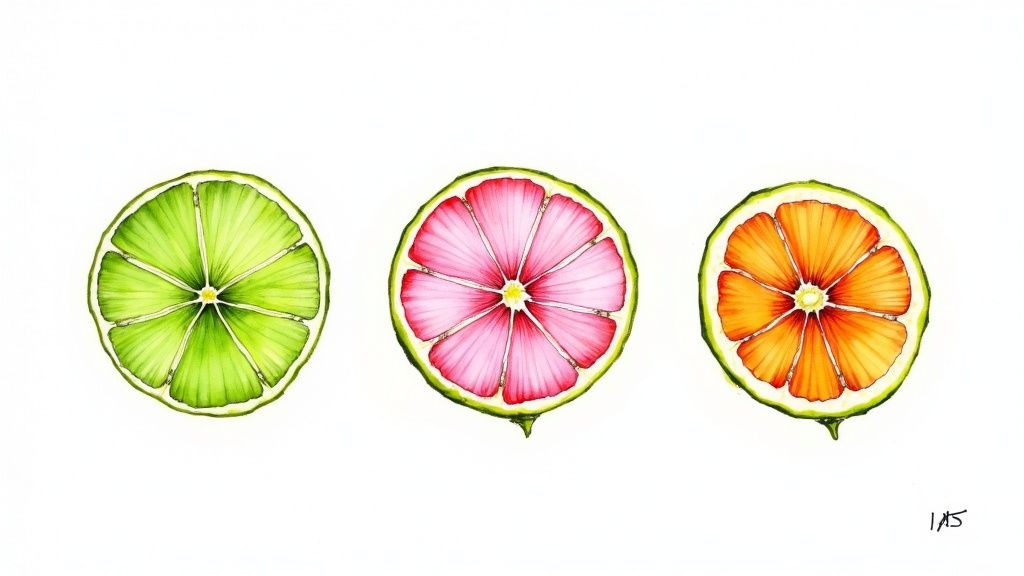
Think of it like choosing an apple tree. You wouldn't plant a Granny Smith if you were after a sweet, mellow apple like a Royal Gala. Finger limes are just the same. Some are intensely sour and zingy, others are more aromatic and subtle. Their "pearls" – the little juice vesicles inside – can be anything from emerald green to ruby red or a stunning sunset pink.
And of course, your local climate here in New Zealand is a huge factor. A variety that loves the balmy, humid air of Northland will likely throw a tantrum during a frosty Canterbury winter. That’s why getting to know the different cultivars before you buy is non-negotiable.
Popular Finger Lime Varieties in New Zealand
While there are dozens of types out there, a handful have really proven themselves as solid performers in Kiwi gardens. Most of the time, these are grafted onto tough citrus rootstock, which gives them a much better chance of thriving in our local soils and conditions.
Let’s take a look at a few of the top contenders you’re likely to come across.
To help you decide, we've put together a quick comparison of some of the most popular and reliable finger lime varieties available in New Zealand. This should give you a good starting point for matching a tree to your garden's climate and your culinary ambitions.
Finger Lime Varieties Suited for New Zealand Growers
| Variety Name | Skin Colour | Pearl Colour | Flavour Profile | Best NZ Region |
|---|---|---|---|---|
| 'Emerald' | Dark green to black | Vibrant light green | Classic, sharp lime zing. Great for beginners. | North Island, Nelson/Marlborough |
| 'Byron Sunrise' | Reddish-brown | Brilliant red-pink | Less acidic, slightly sweeter, complex notes. | Warmer North Island, sheltered spots |
| 'Rainforest Pearl' | Greenish | Beautiful pinkish-red | Wonderfully balanced, versatile for all dishes. | Northland to Bay of Plenty |
| 'Judy's Everbearing' | Dark brown/black | Clear to pale pink | Refreshing and tangy, fruits for a longer season. | Most frost-free areas of North Island |
These are just a few of the fantastic finger lime nz options you can get your hands on. Remember, the "best" one is really the one that best suits your patch of paradise. For more general advice on choosing the right tree, our complete guide to growing fruit trees in NZ has heaps of useful info.
Matching a Variety to Your Space
Beyond the fruit itself, think about the tree's actual shape and size. Some finger lime varieties are naturally dense and thorny as anything, which actually makes them a brilliant, almost impenetrable hedge. Others, especially those sold as 'standard' trees, have a more graceful, weeping form that looks gorgeous and is far easier to harvest from.
For smaller gardens or patios, a 'standard' grafted tree is an ideal choice. Its open structure makes it easier to manage in a pot and simplifies picking the fruit, which hangs conveniently from weeping branches.
If you're tight on space, don't stress. Almost any finger lime can be grown happily in a large pot. In fact, this is what we'd strongly recommend for gardeners in colder spots like Otago and Southland. It means you can simply shift the plant into a sheltered spot, like a porch or glasshouse, when the harshest winter weather hits.
When you're thinking about where to put it, you can get some great ideas from concepts for incorporating edible plants into your landscape design, making your garden both productive and beautiful. Getting the right tree from the start is the key to a garden that doesn't just survive, but truly thrives.
How to Plant Your Finger Lime Tree for Success
Getting your finger lime tree settled in properly is the most important thing you can do to guarantee years of those incredible, pearl-filled fruits. It’s all about giving it the best possible start. Let’s walk through how to get it right, with a few tips tailored for our unique Kiwi conditions.

Finding the Perfect Spot
Your finger lime’s future happiness hinges on its location. Think of it like finding prime real estate for your plant; getting this right now saves a world of headaches later. As subtropical natives, they crave warmth and sun to really hit their stride.
Here in New Zealand, that means finding the sunniest, most sheltered spot you can offer. You’re looking for a position that gets at least six to eight hours of direct sunlight a day. A north-facing wall is often a perfect choice, as it soaks up the sun’s rays and radiates warmth back, creating a cosy little microclimate.
Protection from the elements is just as crucial. Fierce winds can stress the tree, damaging its delicate leaves and flowers, and a hard frost can be a deal-breaker, especially for a young plant. Find a sheltered nook, maybe tucked away by a fence, a hedge, or the side of the house, to give it the best shot at thriving.
Preparing the Soil
Finger limes are a bit fussy about their feet. They absolutely hate being waterlogged, so excellent drainage is non-negotiable. If their roots sit in soggy soil for too long, you're asking for trouble.
The ideal soil is slightly acidic and packed with plenty of organic goodness. If you’re dealing with heavy clay, common in many parts of New Zealand, you’ll need to do a bit of work. Clay holds far too much moisture and is the fastest route to root rot, one of the few serious problems for these otherwise tough trees.
To get your planting site ready:
- Boost Drainage: Dig in generous amounts of compost, well-rotted manure, or even a little sand. This will help break up that dense clay and improve its structure.
- Enrich the Soil: Mix in quality organic matter to provide a steady supply of nutrients, mimicking the rich, loamy soil of their native rainforest home.
- Consider a Mound: If your garden tends to be damp, planting on a raised mound or in a raised garden bed is a brilliant strategy. It guarantees water will drain freely away from the sensitive roots.
For a deeper dive into creating the perfect foundation, we’ve got a heap of information in our complete guide to choosing the right potting mix and soil.
A Step-by-Step Planting Guide
The best time to get your finger lime in the ground in New Zealand is spring or early summer, usually between September and December. This gives the tree the whole warm season to get its roots established before the cooler weather rolls in.
Here’s a simple, step-by-step process for planting in the garden:
- Dig the Hole: Go for a hole that’s about twice as wide as the plant's root ball, but only just as deep. This gives the roots plenty of loosened soil to spread out into.
- Free the Roots: Gently slide the tree out of its nursery pot. If the roots are tightly wound up (what’s known as being 'root-bound'), carefully tease them apart with your fingers to encourage them to grow outwards into their new home.
- Position the Tree: Pop the plant in the centre of the hole. The critical part here is making sure the top of the root ball is level with the surrounding ground. Planting too deep can cause the trunk to rot at the soil line.
- Backfill and Firm: Fill the hole back in with your lovely prepared soil, gently patting it down around the roots to get rid of any big air pockets.
- Water Generously: Give your new tree a really deep, thorough soak. This helps the soil settle and makes sure the roots have immediate access to the moisture they need.
- Stake for Support: A stake is a great idea, especially in wind-prone spots. It keeps the young tree stable, preventing the new roots from being disturbed and helping the trunk grow straight and strong.
Once it's planted, add a layer of mulch like pea straw or wood chips around the base. This simple trick helps the soil hold onto moisture, keeps weeds down, and protects the roots from our hot Kiwi sun. Just remember to leave a small gap right around the trunk to stop moisture from building up against the bark.
Getting into the Groove: Seasonal Care in New Zealand
A finger lime tree, like any good fruit tree, really hits its stride when you work with its natural rhythm. Think of it as an ongoing conversation you have with your plant throughout the year, giving it what it needs, right when it needs it. This encourages strong growth, beautiful flowers, and eventually, a fantastic harvest. For those of us growing finger lime NZ trees, this means syncing up our care schedule with our unique Southern Hemisphere seasons.
Following a seasonal checklist is the best way to keep your tree healthy, happy, and productive. Here’s a breakdown of what to do and when, right through a typical New Zealand year.
Spring (September – November)
Spring is when everything happens at once. It’s a time of explosive growth as your tree wakes up from its winter dormancy, and it's the critical moment when flowers begin their journey to becoming fruit. As the days get longer and warmer, your finger lime kicks into high gear, and your attention here really counts.
- Watering: Start watering more often as the temperature climbs. A good rule of thumb is to check the soil every few days; when the top few centimetres feel dry, give it a deep, thorough soak. Consistent moisture is absolutely vital as the tiny fruits start to set.
- Feeding: This is the main feeding window. Give your tree a good quality, balanced citrus fertiliser in early September to power all that new growth. Hold off on any more feeding until the fruitlets are at least 1 cm long – feeding too early can sometimes cause the tree to drop them.
Summer (December – February)
The Kiwi summer sun brings the heat, and often, long dry spells. Your main job during these months is to protect your tree from stress. You want to make sure it has enough water to plump up those developing limes without getting scorched by the heat.
Hydration and protection are the name of the game. This is especially true for trees in pots, which can dry out incredibly fast on a hot day.
A simple layer of mulch, like pea straw or wood chips, is your best friend in summer. It acts like a protective blanket over the soil, locking in precious moisture, suppressing weeds, and keeping the root zone cool.
Autumn (March – May)
As the intense summer heat begins to fade, your finger lime starts to harden off its new growth, getting ready for the cooler months. The fruit will be coming along nicely, slowly maturing on the branches. You can ease back on your care routine a bit now.
- Watering: You can water less frequently now, as we usually get more rain and there’s less evaporation. Keep checking the soil, but let it dry out a little more between drinks. Overwatering as the soil cools can lead to root issues.
- Feeding: Give the tree one last feed with a citrus fertiliser around March. This provides a final nutritional boost to get it through winter and helps with the last stage of fruit ripening.
Winter (June – August)
Winter is a time of rest for the tree, but it's an exciting time for the gardener because this is when the flowering cycle kicks off. Here in New Zealand, finger limes usually start flowering from late winter into early spring. The tree is mostly dormant, so your main job is to protect it from the cold and keep an eye out for those beautiful, delicate blossoms.
Minimal intervention is key. Avoid any heavy pruning or feeding during these months. Only water if you hit a long dry spell and the soil gets completely dry, which is pretty rare in most New Zealand winters. If you live in a frost-prone area, it’s a wise move to cover young trees with frost cloth on those clear, cold nights.
The buzz around these unique fruits is definitely growing. To give you an idea, the Australian finger lime industry saw its farmgate value jump from $600,000 in 2017 to $3.1 million by 2020. Kiwi growers are getting in on the action too, using tough citrus rootstocks to grow trees that can yield 4-6 tonnes per hectare once they're established, with our harvest season landing perfectly between late August and November.
Pruning for Health and Harvest
The best time to prune is after the main harvest, usually in late spring or early summer. The goal isn't to dramatically reshape the tree, but more of a tidy-up to keep it healthy and make harvesting easier. Focus on taking out any dead, damaged, or crossing branches. This opens up the canopy and improves airflow. Beyond this simple clean-up, learning specific techniques for pruning fruit trees for a better harvest can make a huge difference to your yield and the overall health of your tree.
Harvesting and Using Your Homegrown Citrus Pearls
After all the care you've put into your tree, the best part finally arrives: harvest time. There's nothing quite like enjoying the literal fruits of your labour, but the trick with finger limes is knowing exactly when to pick them. It’s all about learning to read the subtle cues your tree sends out.

Unlike a lemon or a standard lime, finger limes don’t exactly shout when they’re ready. The change can be pretty subtle. You might notice the skin softening just a little, or the colour deepening, maybe even developing a slight blush depending on the variety. A ripe finger lime should feel plump and firm in your hand, packed full of those precious citrus pearls.
The real giveaway, though? How easily the fruit parts from the branch. A perfectly ripe finger lime will pop right off with a gentle twist. If you find yourself having to give it a good yank, it’s not quite there yet. Just give it a few more days on the tree to finish doing its thing.
How to Harvest Your Citrus Caviar
For most finger lime NZ gardens, the main harvest season kicks off in late winter and runs through to late spring, roughly from August to November. Of course, this can shift a bit depending on your specific variety and local climate.
Now, harvesting can be a thorny issue—literally. Many finger lime trees are covered in prickles, so a decent pair of gardening gloves is a very good idea to save your hands from getting scratched up.
- Look for Plumpness: Go for the fruits that look and feel full and substantial.
- Give a Gentle Twist: Hold the fruit and give it a slight turn. If it detaches easily, it’s good to go.
- Work Methodically: I find it helps to start on one side of the tree and work your way around so you don't miss any of those little gems hiding amongst the leaves.
Once they're off the tree, your finger limes have an impressive shelf life. They’ll keep perfectly well in a fruit bowl at room temperature for about a week. If you want them to last longer, pop them in the crisper drawer of your fridge, where they can stay fresh for up to a month. You can even freeze them whole, which is a brilliant way to preserve their unique texture and flavour for later.
The real magic happens when you cut the fruit in half and give it a gentle squeeze from one end. The citrus pearls will spill out effortlessly, ready to completely transform a dish with their incredible zesty burst.
Unleashing the Flavour in Your Kitchen
The real joy of growing your own finger limes is discovering all the incredible ways you can use them. These little pearls are so versatile, adding a pop of sharp acidity and a sophisticated texture that elevates both sweet and savoury dishes. They are a total game-changer in the kitchen.
Here are a few ideas to get you started:
- Elevate Seafood: A sprinkle of finger lime pearls over freshly shucked oysters, grilled fish, or seared scallops is just stunning. The burst of flavour is a perfect match for delicate seafood.
- Transform Salads and Dressings: Toss the pearls through a fresh green salad for surprising little pops of citrus, or mix them straight into a vinaigrette for a dressing with an amazing texture.
- Garnish Desserts: Scatter them over a cheesecake, pavlova, or a simple panna cotta. They look beautiful and their tangy kick cuts right through the sweetness.
- Brighten Up Cocktails: Drop a spoonful of pearls into a gin and tonic, a margarita, or even a glass of bubbles. They sink to the bottom like tiny jewels and release their flavour as you sip.
Troubleshooting Pests and Diseases in NZ Gardens
Even with the best care, plants can sometimes run into trouble. The great news is that finger limes are remarkably tough customers. Thanks to their thorny branches and hardy genetics, they have a solid natural defence against many common garden issues. The key, as always, is knowing what to look out for so you can keep your tree in peak condition.
Most problems you might encounter are the usual suspects you'd find in any New Zealand citrus patch. A little bit of vigilance and the right approach will see you through, keeping your finger lime NZ tree happy for years to come.
Common Garden Pests
When pests do decide to show up, they're typically the same ones that bother other citrus trees. Your best strategy is to catch them early.
- Aphids: These tiny, sap-sucking insects love to cluster on fresh, tender new growth in the spring. Often, a sharp spray of water from the hose is enough to send them packing. For a more stubborn infestation, an organic solution is the way to go.
- Scale Insects: Keep an eye out for small, brown, motionless bumps on the stems and undersides of leaves. They slowly weaken the plant by feeding on its sap.
- Citrus Leafminer: You'll spot this pest by its handiwork – distinctive silvery trails, or "mines," tunnelling through young leaves, which causes them to curl up and look distorted.
For an effective, low-impact way to deal with these critters, many Kiwi gardeners reach for organic sprays. A well-made horticultural oil or even a simple homemade soap spray can do the trick. For a deeper dive, check out our guide on using neem oil for plants; it's a fantastic organic control method.
Preventing Disease Before It Starts
When it comes to diseases, an ounce of prevention is truly worth a pound of cure. Finger limes are naturally resilient, but they have one Achilles' heel, especially in New Zealand's wetter regions.
The single biggest threat to a finger lime tree is root rot, specifically from the fungus Phytophthora. It absolutely thrives in waterlogged soil, which is why making sure you have excellent drainage when you plant is completely non-negotiable.
Heavy clay soils, a common feature across many parts of NZ, are the main culprits for trapping too much moisture around the roots. The best things you can do are to amend your soil with plenty of compost and grit or to plant your finger lime on a raised mound. A healthy, well-drained root system is the absolute foundation of a thriving, disease-free tree.
This natural resilience is part of what makes the finger lime such an exciting crop for New Zealand's boutique fruit scene. While places like Guatemala lead global production, NZ's small-scale cultivation, with around 5,000 trees, is growing fast. This growth is backed by research into the plant's natural resistance to diseases that plague other citrus. You can find more insights on the rise of finger lime cultivation and its genetics. By focusing on good drainage and airflow, you're playing to the plant's natural strengths, creating a healthy environment where problems are far less likely to get a foothold.
Here are the most common questions we get from Kiwi gardeners who are excited to get a finger lime tree in the ground. Hopefully, these quick answers give you the confidence to get started.
How Long Until My Tree Fruits?
This is always the first question, and for good reason! If you've got one of our grafted finger lime trees, you're in luck. You can realistically expect to see your first small crop within 2-3 years of planting it out.
Once it hits year four or five, the tree really settles in and starts producing much more generous harvests. Of course, this all depends on things like your local climate, how much sun it's getting, and the love you give it.
Can Finger Limes Grow in Colder Regions?
You absolutely can grow finger limes in colder spots like Canterbury or Otago, but you'll need a bit of a strategy. These are subtropical trees, so they really don't appreciate a hard, prolonged frost.
A mature, well-established tree can probably handle a fleeting, light frost (down to about -2°C), but young plants are far more delicate. The best bet for regions with reliable winter freezes is to grow your finger lime in a large pot. That way, you can easily move it into a sheltered spot—like under the eaves, in a glasshouse, or even into the garage—when the cold really bites.
Do I Need More Than One Tree for Pollination?
Nope, just one tree is all you need to get fruit. The vast majority of finger lime varieties available here in New Zealand are self-fertile.
The local bees and other insects are usually more than happy to do the pollination work for you. That said, if your tree is in a super sheltered spot like a glasshouse where insects might not visit, you can always play matchmaker. Just take a small, soft paintbrush and gently tickle the inside of each flower, transferring pollen from one to the next.
Ready to start growing your own citrus caviar? Check out our amazing selection of healthy, grafted finger lime trees at Jungle Story. We’ve got varieties perfect for any Kiwi garden, and we'll deliver it right to your door. Find your perfect tree today at https://junglestory.co.nz.