It's a classic for a reason: turning that avocado stone you nearly tossed into a thriving, leafy plant is one of the most rewarding little projects you can do. The process is surprisingly simple. You just need to get the seed started—either suspended over water or planted straight into some soil—and keep it moist in a warm, sunny spot. Before you know it, you'll see a root appear, followed by a stem, usually within a few weeks.
From Kitchen Scrap to Leafy Houseplant


Growing an avocado from a seed is one of those deeply satisfying indoor gardening journeys. You’re literally transforming a bit of kitchen scrap into a gorgeous houseplant that brings a lush, green vibe into your home. This guide is written with New Zealand gardeners in mind, so we’ll be keeping our local seasons and temperate climate at the forefront.
The best part? You don't need a huge garden or any fancy gear. A single avocado stone, a few basic supplies, and a bit of patience are all it takes to watch the magic happen right on your windowsill.
What to Expect on Your Growing Journey
Let's skip the complicated horticultural jargon and get straight to what it’s really like. We’ll walk you through the whole process, from choosing the right seed out of your supermarket avocado to the exciting moment you see that first green shoot poke through. It’s important to know this is more about the joy of growing something than it is about getting fruit. While it's not impossible, avocados grown from seed can take anywhere from 8 to 20 years to mature, with no guarantee they'll ever produce avocados.
The real reward is in the experience itself. We'll cover the two most common ways to get your seed started:
- The Classic Water Method: This is the one you’ve probably seen online, using toothpicks to suspend the stone over water. It’s fantastic because you get a front-row seat to watch the roots emerge.
- The Straightforward Soil Method: A more hands-off approach that mimics how avocados grow in nature. You simply plant the stone directly into a pot of soil.
We’ll go through the real-world pros and cons of each method so you can choose the one that fits your home and curiosity best. Consider this your complete roadmap to successfully growing your own avocado plant from a seed.
The Best Time to Start in New Zealand
To give your avocado seed the very best shot here in New Zealand, you'll want to start your project in the spring. Aim for sometime between September and November.
Starting during these months gives your seed the benefit of naturally increasing daylight and warmer temperatures, which is the perfect recipe for encouraging it to sprout. You can definitely start at other times of the year, but spring gives your little plant a powerful head start before the cooler, darker days of winter set in. Right, let's get that humble stone started on its journey to becoming your new favourite houseplant.
Selecting and Preparing Your Avocado Stone
Your whole avocado-growing adventure starts with one simple choice: the stone itself. It might seem like a small thing, but not all avocado stones are created equal. Picking a healthy, viable one is the very first step, and honestly, it’s the most important one for getting a good result. Think of it as laying the foundation before you build a house.
It all begins at the supermarket. When you're picking out an avocado, you want one that's ripe but still has a bit of firmness. If it's overripe and mushy, the stone inside might have already started to rot. A rock-hard one isn't great either. The perfect 'ready-to-eat-today' avocado usually holds the perfect stone for growing.

Finding the Best Avocado Varieties in New Zealand
While pretty much any avocado stone can be coaxed into growing, some varieties just give you more vigorous seedlings. Here in New Zealand, you'll mostly come across two types: 'Hass' and 'Fuerte'.
- 'Hass' Avocados: These are the classic small, dark avocados with bumpy skin. They’re everywhere, and their stones are famously reliable sprouters.
- 'Fuerte' Avocados: These are the bigger, pear-shaped ones with smooth green skin. Their stones are also excellent candidates.
You really can't go wrong with either. The main thing is just to start with a healthy fruit so you can get an undamaged stone.
The Gentle Art of Removing the Stone
So, you’ve enjoyed your avocado on toast. Now it's time to get that stone out. This part is surprisingly delicate. When you slice the avocado open, try your best not to hit the stone with the knife. A deep gash can damage the little embryo inside and stop it from ever sprouting.
The best way is to slice all the way around the avocado lengthwise, then gently twist the two halves apart. One side will come away clean, leaving the stone in the other half. From there, use a spoon to gently scoop the stone out. It’s much safer than trying to pry it out with your knife tip and massively reduces the risk of damage.
A little nick or scratch might not seem like a big deal, but it can be the difference between a sprouting seed and a mouldy one. Treat that stone with care right from the start.
Once your stone is free, it needs a good clean. You have to get all of the green flesh off. Any leftover bits of fruit will just invite mould, which is one of the top reasons germination fails.
Rinse the stone under warm water and give it a gentle scrub with your fingers or a soft brush until it’s completely clean. Then, just pat it dry with a paper towel. A clean stone is a happy stone, ready for the next step.
Big Seeds Mean Better Seedlings
Interestingly, the size of the avocado stone you pick can really make a difference. While any size can work, bigger stones tend to have more stored energy, which gives the seedling a more powerful kickstart in life.
This is especially true for us growers in New Zealand. Research has shown that seed size has a direct impact on how well the seedling does. Seeds weighing over 80 grams hit germination rates above 70%. These bigger seeds also produce seedlings that are taller, have thicker stems, and just more oomph overall. This initial head start can shorten the time it takes to get an established plant by 20-30% – a huge advantage for any Kiwi gardener. You can discover more insights about these avocado seedling findings and how they apply to New Zealand’s growing systems.
Identifying Top from Bottom
Okay, last step before we get to the fun part. You need to figure out which end is up. This is absolutely crucial. Roots grow from the bottom, and the stem sprouts from the top. If you get it backwards, the seed just won't grow.
Luckily, it’s usually pretty easy to tell:
- Look at the shape: Most avocado stones are a bit pointed on one end and flatter on the other. The pointed end is the top, where the sprout will come out.
- Observe the colour: The flatter end is the bottom, which is where the roots will emerge. This end is often a bit lighter in colour and might have a small round mark where it was attached to the fruit.
Once you’ve confidently worked out top from bottom, your stone is prepped and ready to go. You’ve picked a winner, cleaned it up, and got it oriented for success. Now for the exciting bit—getting it to sprout.
Two Proven Germination Methods for Success

Now that you've got a clean avocado stone and you know which end is which, it's time for the magic to happen. Getting that stone to sprout is easily the most rewarding part of the journey, where you watch a humble seed crack open and start its transformation into a proper plant.
You've got two main paths to choose from: the classic 'water method' or the more hands-off 'soil method'. Neither is better than the other; it’s all about what fits your space, your routine, and how curious you are. Let's figure out which germination technique is the perfect one for you.
The Classic Water Method
This is the one most people think of when they picture growing an avocado from a stone. It’s a favourite for good reason — you get a front-row seat to the entire germination show. Watching those first roots snake out is a fantastic experience, perfect for kids, classrooms, or anyone who just loves to see nature in action.
You'll need three toothpicks and a glass or jar to get started. Gently but firmly poke the toothpicks into the sides of your avocado stone, angling them slightly upwards. Think of them as a little scaffold that will suspend the stone over your glass. Try to space them evenly around the middle of the stone.
Next, rest the stone on the rim of the glass with the flat 'bottom' end pointing down. The goal is to submerge only the bottom third to a half of the stone in water. It’s crucial that the pointed top end stays dry and exposed to the air. Find a warm spot for your setup, like a sunny windowsill that gets plenty of bright, indirect light.
Be prepared to be patient. It can take anywhere from four to eight weeks for the stone to split and a taproot to emerge. Some are faster, some are slower, so don't lose hope if you don't see anything happening right away.
Keeping the water fresh is absolutely key to success. You'll want to change it every five to seven days to stop any mould or bacteria from building up. If you notice the water level dropping from evaporation, just top it up to make sure the bottom of the stone stays submerged.
The Direct Soil Method
If fussing with toothpicks and water changes sounds like a bit much, the soil method is a brilliant, straightforward alternative. This technique is more "set it and forget it," closely mimicking how an avocado would grow in the wild. It demands less daily attention, which is a big plus if you have a busy schedule.
For this approach, grab a small pot (around 15cm in diameter) with good drainage holes and some quality potting mix. Fill the pot with your mix, leaving a little room at the top.
Now, plant your prepared avocado stone right into the soil. You want to bury the bottom half, leaving the pointed top half completely exposed to the air. This is vital — burying the entire stone will likely cause it to rot before it ever gets a chance to sprout.
Pop the pot in a warm, sunny spot. Your main job now is to keep the soil consistently moist but never waterlogged. A good rule of thumb is to water it whenever the top centimetre or so of soil feels dry to the touch. This method often takes longer to show results, as all the initial action is happening under the surface. You could be waiting for up to three months before a sprout finally pokes through.
Avocado Stone Germination Method Comparison
So, which germination journey should you embark on? Both methods will get you there, but they cater to different styles of plant care. To help you decide, here’s a quick comparison of the two approaches.
| Feature | Water Method | Soil Method |
|---|---|---|
| Visibility | Excellent. You can see the roots and sprout forming in real time. | Low. All the initial growth happens out of sight under the soil. |
| Maintenance | Higher. Requires regular water changes and top-ups every few days. | Lower. Just needs consistent watering to keep the soil moist. |
| Sprouting Time | Faster. Usually takes 4-8 weeks to see visible sprouting. | Slower. Can take up to 2-3 months for a sprout to emerge. |
| Risk of Rot | Lower, as long as water is changed regularly. | Higher, if the soil is overwatered or has poor drainage. |
| Best For | Visual learners, children, and those who enjoy observing the process. | Gardeners who prefer a more natural, hands-off approach. |
Ultimately, there’s no wrong choice here. Whether you opt for the fascinating transparency of the water method or the simple reliability of the soil method, you’re well on your way. The next crucial phase is nurturing that tiny new sprout into a thriving young plant.
Potting and Caring for Your Avocado Seedling
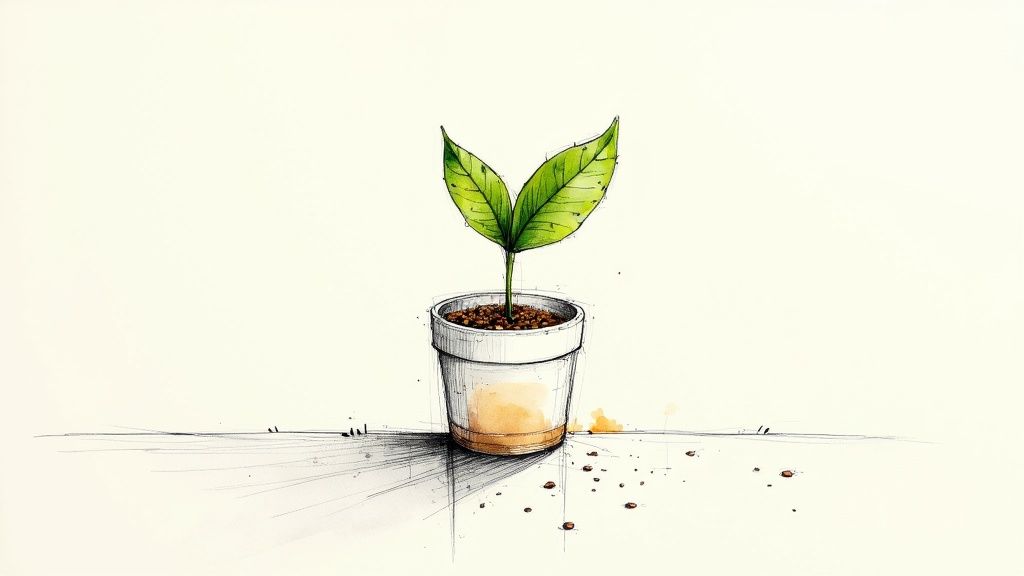
Congratulations, you've got a sprout! That first glimpse of a green stem pushing its way out of the avocado stone is a truly exciting moment. It signals the end of germination and the start of your avocado's life as a proper plant.
Now, it’s time to graduate your little seedling from its glass of water or starter container into its very first pot. This is a critical step, and getting it right sets the stage for a strong, healthy houseplant you can enjoy for years.
Knowing When It's Time to Pot
Patience is key during germination, but so is timing this next move correctly. Move your seedling too early, and you risk shocking its delicate new root system. Wait too long, and you could end up with a tangled, unhappy mess of roots.
Keep an eye out for these signs that your avocado seedling is ready for its new home:
- A Healthy Taproot: The main root should look robust and be at least 5–7 centimetres long. A well-developed root system is the engine for all future growth.
- A Sturdy Stem: You should see a stem that has pushed its way out of the top of the stone and is now several centimetres tall.
- The First Leaves: At least a couple of small leaves should be starting to unfurl at the top of the stem.
Once your seedling ticks all these boxes, it’s strong enough to handle the transition into soil.
Choosing the Right Pot and Soil Mix
Think of your seedling's first pot as its new universe—choosing wisely is essential. The two most important factors here are size and drainage.
Start with a pot that's around 15–20 centimetres in diameter. This gives the roots enough room to expand without being swamped by a huge volume of soil that stays wet for too long. Crucially, make sure the pot has at least one decent-sized drainage hole at the bottom. Avocado roots absolutely despise sitting in soggy soil. Once your avocado seed has sprouted, choosing the right home is crucial. You can explore a wide selection of planters to find the perfect fit.
Next up is the soil. Standard garden soil is usually too dense and can easily compact, which will suffocate the roots. You need a potting mix that’s light, airy, and drains freely. This is a non-negotiable for avocado plants.
For the best results, grab a high-quality mix designed for indoor plants. Look for ingredients like perlite, pumice, or sand, which all help create air pockets and improve drainage. To make things simple, we've put together a detailed guide on selecting the perfect indoor potting mix.
When you're potting it up, be incredibly gentle with that main taproot. Place the seedling in the pot so that the top half of the avocado stone remains exposed above the soil line, just like it was in the water. Backfill with your potting mix and lightly firm the soil around the stone.
Essential Care for Your Young Plant
With your seedling happily potted, the focus now shifts to giving it the right environment to thrive. Light, water, and early-stage nutrients are your three pillars of care.
Finding the Perfect Sunny Spot
Avocado plants are sun-worshippers. Place your newly potted seedling on the sunniest windowsill you have, ideally one that gets at least six hours of bright, indirect sunlight each day. Here in New Zealand, a north-facing window is perfect for providing that consistent, all-day light.
Mastering the Watering Routine
This is where many new growers slip up. The goal is to keep the soil consistently moist but never waterlogged. A good rule of thumb is the 'finger test': stick your finger about 2–3 centimetres into the soil. If it feels dry, it’s time for a drink.
When you do water, do it thoroughly. Pour water evenly over the soil until you see it start to run out of the drainage hole at the bottom. This ensures the entire root ball gets properly hydrated. Just remember to discard any excess water that collects in the saucer below.
Early-Stage Feeding
Your fresh potting mix will have enough nutrients to keep your seedling going for the first month or two. After that, it’s time to start a gentle feeding routine to support its rapid growth.
During the growing season—spring and summer here in New Zealand (September to February)—feed your young plant with a balanced, water-soluble fertiliser every 3–4 weeks. Make sure to dilute it to half the recommended strength to avoid burning the delicate new roots. You can hold off on fertilising during the cooler, darker months of autumn and winter when the plant’s growth naturally slows right down.
Encouraging Bushy Growth and Troubleshooting Problems
Once your avocado seedling really starts to take off, it often shoots up as one long, ambitious stem. It's exciting to see that height, but it can leave you with a lanky, sparse plant instead of the lush, bushy tree you were probably hoping for.
Thankfully, a little strategic pruning is all it takes to encourage a fuller shape. This technique is often called ‘pinching back’, and it's surprisingly simple. Wait until your plant is about 30 centimetres tall, then take some clean scissors and snip off the very top cluster of leaves.
This little trim removes the main growth point, which sends a signal to the plant to redirect its energy. Instead of growing taller, it will start pushing out new branches from the nodes along the stem, creating a much fuller, more robust plant. It might feel wrong to cut your plant back, but trust me, this is the secret to getting that classic leafy look. If you get serious about it, it's worth learning how to prune fruit trees for better harvests in general.
Solving Common Avocado Plant Problems
Even with the best intentions, you might run into a few issues. Don't stress—most of them are easy to diagnose and fix. Here are some of the most common dramas New Zealand growers face and how to get your plant happy again.
Yellowing Leaves
This is almost always a classic sign of overwatering. When the soil is constantly waterlogged, the roots can't get any oxygen and can start to rot, which means they can't absorb the nutrients your plant needs.
- The Fix: Back off on the watering can. Let the top 3-5 centimetres of soil dry out completely before you even think about watering again. And make sure your pot has excellent drainage – never let it sit in a saucer of water.
Brown, Crispy Leaf Tips
If you're seeing dry, brown edges on the leaves, it usually points to one of three culprits: low humidity, an inconsistent watering schedule, or a build-up of minerals from your tap water.
- The Fix: Try misting your plant a few times a week to boost the humidity, especially during winter when the heater is on. If you're using tap water, let it sit out overnight before using it; this allows some of the chlorine to evaporate. Every few months, it's a good idea to give the soil a thorough flush with water to wash away any of those built-up mineral salts.
Pesky Pests
Indoor avocados can sometimes attract unwelcome guests like aphids and spider mites, particularly if the plant is a bit stressed. You'll usually spot them hiding on the undersides of leaves or gathering on new, tender growth.
- The Fix: For a minor invasion, a strong jet of water can often be enough to blast them off. If they're more persistent, a simple spray of neem oil or insecticidal soap should take care of them. At the end of the day, a healthy, properly watered plant is your best line of defence.
A Note On Fruiting Expectations
This is the big question everyone asks: will my plant actually grow avocados? While it’s a lovely dream, it's important to be realistic. Growing an avocado from a seed is a bit of a genetic lottery – it’s not a clone of the parent fruit.
In New Zealand, varieties like 'Hass' don't grow "true to seed," which means any fruit you might eventually get will likely be very different from the avo you enjoyed in the first place. On top of that, getting a seed-grown tree to fruit can take anywhere from 8 to 20 years. Commercial growers use grafted trees, which can fruit in just 2 to 4 years.
So, my advice? Enjoy your plant for its beautiful foliage and the simple satisfaction of having grown it yourself from a single seed. If you get a surprise avocado in a decade or two, think of it as a very special bonus.
Answering Your NZ Avocado Growing Questions
As you start your avocado-growing adventure, you're bound to have a few questions pop up. It happens to all of us! Here are some of the most common queries we get from fellow Kiwi plant lovers, with straightforward answers to help you along the way.
How Long Does an Avocado Stone Take to Sprout in NZ?
A bit of patience is key here, as the timeline for sprouting an avocado stone in New Zealand can change quite a bit with our seasons. Your chosen method makes a big difference, too.
If you go with the popular water method, you could see the stone crack open in as little as 2-4 weeks. A proper root and sprout usually follow within 4-8 weeks. Planting directly in soil is a slower game since you can't see what's happening; you might be waiting up to 2-3 months for that first little shoot to break through the surface.
For the best shot at success, I always recommend starting in spring (September to November). This gives your seed a huge advantage by tapping into the increasing daylight and natural warmth, creating the perfect kick-starter conditions.
Will My Seed-Grown Tree Actually Give Me Avocados?
Ah, the ultimate dream! It's fun to imagine, but it's important to keep expectations realistic. While it is technically possible for a tree grown from a supermarket avocado stone to fruit, it can take a seriously long time—anywhere from 8 to 20 years to reach maturity.
Even after all that waiting, there's no guarantee the fruit will taste anything like the original avocado. Commercial growers get around this by using grafted trees, which ensures consistent, quality fruit in a much shorter timeframe, often just 2-4 years.
For most of us growing at home in New Zealand, the real reward is the process itself and ending up with a beautiful, leafy indoor plant. Think of any potential fruit as a surprise bonus, maybe for your grandkids!
Why Are My Avocado Plant's Leaves Turning Yellow or Brown?
Leaf discolouration is probably the most common headache for new growers, but don't panic. It nearly always comes back to your watering routine, and it's usually an easy fix once you know the signs.
- Yellow, soft leaves: This is the classic sign of overwatering. When the roots are stuck in soggy soil, they can't breathe and start to rot. Make sure your pot has great drainage and always let the top few centimetres of soil dry out completely before you water again.
- Crispy, brown leaf tips: This usually points to low humidity or a build-up of minerals from tap water, especially common in winter when we have heaters blasting. Try giving your plant a mist every now and then. A good trick is to let your tap water sit out for 24 hours before using it; this allows some of the chlorine to evaporate.
Can I Put My Avocado Plant Outside in New Zealand?
Young avocado trees are pretty sensitive and definitely not frost-hardy. If you're thinking about moving your plant outdoors, timing and location are absolutely critical.
Wait until all danger of frost has well and truly passed in late spring. Then, pick a sunny spot that's sheltered from our classic Kiwi gales. For a lot of New Zealand, especially down south or in cooler inland spots, it's much safer to just keep your avocado as a permanent indoor plant.
A great middle-ground is to keep it in a pot on the patio. That way, you can bring it inside during the cold winter months. This gives it the best of both worlds—glorious summer sun and crucial winter protection. If you're keen on other outdoor options, feel free to check out our guide on growing fruit trees in NZ.