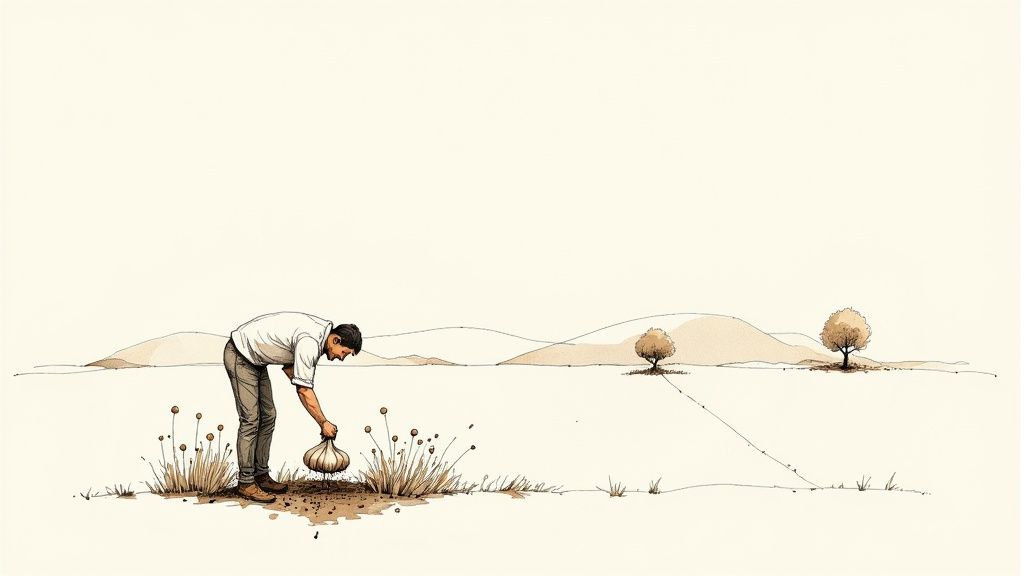
There’s a simple, earthy satisfaction that comes from pulling your own garlic from the soil. It’s not just about adding incredible flavour to your meals—it’s about connecting with your garden and enjoying a little self-sufficiency.
Forget the often-disappointing imported bulbs you find at the supermarket. We’re here to help you get a harvest that's fresher, more pungent, and tastier than you can imagine.
Why Growing Garlic in New Zealand Is Worth the Effort
New Zealand's temperate climate is perfect for growing a surprisingly wide range of garlic varieties. Whether you're in the subtropical north or the cooler south, there's a type of garlic that will happily settle into your garden patch. Think of this guide as your companion to a fulfilling project, packed with practical advice grounded in local Kiwi know-how.
A Rewarding and Flavourful Project
The appeal of growing your own food goes far beyond the harvest itself. It’s an investment in quality and taste that really pays off in the kitchen. Homegrown garlic has a complexity of flavour that mass-produced bulbs just can't touch.
Plus, it's a fantastic addition to any productive garden, fitting in neatly alongside other cool-season crops. If you need more inspiration on what to plant, check out our guide on garden ideas for NZ gardens.
The whole process is remarkably straightforward, which makes garlic an ideal crop for beginners. With just a few key steps—choosing good cloves, planting at the right time, and providing some basic care—you're well on your way to a brilliant crop.
The real beauty of growing your own garlic is the connection it creates. You're not just planting a bulb; you're cultivating flavour from the ground up. Every meal it enhances feels like a small victory.
More Than Just a Hobby
Growing garlic in New Zealand is also becoming more popular on a larger scale. The local market is strong, reflecting our national appreciation for fresh, high-quality produce. In fact, New Zealand's garlic market recently hit a value of $10 million, a sharp 9% increase from the previous year.
If growing garlic sparks a bigger interest in self-sufficiency for you, you might even consider a home food gardening certificate to expand your skills. It's a fantastic way to deepen your understanding of growing your own food right at home.
Choosing the Right Garlic for Your NZ Garden
Getting your garlic choice right from the get-go is probably the single most important step towards a brilliant harvest. Not all garlic is the same, and here in New Zealand, the variety you pop in the ground will make a huge difference to its growth, flavour, and how long you'll have it stored in the pantry.
Your spot on the map, whether you're gardening in the balmy north or the chilly south, really dictates your best options.
The main thing to get your head around is the difference between Hardneck and Softneck garlic. They're like two distinct families, each with its own personality and preferences for certain Kiwi climates.
Hardneck Garlic Varieties for Colder Climates
If you're in the South Island or another part of the country that gets a proper winter, Hardneck garlic (Allium sativum var. ophioscorodon) is your friend. These types need a decent cold spell (a process called vernalisation) to kickstart bulb formation, which is why they do so well where there are plenty of frosts.
You can spot them by the stiff, central stem—the 'scape'—that shoots up from the middle of the bulb. Don't throw it out! This scape is a delicious bonus harvest, amazing in pestos or chopped into a stir-fry.
- Flavour Profile: Generally packs a bigger punch. Expect complex, pungent flavours with a real fiery kick.
- Cloves: Hardnecks form fewer, but much larger, cloves all neatly arranged in a single ring. This makes them a dream to peel.
- Storage: They're more of a short-term guest. You can expect them to last about 4-6 months when stored properly.
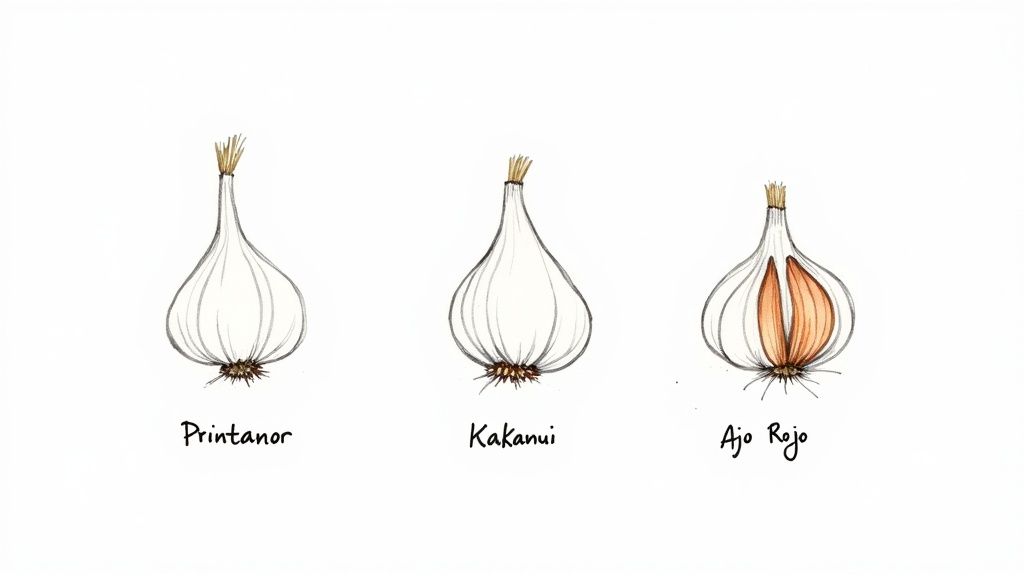
- NZ Example 'Ajo Rojo': A fantastic hardneck known for its rich, spicy character and lovely purple-streaked skin.
Softneck Garlic Varieties for Warmer Regions
Softneck garlic (Allium sativum var. sativum) is the go-to for gardeners in the milder North Island and other temperate spots. It’s more forgiving and doesn't demand that intense cold period, making it a reliable choice for most Kiwi backyards.
Just as the name implies, it has a soft, flexible neck once cured. This is the type you see woven into those beautiful, classic garlic braids.
- Flavour Profile: The taste is usually milder and less aggressive than hardnecks, but still absolutely packed with flavour.
- Cloves: You'll get more cloves from a softneck bulb, often in slightly messy, overlapping layers with a mix of sizes.
- Storage: This is where softnecks are the undisputed champions. They store incredibly well, often lasting a solid 9-12 months if you cure and store them right.
- NZ Example 'Printanor': This French variety has become a true Kiwi staple. It’s dependable, stores for ages, and produces lovely white bulbs. Another excellent one is 'Kakanui', a huge elephant-type garlic that also keeps exceptionally well.
Always, always buy your garlic from a proper seed supplier. The garlic you grab from the supermarket is often treated to stop it from sprouting and can carry diseases you definitely don't want in your soil. Starting with certified, disease-free seed garlic is the best insurance for a healthy crop.
Why Your Choice Matters for National Food Goals
Picking the right garlic isn't just a win for your kitchen; it ties into the bigger picture of our national food supply. New Zealand's commercial garlic growers produce between 1,550-1,933 tonnes each year, and every thriving home patch helps boost our country's food resilience.
By growing a variety that flourishes in your region, you're doing your bit. You can find more details about local production and see how backyard gardeners are part of this important national effort.
Your Seasonal and Regional Planting Blueprint
Timing is everything when it comes to growing garlic in New Zealand. Get it right, and you’re rewarded with fat, flavourful bulbs. Get it wrong, and you might end up with something a bit disappointing. The real secret is understanding our unique seasons and how your specific spot on the map changes the ideal planting window.
A great rule of thumb for us Kiwi gardeners is to use the shortest day of the year (Winter Solstice, around 21 June) as your anchor. The idea is to get your garlic cloves in the ground long enough before this date to establish a strong root system. These roots will see the plant through winter, ready for an explosion of leafy growth as the days start getting longer again.
Your Regional Planting Guide
New Zealand’s climate varies massively from the subtropical north to the frosty south, so a one-size-fits-all approach just won’t cut it. Here’s a breakdown of the best planting times for different parts of the country.
-
Northland & Auckland (Warm North): Aim to get your cloves in between April and May. The soil is still warm enough to encourage quick root development before the wetter, cooler months set in. If you plant too late, you risk waterlogged soil.
-
Waikato & Bay of Plenty (Mild Central): Your ideal window is from late April to early June. You’ve got a bit more flexibility here, but May is often the sweet spot for getting plants established before winter really bites.
-
Canterbury & Marlborough (Cooler with Frosts): Get your cloves in the ground between March and May. An earlier autumn planting gives the garlic plenty of time to settle in before the first proper frosts hit.
-
Otago & Southland (Cold South): Planting in March or April is pretty crucial down here. You want to get your cloves in the ground about six weeks before the soil freezes solid. Stick with hardneck varieties suited to these conditions to make sure they get enough cold exposure (vernalisation) for proper bulb development.
Can you plant garlic in spring? Absolutely, but there's a catch. A spring planting around August-September will still give you a harvest, but the bulbs will almost always be smaller. They've simply had less time to develop. For those big, impressive bulbs, autumn planting is the way to go.
Preparing the Perfect Garlic Bed
Garlic isn’t a diva, but it will definitely sulk in poor soil. It absolutely hates "wet feet," so excellent drainage is non-negotiable.
If you’re dealing with heavy clay, your best bet is to either build up the garden bed with good-quality soil and compost or just use a container. For anyone with tricky soil or limited space, raised wooden garden beds are a brilliant solution for creating that perfect growing environment from scratch.
Before you even think about planting, work in plenty of well-rotted compost or aged manure. This not only improves the soil structure but gives the garlic the nutrients it needs. It's a moderately heavy feeder and really appreciates a good start.
A quick soil pH check is also a fantastic idea. Garlic is happiest in slightly acidic to neutral soil, somewhere between a pH of 6.0 and 7.0. You can easily nudge this up with a bit of garden lime if your soil is too acidic or add sulphur if it's too alkaline. It’s a small step that makes a big difference in how well the plant can access nutrients.
The Right Way to Plant Your Cloves
Once your garden bed is prepped and ready, it’s time for the fun part. The process is simple, but getting these little details right is what sets you up for a fantastic harvest down the line.
First, gently break your seed garlic bulbs apart into individual cloves. Only do this right before you plan to plant, as leaving them separated for too long can cause them to dry out. Always pick the biggest, plumpest cloves to plant—a bigger clove almost always produces a bigger bulb.
Here’s the technique:
-
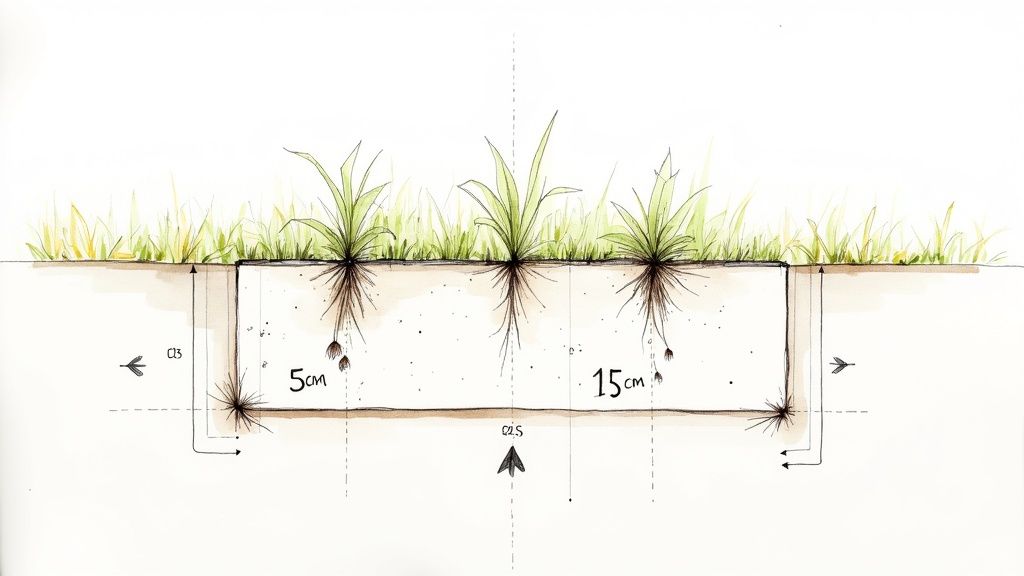
Spacing is Key: Plant your cloves about 15 cm apart from each other. This gives each one enough breathing room to develop a full-sized bulb without fighting its neighbours for water and nutrients. Leave about 20-30 cm between your rows for good air circulation and to make weeding easier.
-
Pointy End Up: This is the golden rule! The flat bottom is where the roots will shoot out, and the pointy tip is where the green stalk will grow from. Planting it upside down just forces the plant to waste energy turning itself the right way around.
-
Depth Matters: Push each clove down into the soil to a depth of about 5-7 cm. A good rule of thumb is to have about twice the clove's own height of soil covering its tip. This keeps it safe from curious birds and helps it anchor in for strong root growth.
After planting, give the bed a gentle watering to settle the soil around the cloves. Now, you can sit back and wait for those first exciting green shoots to appear.
Nurturing Your Garlic Crop Through the Seasons
With your cloves safely tucked in the ground, the quiet work begins. This is where consistent care pays off, directly influencing the size and quality of your future harvest. From those first exciting green shoots pushing through the soil in late autumn to the vigorous growth of spring, your garlic will have different needs as the seasons change.
The early days are all about patience. Don't expect dramatic top growth from your autumn-planted garlic. Beneath the surface, the plant is focused on building a strong root system through the cooler months, laying a crucial foundation for the explosion of growth that’s coming when the days get longer and warmer.
Watering Wisdom for Plump Bulbs
Garlic loves consistent moisture, especially during its active growth phase in spring, but it absolutely hates wet feet. Finding that sweet spot is the key to preventing problems like bulb rot, which can ruin an entire crop.
Through the drier months, from late winter into spring, your garlic patch will need a regular drink. A good rule of thumb is to check the soil a few centimetres down; if it feels dry, it’s time to water. A deep soaking once or twice a week is far better than a light daily sprinkle because it encourages the roots to grow deeper in search of water.
But as you approach the summer harvest, you need to flip your strategy. About three to four weeks before you plan to lift the bulbs, stop watering completely. This is a critical step. It signals the plant to start curing in the ground, helping the outer skins dry and toughen up for much better long-term storage.
Feeding Your Crop for Optimal Growth
Garlic is a moderately hungry plant and will definitely reward you for providing extra nutrients during its key growth spurts. A well-prepared bed with plenty of compost gives it a fantastic start, but a little extra boost in spring can make a world of difference.
Applying a balanced, general-purpose fertiliser as the weather warms up is ideal. I find organic options are particularly effective and are gentle on the soil life.
- Seaweed Fertiliser: A brilliant liquid feed that provides a broad range of micronutrients. I like to apply it every few weeks during spring to support robust green growth.
- Fish Fertiliser: This one is rich in nitrogen and gives the leafy tops a powerful boost, which in turn fuels the development of the bulb underground.
- Compost Tea: If you make your own compost, a nutrient-rich "tea" is an excellent, free way to feed your plants.
For those wanting to get the balance just right, our guide on choosing the best fertiliser for vegetables offers more detailed advice on matching nutrients to what your plants actually need. Remember, consistent feeding now means bigger bulbs later.
Keeping Weeds and Pests at Bay
Your garlic doesn't like sharing. Weeds will happily steal water, nutrients, and sunlight, which can lead to noticeably smaller bulbs at harvest time. Hand-weeding is really the best approach here, as it avoids disturbing the shallow roots of your garlic plants.
A thick layer of mulch—like pea straw, lucerne, or even shredded leaves—is your best friend in the garlic patch. It's fantastic for suppressing weeds, retaining precious soil moisture, and it slowly breaks down to enrich the soil. Just wait until the first green shoots are well-established before you apply it.
While garlic is fairly resilient, you'll want to keep an eye out for a few common Kiwi garden troublemakers.
- Aphids: These tiny pests can sometimes cluster on the leaves. Often, a sharp spray of water is enough to dislodge them. For more stubborn infestations, you can use a horticultural oil.
- Rust: This fungal disease shows up as small, orange-coloured pustules on the leaves and loves damp, humid conditions. To manage it, make sure your plants are spaced correctly for good air circulation and try to avoid watering the leaves directly. If you see it, remove and dispose of the affected leaves straight away to stop it from spreading.
The All-Important Scape Snipping
If you're growing hardneck varieties, you'll be treated to a bonus harvest in late spring or early summer: the garlic scape. This is the flowering stalk that shoots up from the centre of the plant.
While they are absolutely delicious in the kitchen—perfect for pesto or stir-fries—removing them is essential for growing the biggest bulbs. By snipping the scape off as soon as it appears, you redirect the plant's energy away from making a flower and back down into bulb formation. Simply snap it or cut it off near the top set of leaves.
Harvesting, Curing, and Storing Your Garlic Bounty
After months of patient tending, the big moment has finally arrived. All that hard work is about to pay off, but timing the harvest just right is the key to getting garlic that will last. Lift it too early and you'll get small, underdeveloped bulbs. Wait too long, and the cloves can start to separate in the soil, which drastically shortens their storage life.

Thankfully, the plant gives you all the clues you need. For most garlic planted in autumn here in New Zealand, you'll be looking to harvest in early to mid-summer, usually sometime in December or January. Keep an eye on the leaves – when the lower ones start turning yellow and browning off, but the top few are still green, that's your signal to get ready.
As a rule of thumb, wait until about one-third to one-half of the leaves have died back. Each of those green leaves represents a protective wrapper around the bulb, so you want to leave enough intact to ensure your garlic stores well.
Lifting Your Garlic Bulbs
Pick a dry day to get the garlic out of the ground. It’s a much cleaner job, and it gives the bulbs a head start on the drying process. Whatever you do, don't just yank them out by the stems. It's a tempting shortcut, but the stem can easily snap, leaving your precious bulb stuck in the ground.
Instead, grab a garden fork or a small spade. Slide it into the soil a good distance away from the bulb to avoid any accidental piercings, then gently lever up and loosen the earth. Once the soil is loose, you can carefully lift the whole plant out. Be gentle with the bulbs – any bruises will create weak spots where rot can set in later.
Brush off any big, heavy clumps of soil from the roots, but resist the urge to wash the bulbs. Adding water at this stage is a recipe for rot during curing. A bit of dry soil clinging to the roots is totally fine.
The All-Important Curing Process
Getting the garlic out of the ground is only half the battle. Curing is the magic step that prepares it for long-term storage, toughening up the outer skins and concentrating that amazing flavour.
You'll need a spot that’s warm, dry, and has good airflow, but is out of direct sunlight which can actually cook the bulbs. A covered porch, carport, or airy garage is usually perfect.
You’ve got a couple of options for curing:
- Bundling: Tie the plants into small bunches of five to ten and hang them from the rafters.
- Spreading: Lay the garlic in a single layer on mesh screens or old pallets – anything that lets air circulate freely all around each bulb.
Leave them to cure for at least three to four weeks. You’ll know they’re ready when the outer wrappers feel papery and dry, the roots are shrivelled up, and the neck where the stem meets the bulb is completely dry and tight.
Storing Your Harvest for the Months Ahead
Once your garlic is perfectly cured, it's time for a final tidy-up. Snip the stems off, leaving about 3-5 cm attached to the bulb, and trim the roots right back to the base. Now they’re ready for storage.
The ideal spot is cool, dark, and dry with plenty of air moving around. A pantry or cellar is great. Just don't put it in the fridge – the humidity will make it start sprouting.
- Hardnecks: These guys are best eaten sooner rather than later, as they typically only store for 4-6 months. Keep them loose in mesh bags or wire baskets.
- Softnecks: These are your long-keepers, easily lasting 9-12 months. Their pliable necks are perfect for weaving into those classic garlic braids you can hang in the kitchen.
It’s amazing how much garlic you can get from a small home patch. While commercial growers measure their yield in tonnes per hectare, a well-cared-for garden bed can easily keep a family supplied for most of the year. You can even explore more about NZ's garlic market potential and production stats if you're curious
Common Garlic Growing Questions Answered
Even the most seasoned gardeners run into a few head-scratchers now and then, and growing garlic is no exception. Certain questions seem to pop up for Kiwi gardeners year after year.
Let’s dig into some of the most common queries. Think of this as your go-to guide for those puzzling moments in the garlic patch.
Why Are My Garlic Bulbs So Small?
This is, without a doubt, the number one frustration for new garlic growers. You put in all that effort, only to harvest bulbs the size of a marble. Small bulbs are simply a sign that the plant didn't have everything it needed to properly bulk up.
More often than not, it comes down to a few key things:
- Planting too late: Garlic needs a long, cool period to establish itself. Autumn-planted cloves use the winter months to develop a strong root system, which is the engine for big bulb growth in spring. A late planting just doesn't give it enough of a head start.
- Not enough food: Garlic is a surprisingly hungry crop. If your soil is a bit tired or you haven’t fed the plants during their main growth spurt, they simply won’t have the fuel to form large bulbs.
- Weed competition: This is a big one. Weeds are thieves, stealing water, sunlight, and precious nutrients directly from your garlic. A clean, weed-free bed makes a massive difference to your final harvest.
- Inconsistent watering: Letting the soil dry out too much during that critical spring growth phase will definitely stunt your bulbs.
To avoid disappointment next season, really focus on hitting that autumn planting window, enriching your soil with plenty of good compost, and staying on top of the weeding and watering.
Can I Plant Garlic From the Supermarket?
It might seem like a clever hack, but planting cloves from the supermarket is a gamble you’ll almost certainly lose. There are a couple of big reasons why this is a bad idea.
First, a lot of the garlic sold in our supermarkets is imported. That means it has likely been treated with a growth inhibitor to stop it from sprouting on the shelf. That same treatment will stop it from growing in your garden, too.
Secondly, and this is the crucial part, supermarket garlic can carry soil-borne diseases. You absolutely do not want to introduce these into your garden soil. Starting with certified, disease-free seed garlic from a reputable New Zealand supplier is the best investment you can make for a healthy, successful crop.
What Is Garlic Rust and How Do I Deal with It?
Garlic rust is a fungal disease that shows up as small, bright orange spots or pustules on the leaves. It loves damp, humid weather and can spread fast, reducing the plant's ability to photosynthesise and ultimately shrinking your bulb size.
Good prevention is your best line of defence.
- Give your plants good air circulation by spacing them correctly – at least 15 cm apart is a good rule of thumb.
- Avoid overhead watering. Drenching the leaves creates the perfect damp conditions for rust to take hold. Always water the soil, not the plant.
- Practise good crop rotation. Don't plant garlic or other alliums (like onions and leeks) in the same patch of dirt year after year.
If you do spot rust, snip off the affected leaves immediately and bin them – don’t throw them in the compost where the spores can spread. If you catch a mild case early, it shouldn't ruin your harvest.
When Is the Absolute Latest I Can Plant Garlic?
So, you've missed the ideal autumn window. It happens! For those of us in New Zealand, there’s still a bit of hope. You can usually get away with planting garlic right up to the Winter Solstice (around 21 June), and maybe even into July or early August in the warmer northern regions.
But you have to accept the trade-off. Every week you delay planting after May will likely mean a smaller bulb come summer. The plant just has less time to get its roots down and produce the leafy growth needed to power a big bulb. If you find yourself in this situation, just be extra diligent with feeding and watering in spring to give your late starters the best possible chance.
Ready to start your garlic growing journey with top-quality supplies? At Jungle Story, we connect you with trusted local sellers offering everything from seed garlic to the perfect garden tools. Explore our marketplace and get everything you need delivered right to your door. Visit us at https://junglestory.co.nz today.