Imagine a tree that’s not just a beautiful addition to your landscape but also your garden’s personal bodyguard. That’s the Neem tree (Azadirachta indica) for you—a remarkable evergreen often nicknamed ‘the village pharmacy’ for its incredible versatility and countless benefits. It’s highly valued as both a fast-growing shade tree and a source of powerful, all-natural garden care solutions.
Discover The Versatile Neem Tree

The neem tree is so much more than just another plant; think of it as a living, breathing toolkit for the modern, eco-conscious gardener. Hailing from the Indian subcontinent, this resilient species has travelled the globe and found a welcoming home in many parts of New Zealand, especially in our warmer northern regions. Its reputation as a hardy and useful tree is definitely well-earned.
For centuries, various cultures have relied on neem for everything from traditional medicine to pest control. This rich history is now inspiring Kiwi gardeners who are searching for sustainable ways to care for their plants and properties. The tree’s dual-purpose nature is its greatest strength, offering both aesthetic beauty and practical benefits that few other plants can match.
Here’s a quick rundown of what makes the neem tree such a garden superstar in New Zealand.
Neem Tree At A Glance
| Attribute | Description |
|---|---|
| Common Name | Neem Tree, Indian Lilac |
| Scientific Name | Azadirachta indica |
| Tree Type | Evergreen |
| Mature Size | Can reach 15–20 metres in ideal conditions, but often smaller in NZ gardens. |
| Sunlight Needs | Full sun is essential for healthy growth. |
| Soil Preference | Adaptable to a wide range of soils but thrives in well-drained soil. |
| Drought Tolerance | High; it’s a very water-wise choice once established. |
| Key Benefit | Source of azadirachtin, a natural insecticide and fungicide. |
| Best Suited For | Warmer, frost-free regions of New Zealand. |
This table gives you the basics, but the real story of the neem tree is in how it seamlessly blends beauty with utility in the garden.
A Tree Of Two Talents
What truly sets the neem tree apart is its knack for playing two very different, yet equally important, roles. On one hand, it's a fantastic ornamental and shade tree. With its dense canopy of bright green leaves, it can quickly become a stunning focal point, offering a welcome break from the harsh New Zealand sun during the summer months from December to February.
On the other hand, it’s a potent source of natural compounds that keep your garden healthy. The leaves, seeds, and bark contain a powerful substance called azadirachtin, which is the active ingredient in many organic pesticides and fungicides. This allows you to look after your garden without having to reach for harsh synthetic chemicals.
The real beauty of the neem tree lies in its self-sufficiency. It provides shade, enhances your landscape, and simultaneously offers the very ingredients you need to protect it and the surrounding plants.
Why It's Gaining Popularity In New Zealand
The buzz around the neem tree in New Zealand is growing, and for good reason. As more of us get into organic and water-wise gardening, neem stands out as an ideal choice. Its drought-tolerant nature makes it a smart pick for gardens facing summer water restrictions.
Even better, its natural pest-repellent properties align perfectly with the desire to create a balanced, healthy garden ecosystem that's safe for family, pets, and beneficial insects like bees when used correctly. This guide will walk you through everything you need to know to bring this amazing tree into your own garden.
Will A Neem Tree Thrive In Your Garden?
Before you get your heart set on planting a neem tree, it's worth asking a crucial question: will it actually thrive in your garden? While this is one tough tree, it has some non-negotiables when it comes to its environment. Getting this right from the start is the key to growing a magnificent specimen you'll enjoy for decades.
At its core, neem is a tropical to subtropical tree. That means it absolutely loves warmth and a good dose of sun. It's simply not built for the colder, frost-prone areas of the South Island or the central North Island. For a young neem sapling, a hard frost isn't just a setback—it can be fatal.
Ideal Climate and Location in New Zealand
The secret to successfully growing a neem tree in New Zealand really comes down to location, location, location. The further north you are, the better, as the climate more closely mimics its native home in India and Southeast Asia.
Here’s what a happy neem tree looks for:
- Temperature: It does best in areas where the temperature reliably stays above freezing. The sweet spot for its growing season is between 25°C and 35°C.
- Sunlight: Full, direct sun is a must. Pick a spot that gets at least six to eight hours of bright sunlight every day.
- Best Regions: Northland, Auckland, the Bay of Plenty, and parts of Gisborne are prime real estate for neem. Gardeners in these spots will have the most success, as the climate is warm enough to see them through the winter.
In these warmer northern regions, neem is finding a home with gardeners looking for drought-resistant, evergreen trees to anchor their tropical-style gardens. According to Kiwi growers, a mature tree can reach 10–15 metres in a good climate, providing wonderful shade and acting as an effective windbreak. If you're designing a garden with rare palms or tropical fruits, neem is a fantastic companion. You can dive deeper with the Tree Crops Association's detailed notes on growing neem in NZ.
Soil Requirements and Water Wisdom
Climate is only half the story; soil is the other. The good news? Neem isn't particularly fussy about soil type, which is a huge plus for Kiwi gardeners. It can handle everything from sandy to loamy soils, as long as you get one thing right.
The number one rule is excellent drainage. Neem trees have a deep-seated hatred for 'wet feet' and will quickly succumb to root rot in waterlogged ground. If your garden is blessed with heavy clay, you’ll need to work in some compost or sand to open up the soil structure and let that water drain away.
Once it's established, the neem tree is impressively drought-tolerant. This makes it a fantastic, water-wise choice for a modern New Zealand garden, especially where summer water restrictions are common.
This natural resilience means less time with the hose and more time enjoying your garden. It will need consistent watering for its first year to get its roots down, but after that, it can handle dry spells like a champ. For more low-maintenance ideas, check out our guide on fast-growing trees for New Zealand conditions.
Planning for Mature Size
It’s so easy to look at a small sapling and forget what it will become. But a neem tree isn’t a shrub—it’s a proper tree that needs room to spread out and show off its broad, dense canopy.
Think ahead about the role you want it to play. Is it going to be a majestic shade tree in the middle of the lawn? A natural screen along your boundary? Make sure you plant it well clear of the house, power lines, or other buildings to avoid headaches down the line. Give your neem the space it deserves from day one, and it will reward you by becoming a beautiful, trouble-free asset for your property.
How To Plant And Nurture Your Neem Tree
Okay, you’ve picked the perfect spot. Now for the exciting bit: actually getting your neem tree into the ground and watching it grow.
Giving your tree a strong start is the single best thing you can do to ensure it becomes a healthy, magnificent specimen. Whether you're planting directly in the garden or using a container, the basic principles are the same. We’re just creating a happy home where its roots can stretch out and get established.
Selecting Your Sapling and Preparing The Site
It all starts with choosing a healthy, vibrant sapling. Look for a young neem with bright green leaves and a sturdy, straight stem. Give a pass to any plants that look a bit sad—yellowing leaves, signs of pests, or a tangled mess of roots at the bottom of the pot are all red flags.
Once you’ve got your tree, it's all about site prep. The best time to plant in New Zealand is during spring or early autumn. This gives the tree a chance to settle in and establish its roots before the intense heat of summer or the chill of winter arrives.
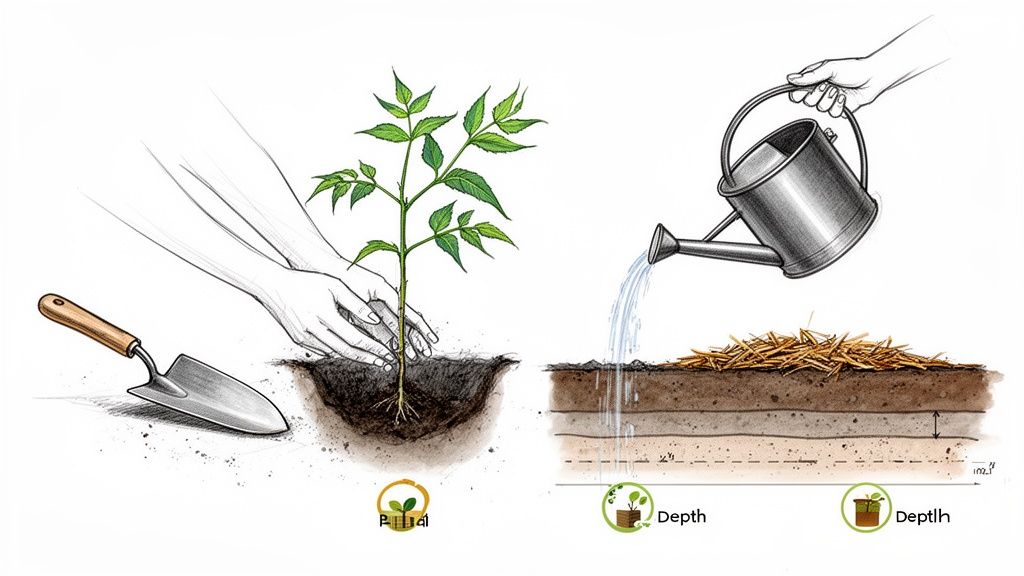
For in-ground planting, follow these steps:
- Dig a Generous Hole: Aim for a hole that’s about twice as wide as the root ball and just as deep. This loosened soil gives the roots plenty of room to expand.
- Amend the Soil: Neem isn't fussy, but a bit of good quality compost or well-rotted manure will give it a fantastic head start. Mix this into the soil you’ve just dug out.
- Check the Drainage: Before you plant, fill the empty hole with water. If it takes more than an hour to drain away, your soil is likely too heavy. For a deeper dive into getting your soil just right, check out our guide on soil for your plants.
- Position the Tree: Gently slide the sapling out of its pot and tease out any roots that are circling the bottom. Place it in the centre of the hole, making sure the top of the root ball is level with the surrounding ground. Planting too deep is a common mistake that can cause problems down the line.
- Backfill and Water: Fill the hole with your amended soil, patting it down gently to remove any air pockets. Create a small moat or basin around the tree’s base and give it a thorough watering to help everything settle.
Watering and Feeding Your Neem Tree
For the first year, your young tree will need consistent moisture to develop a strong root system. Plan to give it a deep watering once or twice a week, especially during our dry summer months from December to February.
The good news? Once it's established, the neem is wonderfully drought-tolerant. Its deep taproot is a master at finding moisture far below the surface, so a mature tree will generally only need a drink during really long dry spells.
The biggest mistake you can make with an established neem tree is overwatering. Its resilience to dry conditions is one of its greatest assets, so trust it to look after itself once it’s settled in.
When it comes to feeding, neem is not a greedy plant. A single application of a balanced, slow-release fertiliser in spring is usually plenty to support healthy growth. Spreading a layer of organic mulch like bark or compost around the base is also a great idea—it helps hold in moisture and slowly nourishes the soil.
Pruning For Shape and Health
Pruning is your chance to guide the tree’s growth, whether you're aiming for a strong structure or just trying to keep it a manageable size. The ideal time to get the pruners out in New Zealand is during its dormant period in late winter (July to August), right before the new spring growth kicks off.
Here are the main reasons you'll want to prune:
- Structural Pruning: While the tree is young, snip off any competing main stems to encourage a single, strong central leader. It’s also wise to remove branches that are crossing or rubbing against each other.
- Canopy Raising: As the tree gets taller, you might want to remove some of the lower branches. This creates clearance underneath, which is perfect if it's near a lawn or a walkway.
- Size Management: If your neem is in a smaller garden or a pot, regular pruning is key to keeping it compact. You can easily trim the branches back by up to one-third each winter to maintain its shape.
Using Neem For Organic Pest Control
While it’s a fantastic shade tree, the neem’s legendary status in the garden really comes from its power as a natural pest control. For Kiwi gardeners aiming for a truly organic patch, neem oil is a must-have. It's the perfect answer for managing common pests without reaching for harsh chemicals that can harm the good bugs and the environment.
This is where the real magic is. The secret is a compound called azadirachtin, found in the tree's seeds. Once you understand how it works, you can unlock your neem tree’s full potential.
How Neem Oil Works Its Magic
Unlike synthetic sprays that kill insects on contact with nerve poisons, neem oil is much smarter. Azadirachtin isn't a blunt instrument; it works as an antifeedant, insect growth regulator, and repellent all in one.
Think of it as a biological scrambler for pests. When an insect like an aphid or caterpillar munches on a treated leaf, the azadirachtin messes with its hormonal system. This completely throws them off—they lose their appetite, can't moult properly, and stop reproducing. Over a few days, the pest population just fizzles out, all without toxic residues.
This clever, multi-pronged attack is what makes neem so good at tackling a whole range of garden nuisances.
Pests Targeted By Neem Oil
Neem oil is a powerhouse, effective against over 200 species of chewing and sucking insects. For the average New Zealand gardener, that means you've got a solution for most of the frustrating pests you’ll find on your indoor and outdoor plants.
- Sucking Insects: This is your go-to for troublemakers like aphids, mealybugs, whiteflies, scale, and thrips. They're especially vulnerable because they ingest the neem directly from the plant's sap.
- Chewing Insects: Caterpillars, beetles, and leafhoppers that chomp on leaves are also put off. The antifeedant properties make the foliage taste terrible, encouraging them to pack their bags and leave.
- Mites: Spider mites, which are actually arachnids, can't stand neem either. The oil has miticidal properties and can suffocate them.
- Fungal Diseases: Neem also doubles as a fungicide, helping to keep common problems like powdery mildew, black spot, and rust at bay by stopping fungal spores from germinating.
The best part about neem oil is its selective nature. When used correctly, it zeroes in on the pests actively feeding on your plants, leaving beneficial insects like bees, ladybirds, and earthworms largely unharmed.
How To Mix And Apply Neem Oil Safely
Whipping up your own neem spray is incredibly easy and saves you money. The trick is to use high-quality, cold-pressed neem oil, which has the highest concentration of azadirachtin.
For a standard spray, you just need three things: neem oil, a mild liquid soap (as an emulsifier), and water. Don't skip the soap! Without it, the oil and water won't mix, giving you an uneven spray that could burn leaves.
Simple Neem Oil Spray Recipe
- Start with Water: Fill a one-litre sprayer with lukewarm water. Warm water helps the oil mix in better.
- Add the Emulsifier: Add one teaspoon (around 5ml) of a gentle liquid soap and give it a little swirl.
- Add Neem Oil: Now add one to two teaspoons (5-10ml) of your cold-pressed neem oil.
- Shake Vigorously: Pop the lid on and give it a really good shake. You’ll need to shake it every so often while you’re spraying to keep everything mixed.
Best Practices For Application
Getting the timing and technique right is key to getting great results while keeping your garden’s good guys safe.
- Spray at the Right Time: Always apply your neem spray in the early morning or late evening. This helps you avoid the hot sun, which can cause leaf scorch, and it minimises contact with pollinators like bees who are less active at these times.
- Provide Thorough Coverage: Pests are sneaky and love to hide under leaves and in the little nooks where stems meet. Make sure you spray everywhere—top and bottom—for full coverage.
- Be Consistent: If you have an active infestation, apply the spray every 5-7 days until the pests are gone. For prevention during the growing season, a light spray every couple of weeks is plenty.
- Test a Small Area: If you’re using neem on a new or sensitive plant, it’s smart to spray one leaf first and wait 24 hours to see how it reacts before doing the whole plant.
By following these tips, you can tap into the natural power of your neem tree to keep your garden happy and healthy. To take things a step further, look into broader Integrated Pest Management strategies for a truly balanced garden ecosystem. For a deeper dive, check out our dedicated guide on how to use neem oil for plants.
Harvesting And Preparing Neem At Home
Once your neem tree is nicely established, you can start harvesting its leaves and seeds to make your own garden remedies. This is the best part, really—it’s where you get to connect with the plant’s natural power and become a bit more self-sufficient in your own backyard. It all comes down to knowing when and how to gather everything to get the most out of it.
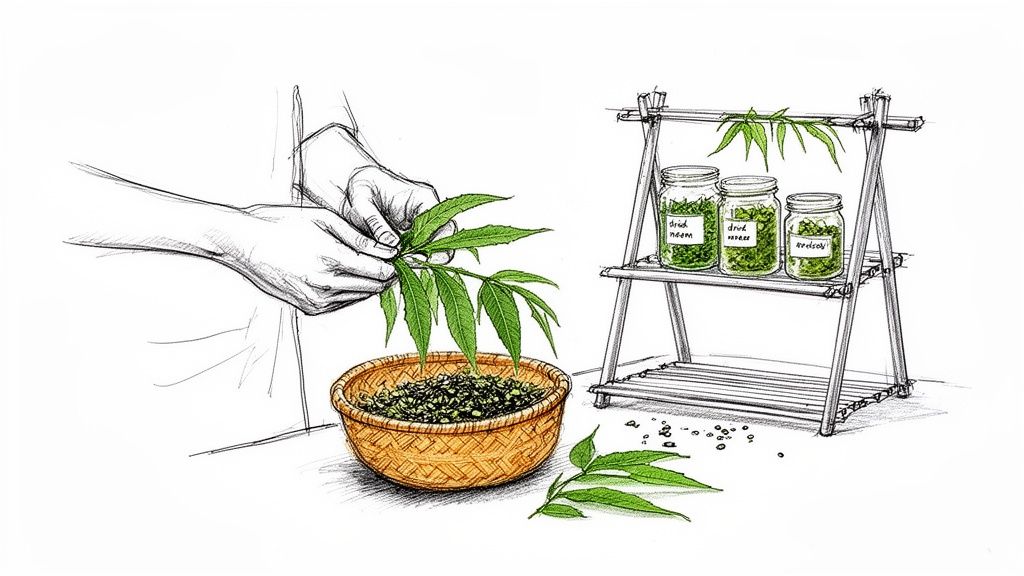
For the leaves, you can pretty much pick them all year round, as long as the tree is mature enough to handle it. The best time to do it is in the morning after the dew has dried off but before the full heat of the day sets in. Just snip off a few sprigs of healthy, green leaves, but try not to strip any one branch bare. This actually encourages the tree to bush out with fresh growth.
Getting the seeds requires a bit more patience. Your neem will likely flower around December and January here in New Zealand, and the little olive-like fruits will ripen a few months after that. You’ll want to wait until the fruits turn yellow and start dropping from the tree on their own—that’s your sign that the seed inside is mature and packed with goodness.
Drying And Storing Your Harvest
Properly drying and storing your neem is key to locking in all those active compounds. Thankfully, for the leaves, it’s a straightforward process.
- Air-Drying: Tie the leafy sprigs into small bunches and hang them upside down somewhere dark, dry, and with good airflow, like a garage or shed.
- Check for Brittleness: After a week or two, they should be totally dry and crumble easily in your hand.
- Storage: Once they’re ready, strip the leaves off the stems and pop them into an airtight container, like a glass jar, and keep it out of direct sunlight.
With the seeds, the first step is to get rid of the pulp. You can do this by soaking the ripe fruits in water and simply rubbing the flesh away. Give the seeds a good rinse, then spread them out in a single layer on a screen or tray to dry completely in a shady, breezy spot. This can take a few weeks, but it’s worth the wait. Store the dried seeds just like you would the leaves.
Taking the time to dry your harvest properly is like locking in all the plant's magic. It means your homemade preparations will stay potent for months, giving you a ready supply whenever you need it for the garden.
Simple DIY Neem Preparations For Your Garden
While making pure neem oil is a job for industrial equipment, whipping up powerful teas and powders at home is incredibly easy. These simple recipes give you many of the same protective benefits for your garden plants. Here are a few easy ones anyone can try.
| Preparation | Method | Primary Use |
|---|---|---|
| Neem Leaf Tea | Steep a large handful of fresh leaves (or half a handful of dried) in two litres of hot—not boiling—water overnight. Strain and add a drop of soap. | A gentle foliar spray to deter chewing insects and help prevent fungal issues like powdery mildew. |
| Neem Seed Kernel Powder | Crack open dried neem seeds to get the kernel inside. Grind the kernels into a fine powder using a coffee grinder or blender. | Sprinkle around the base of plants or mix with water for a powerful systemic pest deterrent. |
These simple preparations are a fantastic starting point for tapping into the natural power of your own neem tree. They're effective, organic, and connect you directly to your garden's ecosystem.
Common Questions About Growing Neem Trees
Even with the best guide, a few questions always pop up. When you're dealing with a plant as unique as the neem tree, getting those last few details right can be the difference between a thriving tree and one that’s just getting by. We've pulled together some of the most common queries from fellow Kiwi gardeners to help you grow with total confidence.
How Fast Does a Neem Tree Grow in New Zealand?
In a good spot, especially up in the warmer northern bits of the country like Auckland or Northland, a neem tree can grow at a pretty decent clip. You could see it reach 4-7 metres in around five to seven years.
But, its growth will slow right down in cooler areas or if it gets nipped by frost. For the best results and the fastest growth, give it a home with well-draining soil and a spot that gets heaps of sun.
Can I Grow a Neem Tree in a Pot?
Yes, absolutely! Growing a neem tree in a large container is a fantastic option. It’s perfect for those of us in the cooler parts of New Zealand because you can shift it to a sheltered spot—like a porch or greenhouse—through the winter months from June to August.
To get this right, you'll want a pot that's at least 50 litres and has plenty of drainage holes. You’ll also need to give it a regular prune to keep it a manageable size and repot it every two or three years with fresh, high-quality potting mix to top up its nutrients.
Growing a neem in a pot is a game-changer for gardeners in borderline climates. It gives you control over the plant's environment, making sure it stays safe from the worst of our winter weather.
Is Neem Oil Safe for All Plants and Bees?
Neem oil is generally safe for most plants, but it's always smart to do a patch test first. Just spray a small leaf area, particularly on sensitive plants with delicate foliage, and wait 24 hours to see if there's any reaction before you spray the whole plant.
When it comes to bees and other good bugs, safety is all about timing. The active ingredient, azadirachtin, mainly works on insects that chew or suck on the leaves. To keep your pollinators safe, just follow these simple rules:
- Spray at the Right Time: Apply your neem solution late in the evening or very early in the morning when bees and other pollinators aren't active.
- Avoid Direct Contact: Never spray directly onto open flowers where you can see bees foraging.
This careful timing means you’re far less likely to harm the good guys, keeping your garden a healthy, buzzing ecosystem. The goal is to tackle the pests you don't want while looking after the ones you do.
Ready to get this incredible plant into your garden? At Jungle Story, you’ll find healthy neem trees and high-quality, cold-pressed neem oil from trusted New Zealand sellers. Check out our marketplace for everything you need to start your neem journey. Find your perfect neem tree at https://junglestory.co.nz.